326

I'd like to see the full How-To on how to use manual partitioning during Ubuntu installation. The existing guides (at least those I found here) cover only automatic part and leave untouched the manual part (or extremely short and contain no pictures).

I'd like to cover such situations:

Danatela
  • 13,384

6 Answers6

296

If you have blank disk

  1. Boot into Ubuntu Installation media. This can be either CD or USB stick.
  2. Start the installation. Proceed to Step 4 and choose "Something else": Step 4 — Something else
  3. You will see your disk as /dev/sda or /dev/mapper/pdc_* (RAID case, * means that your letters are different from ours)

    Click "New Partition Table..." You will see that you have free space on your disk now: free space

  4. (Recommended) Create partition for swap. Swap is the partition for keeping unneeded memory pages, like Windows swap. Also it can be used for hibernation.

    • Select free space and click +
    • Set parameters like on the picture below: Swap parameters

    Notice that you should set swap size more than you have physical memory in order to use hibernation. Also, you can place it in the end of disk, but thus it will be slow.

  5. Create partition for / (root fs). This is the filesystem that contains your kernel, boot files, system files, command-line utilities, libraries, system-wide configuration files and logs.

    • Select free space and click +
    • Set parameters like on the picture below: Root fs parameters

    10 – 20 GiB should be enough

  6. Create partition for /home. This is the filesystem for your user's files: documents, images, music and videos. It's much more like Users folder in Windows.

    You can do this just like in step 5 and even choose other fs type (though I recommend use ext4 instead of reiserfs. Simply, the first is much more flexible and the second is quicker)

  7. (Optional) Create separate partitions for /boot, /tmp and /var. Set their size according to your needs:

    • /boot should be 100 – 500 MiB
    • /var and /tmp should be > 5 GiB
  8. If you doubt about which device for boot loader installation to choose, leave it default. It would be set by installer. But sometimes it does mistakes. Let me guide you how to deal with it:

    • If you use only one hard disk, select or leave /dev/sda intact.
    • If you use more than one hard disk with no RAID, select the one from which your system does boot. You can also select other disk and set BIOS to boot from it.
    • If you have RAID from which your system starts, it will be /dev/mapper/...

    Be sure that you select entire disk, not a single partition!

After all, you should see your disk like this: Final disk layout

As LiveWireBT noticed in comments, it is recommended to place root partition onto primary partition on MBR scheme disks. However, it belongs to personal taste. Sometimes it's even better to put /boot directory on primary and leave root on logical partition.

That's all! You can now click Install Now and proceed to the installation.

Danatela
  • 13,384
83

If you have disk that contains Windows installed

  1. Boot from Ubuntu Installation media.
  2. Unmount any mounted drives if they exist.
  3. Proceed to Step 4. Choose "Something else" and click Continue:

Something else

You will see partition table. It will look like this:

partition table

  1. Free some space for Ubuntu:

    • Select the Windows drive (not the loader!). It should be the biggest drive in the map.
    • Click Change... button. Reduce Windows' partition to 60% of it's size. Notice that you should remain some free space on it (8 – 20 GiB should be enough). windows partition resize
    • If you want, you can delete some partitions. This is done by clicking - button. Do not delete Windows partition!

    And ~40 GiB should be kept for Ubuntu. Click OK and Continue to write changes on disk.

  2. Now your partition table should look like this:

New partition table

  1. Now, you can proceed with steps 4 – 7 of part about blank installation. Notice that swap will be placed on logical partition. This doesn't matter, in any case it will work perfect.
Danatela
  • 13,384
52

If you have a OEM-preinstalled copy of Windows 8 or later

Computers with OEM installs of Windows usually come with more than 1 or 2 partitions. Starting with Windows 8 the partition table should be GPT, allowing for more than 4 primary partitions.

1. Resizing the Windows partition

There are at least 2 ways doing this:

  • from the live media
  • in Windows

A. Resizing from Ubuntu live media

You can run GParted or use only the manual partitioning menu of the installer.

B. The safer option: Resizing from within Windows

  • Resize the Windows partition with Disk Management (run diskmgmt.msc).

    starting <code>diskmgmt.msc</code> from Windows search

    Select your Windows partition and choose "Shrink Volume…" from the context menu.

    enter image description here

    This will usually shrink to the minimum possible, you may want to adjust the value to leave more space for Windows.

    enter image description here

  • Optionally disable fast startup and probably disable hibernation, if it is activated and you intend to access the Windows partition with Ubuntu. Run powercfg.cpl and navigate to Power Options > System Settings through "Choose what the power button does".

    starting <code>powercfg.cpl</code> from Windows search

    enter image description here

    enter image description here

2. Manually setting up the partition layout for Ubuntu

  • Attention! No, you don't want to erase the entire disk and Windows along with it. Choose the Something else option if you see this screen. (Something else may be the most difficult option to understand, but considering existing bugs you know what you will get.)

    enter image description here

    enter image description here

  • You will get to the manual partitioning menu, where you should at least create a root partition (/) and a swap partition.

    enter image description here

    • Option 1: add only a root partition

      enter image description here

    • Option 2: add a root and home partition

      enter image description here enter image description here

    …finally add the swap partition:

    enter image description here

    Note that there usually is an existing EFI System Partition (short ESP, efi in the screenshot), that the installer will automatically detect and mount to install EFI loaders and programs.

    enter image description here


Related bug reports

Related

  • My answer to SU question: Clean install Windows 8.1 or Windows 8 from OEM key (now updated with info for Windows 10)
  • Adding an encrypted partition with pam_mount during login (1, 2)
LiveWireBT
  • 29,597
19

If you have md RAID

I will not cover how to create mdadm arrays here. There are a lot of articles around the Internet. However, there is one major problem: Ubiquity installer doesn't account for the arrays created in the live session, so you'll probably get unbootable system after installation on such array.

  1. Create the setup like mine:

     $ sudo fdisk -l
    

    Disk /dev/sda: 160.0 GB, 160041885696 bytes ...

    Device Boot      Start         End      Blocks   Id  System
    

    /dev/sda1 2048 156299263 78148608 83 Linux /dev/sda2 156299264 311556095 77628416 7 HPFS/NTFS/exFAT /dev/sda3 * 311556096 312580095 512000 83 Linux

    Disk /dev/sdb: 80.0 GB, 80026361856 bytes ...

    Device Boot      Start         End      Blocks   Id  System
    

    /dev/sdb1 2048 156301311 78149632 83 Linux

    Disk /dev/md0: 160.0 GB, 160048349184 bytes ...

    Disk /dev/md0 doesn't contain a valid partition table

    As you can guess, I created /dev/md0 mdadm array from /dev/sda1 and /dev/sdb1. It's empty now. Let's install something on it.

  2. Create partitions on /dev/md0 as you like:

    Partitions layout

    Important: Install /boot onto one of partition outside the array because GRUB doesn't support mdadm. In my case, it's /dev/sda3. If you want more quick booting of your system, it should be placed at the beginning of the disk.

  3. Install Ubuntu. Click Continue testing. Or reboot and see initramfs prompt ;)

  4. Now, you have to chroot into installed system and install mdadm:

     sudo mount /dev/md0p6 /mnt
     sudo mount /dev/md0p5 /mnt/home
     sudo mount /dev/sda3 /mnt/boot
     for d in /dev /proc /sys /run; do sudo mount --bind $d /mnt$d; done
     chroot /mnt
     apt-get install mdadm
    

    Installing mdadm should fix booting problem.

Danatela
  • 13,384
4

Do any of the following help you? (sorry, I don't have enough rep to comment this).

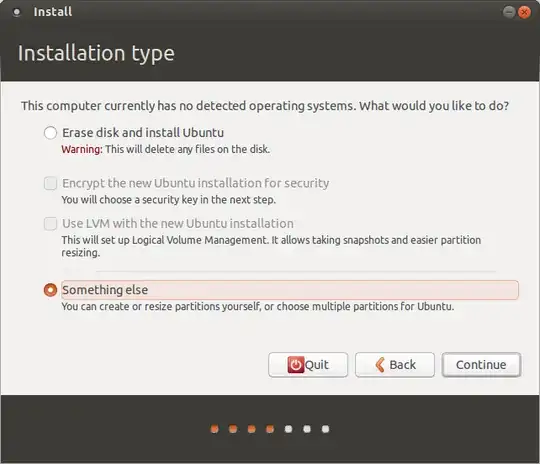
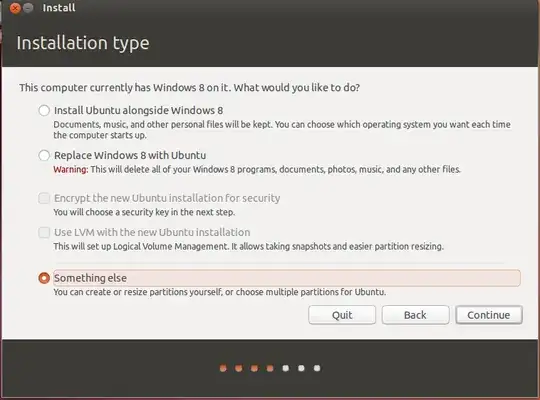
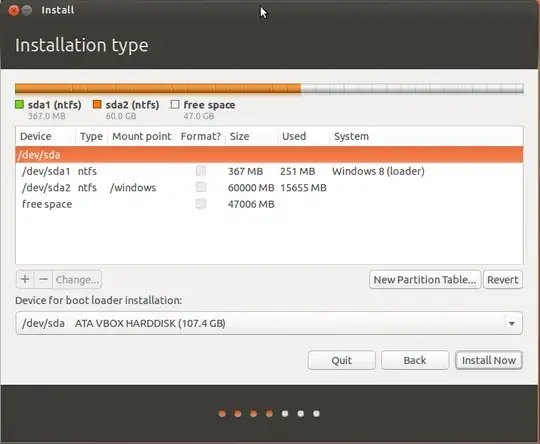
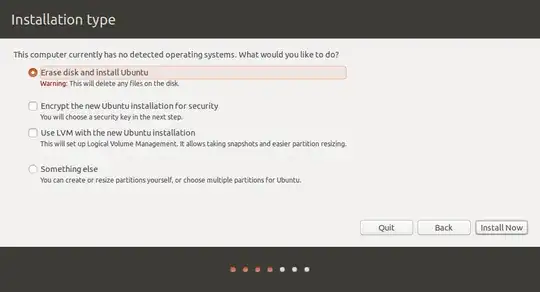
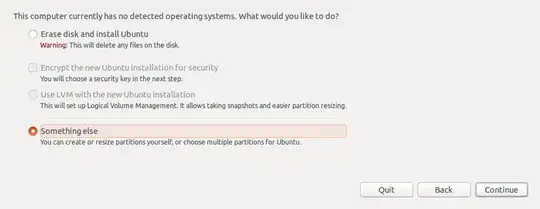
Now suppose that we are going to install Ubuntu 11.04 and at first of the installation process we will meet Allocate drive space screen (the most important step in the installation process). In Allocate drive space screen Select Something else to partition your disk drive manually.

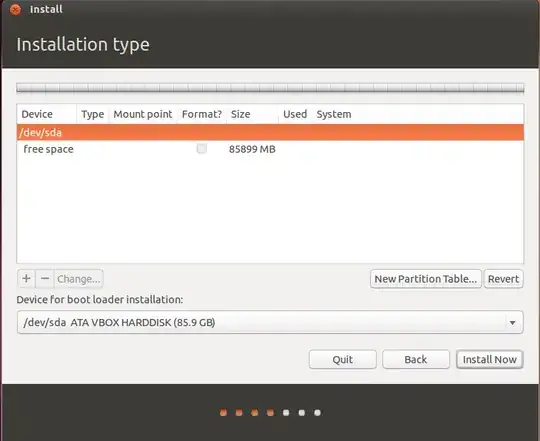
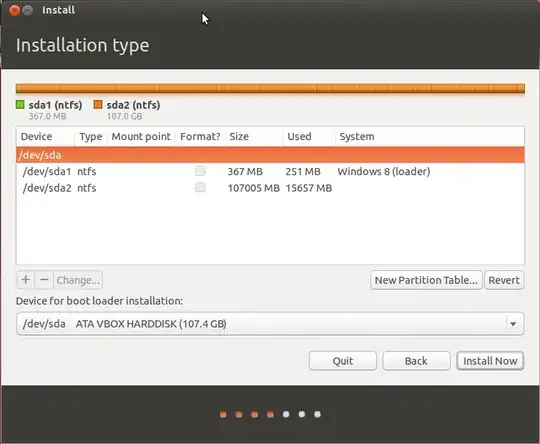
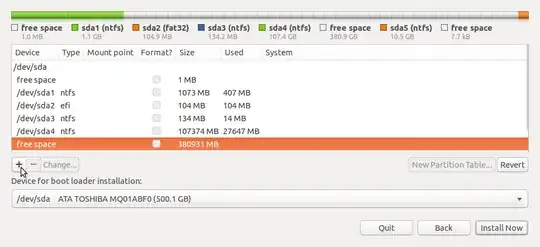
The Next screen shows sda1 partition for Windows Xp and free space, Now we are going to install Ubuntu 11.04 so we need to create / partition and Swap.
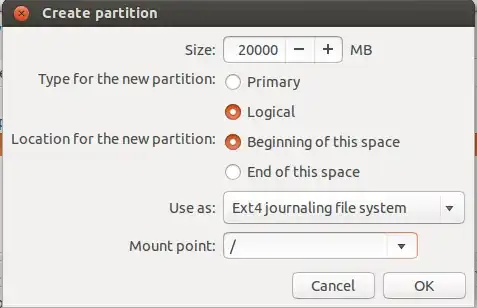
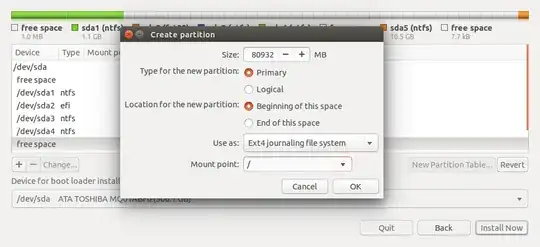
Create / Partition:

Select free space and press on Add button.

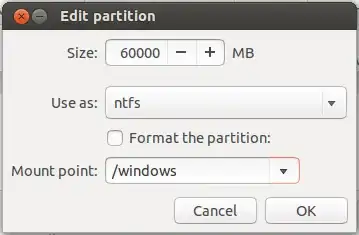
Ubuntu 11.04 requires about 4.4 GB, So we should type a value more than 4.4 GB. Here in my case I put 6000 MB i.e 6 GB.

From "Use as" I selected Ext4 journalling file system.

From "Mount point" I selected /.

Press Add button to create / partition.
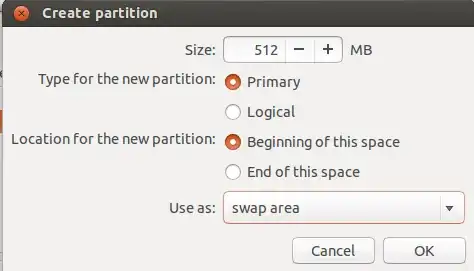
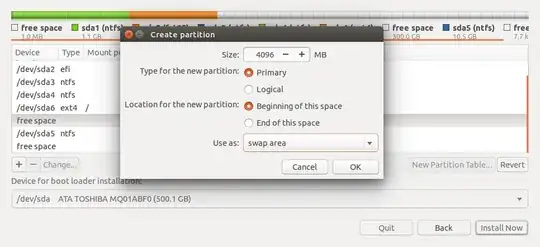
Create Swap:

In the previous screen select free space, and press Add button.

Swap doesn't need much space. In my case I put 500 MB

From "Use as" select Swap area

No need to Mount point.

Click Ok button to create swap.
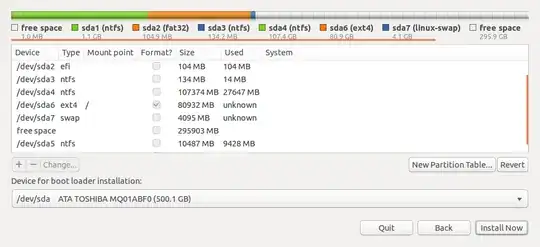
Install:

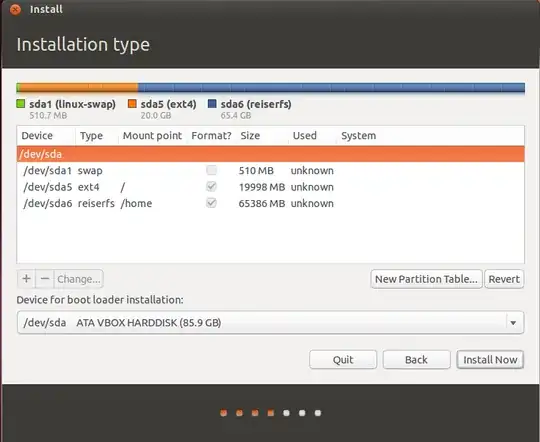
Now we have /, partition, and swap so we are ready to install.

To start installation process press Install now button.

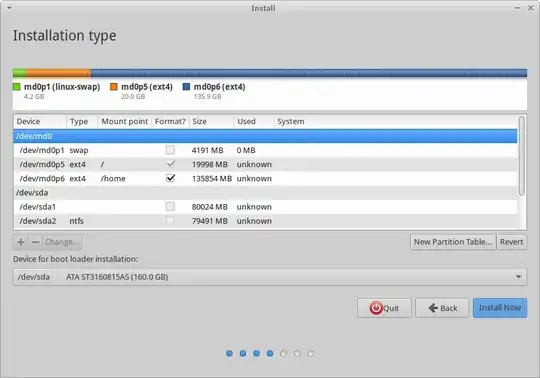
Manual partitioning on Ubuntu installation

For installing Windows on a separate partition, this should be fairly self explanatory from the "Install Ubuntu alongside them" option, however you may come across the following bug.

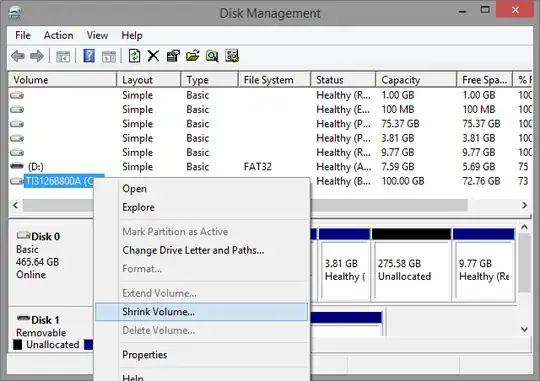
Your existing partition (Windows) is on the left, Ubuntu is on the right. That's the standard order when shrinking one partition to create another for dual-booting.

Installing Ubuntu with Windows installed on a partition

Tom
  • 109
4

Partition shows "unknown" Used in GParted

This happened to me on 17.10 because my Windows 10 Lenovo P51 used a Logical Disk Manager (LDM) Partition.

The solution was to shrink the partition from inside Windows as shown at: https://askubuntu.com/a/521195/52975

You can then install Ubuntu on the free space allocated.

Cannot shrink disk fully

Then I hit the second problem: Windows said I had 400Gb of free space in the partition, but I could only shrink 250Gb.

The solution was to go inside Windows and:

  • Disable Page File (AKA Windows' swap)
  • Disable System Protection

as mentioned at: https://superuser.com/questions/1017764/how-to-shrink-a-windows-10-partition/1060508#1060508

Then after the reboot, it let me shrink it all the way.