628

I added some extra repositories with the Software Sources program. But when I reload the package database, I get an error like the following:

W: GPG error: http://ppa.launchpad.net trusty InRelease: The following signatures couldn't be verified because the public key is not available: NO_PUBKEY 8BAF9A6F

I know I can fix it using apt-key in a terminal, according to the official Ubuntu documentation. But I would have liked to do it graphically. Is there a way to do this without using a terminal?

Wilf
  • 30,732
Agmenor
  • 16,394

16 Answers16

928

This answer was valid for Ubuntu 20.04 and previous versions. For Ubuntu 20.10 and later versions, see this answer.

The short version is:

sudo mkdir -m 0755 -p /etc/apt/keyrings/

wget -O- https://example.com/EXAMPLE.gpg | gpg --dearmor | sudo tee /etc/apt/keyrings/EXAMPLE.gpg > /dev/null sudo chmod 644 /etc/apt/keyrings/EXAMPLE.gpg

echo "deb [signed-by=/etc/apt/keyrings/EXAMPLE.gpg] https://example.com/apt stable main" | sudo tee /etc/apt/sources.list.d/EXAMPLE.list sudo chmod 644 /etc/apt/sources.list.d/EXAMPLE.list

Optional (you can find the email address / ID using 'apt-key list')

sudo apt-key del support@example.com

Original answer:

Execute the following commands in terminal

sudo apt-key adv --keyserver keyserver.ubuntu.com --recv-keys <PUBKEY>

where <PUBKEY> is your missing public key for repository, e.g. 8BAF9A6F.

Then update

sudo apt-get update

ALTERNATE METHOD:

sudo gpg --keyserver pgpkeys.mit.edu --recv-key  <PUBKEY>
sudo gpg -a --export <PUBKEY> | sudo apt-key add -
sudo apt-get update

Note that when you import a key like this using apt-key you are telling the system that you trust the key you're importing to sign software your system will be using. Do not do this unless you're sure the key is really the key of the package distributor.

karthick87
  • 84,513
262

By far the simplest way to handle this now is with Y-PPA-Manager (which now integrates the launchpad-getkeys script with a graphical interface).

  1. To install it, first add the webupd8 repository for this program:

    sudo add-apt-repository ppa:webupd8team/y-ppa-manager
    
  2. Update your software list and install Y-PPA-Manager:

    sudo apt-get update
    sudo apt-get install y-ppa-manager
    
  3. Run y-ppa-manager (i.e. type y-ppa-manager then press enter key).

  4. When the main y-ppa-manager window appears, click on "Advanced."

  5. From the list of advanced tasks, select "Try to import all missing GPG keys" and click OK.

    You're done! As the warning dialog says when you start the operation, it may take quite a while (about 2 minutes for me) depending on how many PPA's you have and the speed of your connection.

monotasker
  • 3,695
100

It happens when you don't have a suitable public key for a repository.

To solve this problem use this command:

gpg --keyserver hkp://keyserver.ubuntu.com:80 --recv 9BDB3D89CE49EC21

which retrieves the key from ubuntu key server. And then this:

gpg --export --armor 9BDB3D89CE49EC21 | sudo apt-key add -

which adds the key to apt trusted keys.

The solution can be found here & here & here.

Kevin Bowen
  • 20,055
  • 57
  • 82
  • 84
Pedram
  • 5,811
39

You need to get and import the key.

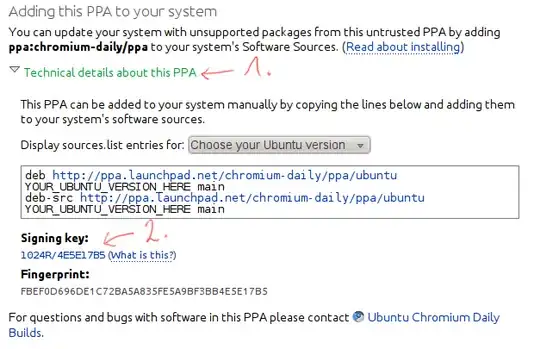
To get the key from a PPA, visit the PPA's Launchpad page. On every PPA page at Launchpad you will find this link (2), after clicking on 'Technical details about this PPA' (1):

image 1

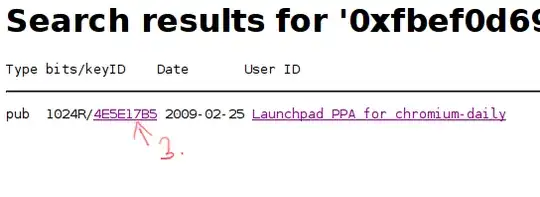
Follow it and click on the key ID link (3):

image 2

Save the page, this is your key file.


Now it's time to import it:

  • Applications > Software Center,
  • Edit > Software sources...,
  • Enter your password,
  • Go to the Authentication tab and click on Import Key File..., finally
  • Select the saved key file and click on OK.
xiota
  • 5,038
htorque
  • 66,086
22

note: As of recent versions, it is no longer considered good practice to add PPA keys to the keyring. However, I will leave this answer but apt-key is now deprecated so it is recommended we follow different methods for now.

apt can only handle 40 keys in /etc/apt/trusted.gpg.d . 41 keys and you will get the GPG error "no public key found" even if you go through all the steps to add the missing key(s).

Check to see if there are any unused keys in this file from ppa(s) you no longer use. If all are in use, consider removing some ppa(s) along with the corresponding keyfiles in /etc/apt/trusted.gpg.d

Furthermore, using

sudo apt-key adv

Is considered a security risk and is not recommended as you are "undermining the whole security concept as this is not a secure way of recieving keys for various reasons (like: hkp is a plaintext protocol, short and even long keyids can be forged, …)". http://ubuntuforums.org/showthread.php?t=2195579

I believe the correct way to add missing keys (for example 1ABC2D34EF56GH78) is

gpg --keyserver hkp://keyserver.ubuntu.com:80 --recv 1ABC2D34EF56GH78
gpg --export --armor 1ABC2D34EF56GH78 | sudo apt-key add -
mchid
  • 44,904
  • 8
  • 102
  • 162
13

There is a tiny script packaged in the WebUpd8 PPA which I'll link as a single .deb download so you don't have to add the whole PPA - which automatically imports all missing GPG keys.

Download and install Launchpad-getkeys (ignore the ~natty in its version, it works with all Ubuntu versions from Karmic all the way to Oneiric). Once installed, open a terminal and type:

sudo launchpad-getkeys

If you're behind a proxy, things are a bit more complicated so see this for more info

Alin Andrei
  • 7,358
11

This error can also occur when the apt list file by the PPA points to a local keyring, like

deb [signed-by=/usr/share/keyrings/SOMETHING.gpg] https://download.something.org/something something/

And while that file may exist on your system (possibly downloaded with a prior command), it may be unreadable due to missing permissions. I just fixed this kind of error by running

chmod 644 /usr/share/keyrings/*

after having fetched the keyring file. The underlying issue was the usage of sudo when I already was root user. Really weird as all of this is root anyway and there was no access permission failure message anywhere... but that fixed it

phil294
  • 639
6

I faced the same issue while installing Heroku. The link below solved my problem -

http://naveenubuntu.blogspot.in/2011/08/fixing-gpg-keys-in-ubuntu.html

After fixing the NO_PUBKEY issue, the below issue remained

W: GPG error: xhttp://toolbelt.heroku.com ./ Release: The following signatures were invalid: BADSIG C927EBE00F1B0520 Heroku Release Engineering <release@heroku.com>

To fix it I executed the following commands in terminal:

sudo -i  
apt-get clean  
cd /var/lib/apt  
mv lists lists.old  
mkdir -p lists/partial  
apt-get clean  
apt-get update  

Source - Link to solve it

dennyac
  • 217
6

Make sure you have apt-transport-https installed:

dpkg -s apt-transport-https > /dev/null || bash -c "sudo apt-get update; 
sudo apt-get install apt-transport-https -y" 

Add repository:

curl https://repo.skype.com/data/SKYPE-GPG-KEY | sudo apt-key add - 
echo "deb [arch=amd64] https://repo.skype.com/deb stable main" | sudo tee /etc/apt/sources.list.d/skype-stable.list 

Install Skype for Linux:

sudo apt-get update 
sudo apt-get install skypeforlinux -y

Source: https://community.skype.com/t5/Linux/Skype-for-Linux-Beta-signatures-couldn-t-be-verified-because-the/td-p/4645756

5

More generally, the following method should work for every repository. First of all search, with eventual help of a search engine, for a text on the program provider's website looking like the following:

-----BEGIN PGP PUBLIC KEY BLOCK-----
Version: GnuPG v1.4.1 (GNU/Linux)
[...]
-----END PGP PUBLIC KEY BLOCK-----

Such a text is for example displayed on http://deb.opera.com. Copy the passage, paste it in an empty file that you create on your desktop. This results in the key file.

Then continue with the importation of the key:

  • Applications > Sofware Center
  • Edit > Sofware sources..., enter password
  • Authentication tab, click on 'Import Key File...'
  • Select the saved key file and click on 'Ok'.

You may now remove the previously created key file.

Agmenor
  • 16,394
3

Ubuntu 20.10 and later versions

The solution for Ubuntu 20.10 and later versions can be found in FWDekker's answer in Stack Overflow, which is quoted below:

Adding a key to /etc/apt/trusted.gpg.d is insecure because it adds the key for all repositories. This is exactly why apt-key had to be deprecated.

Short version

Do similar to what Signal does. If you want to use the key at https://example.com/EXAMPLE.gpg for a repository listed in /etc/apt/sources.list.d/EXAMPLE.sources, use:

sudo mkdir -m 0755 -p /etc/apt/keyrings/

curl -fsSL https://example.com/EXAMPLE.gpg | sudo gpg --dearmor -o /etc/apt/keyrings/EXAMPLE.gpg

echo "Types: deb URIs: https://example.com/apt Suites: stable Components: main Signed-By: /etc/apt/keyrings/EXAMPLE.gpg" | sudo tee /etc/apt/sources.list.d/EXAMPLE.sources > /dev/null

# Optional (you can find the email address / ID using `apt-key list`)
sudo apt-key del support@example.com
# Optional (not necessary on most systems)
sudo chmod 644 /etc/apt/keyrings/EXAMPLE.gpg
sudo chmod 644 /etc/apt/sources.list.d/EXAMPLE.sources

ℹ️ You can also embed the key directly into the .sources file! See the section "Embedding the key" below.

ℹ️ We're using the .sources format here, not the old .list format. This is supported on basically all systems today. See the section "Old one-line format" below for more info.

Long version

While the deprecation notice recommends adding the key to /etc/apt/trusted.gpg.d, this is an insecure solution, and deprecated as of apt 2.9.24 (released January 2025). To quote this article from Linux Uprising:

The reason for this change is that when adding an OpenPGP key that's used to sign an APT repository to /etc/apt/trusted.gpg or /etc/apt/trusted.gpg.d, the key is unconditionally trusted by APT on all other repositories configured on the system that don't have a signed-by (see below) option, even the official Debian / Ubuntu repositories. As a result, any unofficial APT repository which has its signing key added to /etc/apt/trusted.gpg or /etc/apt/trusted.gpg.d can replace any package on the system. So this change was made for security reasons (your security).

The proper solution is explained in that Linux Uprising article and on the Debian Wiki: Store the key in /etc/apt/keyrings/ (or /usr/share/keyrings/ if keys are managed by a package), and then reference the key in the apt source list.

Therefore, the appropriate method is as follows:

  1. Create directory
    Create the directory for PGP keys if it doesn't exist, and set its permissions. This step explicitly sets the recommended permissions, just in case you've changed your umask using sudo's umask_override. Creating the directory is actually only necessary in releases older than Debian 12 and Ubuntu 22.04, but it can't hurt to run this line either way.

    sudo mkdir -m 0755 -p /etc/apt/keyrings/
    
  2. Download key
    Download the key from https://example.com/EXAMPLE.gpg and store it in /etc/apt/keyrings/EXAMPLE.gpg. By giving options -fsSL to curl we enable error messages, ensure redirects are followed, and reduce output so you can see sudo's password prompt. The Debian wiki explains that you should dearmor the key (i.e. convert it from base64 to binary) for compatibility with older software.

    curl -fsSL https://example.com/EXAMPLE.gpg |
        sudo gpg --dearmor -o /etc/apt/keyrings/EXAMPLE.gpg
    

    Optionally, you can verify that the file you downloaded is indeed a PGP key by running file /etc/apt/keyrings/EXAMPLE.gpg and inspecting the output.

  3. Register repository
    A key has been added, but apt doesn't know about the repository yet. To add the repository, you should create a .sources file in /etc/apt/sources.list.d/ that describes how to use the repository, and where to find the key. (You may also have .list files in that directory. See the section "Old one-line format" below for more info.) The contents of the created .sources file should look something like this:

    Types: deb
    URIs: https://example.com/apt
    Suites: stable
    Components: main
    Signed-By: /etc/apt/keyrings/EXAMPLE.gpg
    

    The Signed-By field should link to the key you just downloaded.

    If a repository wants you to specify an architecture, or you want to use multiple components (e.g. main contrib), the contents may instead be something like

    Types: deb
    URIs: https://example.com/apt
    Suites: stable
    Components: main universe
    Architectures: amd64 i386
    Signed-By: /etc/apt/keyrings/EXAMPLE.gpg
    

    A "flat" repository doesn't work with suites and components, and instead specifies an exact path. In the DEB822 format, this is represented by setting Suites: to that path, and omitting the Components: field entirely. In this case, the Suites: field must end with a /. For example:

    Types: deb
    URIs: https://example.com/apt
    Suites: deb/
    Signed-By: /etc/apt/keyrings/EXAMPLE.gpg
    

    If you are adapting the file from an existing repo, they may be using the old one-line format instead. See the section "Old one-line format instead" below for more info.

    For more examples, see the sources.list(5) man pages.

  4. (optional) Remove old key
    If you previously added a third-party key with apt-key, you should remove it. Run sudo apt-key list to list all the keys, and find the one that was previously added. Then, using the key's email address or fingerprint, run sudo apt-key del support@example.com.

  5. (optional) Force-set permissions
    If you have a custom umask_override set for sudo, or if you use ACLs, files will be created with different permissions than usual. In those cases, explicitly set permissions for EXAMPLE.gpg and EXAMPLE.list to 644.

Embedding the key

apt 2.3.10 and newer support embedding the public key directly in the sources.list. You can check your version of apt by running apt -v. Debian 11 "Bullseye" LTS (EOL: 2026-08-31) and Ubuntu 20.04 "Focal Fossa" (EOL: 2025-04-30) are too old, but Debian 12 "Bookworm" and Ubuntu 22.04 "Jammy Jellyfish" are good to go!

To embed a key, replace the path in Signed-By: /etc/apt/keyrings/EXAMPLE.gpg with the raw key, and delete the file /etc/apt/keyrings/EXAMPLE.gpg. Importantly, you must indent each line of the key block by (at least) one space, and you must put an indented . instead of an empty line. (Removing the empty line at the start of the key invalidates the key!) For example, you may have a .sources file like below. (Real keys should be much longer than this. This one is too short to be secure.)

Types: deb
URIs: https://example.com/apt
Suites: stable
Components: main
Signed-By:
 -----BEGIN PGP PUBLIC KEY BLOCK-----
 .
 mI0EZWiPbwEEANPyu6pUQEydxvf2uIsuuYOernFUsQdd8GjPE5yjlxP6pNhVlqNo
 0fjB6yk91pWsoALOLM+QoBp1guC9IL2iZe0k7ENJp6o7q4ahCjJ7V/kO89mCAQ09
 yHGNHRBfbCo++bcdjOwkeITj/1KjYAfQnzH5VbfmgPfdWF4KqS/TmJP9ABEBAAG0
 G0phbmUgRG9lIDxqYW5lQGV4YW1wbGUub3JnPojMBBMBCgA2FiEEK8v49DttJG7D
 35BwcvTpbeNfCTgFAmVoj28CGwMECwkIBwQVCgkIBRYCAwEAAh4BAheAAAoJEHL0
 6W3jXwk4YLID/0arCzBy9utS8Q8g6FDtWyJVyifIvdloCvI7hqH51ZJ+Zb7ZLwwY
 /p08+Xnp4Ia0iliwqSHlD7j6M8eBy/JJORdypRKqRIbe0JQMBEcAOHbu2UCUR1jp
 jJTUnMHI0QHWQEeEkzH25og6ii8urtVGv1R2af3Bxi9k4DJwzzXc5Zch
 =8hwj
 -----END PGP PUBLIC KEY BLOCK-----

The script below will create a new .sources file at /etc/apt/sources.list.d/EXAMPLE.sources with the key at https://example.com/EXAMPLE.gpg embedded into it:

echo "Types: deb
URIs: https://example.com/apt
Suites: stable
Components: main
Signed-By:
$(wget -O- https://example.com/EXAMPLE.gpg | sed -e 's/^$/./' -e 's/^/ /')" | sudo tee /etc/apt/sources.list.d/EXAMPLE.sources > /dev/null
# Optional (see above)
sudo apt-key del support@example.com
sudo chmod 644 /etc/apt/sources.list.d/EXAMPLE.sources

Old one-line format

Thus far, this answer has used the "new" DEB822 format (.sources files) to specify repositories, instead of the old one-line format (.list files). The DEB822 format has been supported since apt 1.1 (released in 2015). Debian and Ubuntu plan to use DEB822 as the default format starting late 2023. Repolib's documentation has a nice comparison and covers the motivation behind the new format. If you are running Debian 9 "Stretch" or newer, or Ubuntu 16.04 "Xenial Xerus" or newer, you're good to go!

This section is intended for those who cannot use DEB822, or for those who want to migrate to DEB822.

Using the old one-line format

The following script replaces the DEB822 script from the section "Short version", at the top of this answer.

sudo mkdir -m 0755 -p /etc/apt/keyrings/

curl -fsSL https://example.com/EXAMPLE.gpg | sudo gpg --dearmor -o /etc/apt/keyrings/EXAMPLE.gpg

echo "deb [signed-by=/etc/apt/keyrings/EXAMPLE.gpg] https://example.com/apt stable main" | sudo tee /etc/apt/sources.list.d/EXAMPLE.list > /dev/null

# Optional (see above)
sudo apt-key del support@example.com
sudo chmod 644 /etc/apt/keyrings/EXAMPLE.gpg
sudo chmod 644 /etc/apt/sources.list.d/EXAMPLE.list

Migrating to DEB822

If you can, you should migrate to DEB822, because that will be the default format in Debian and Ubuntu. That said, as of February 2025, there is no urgency to migrate, because the old one-line format is not deprecated.

Since apt 2.9.24 (released January 2025), you can run apt modernize-sources to automatically migrate all your .list files to DEB822. Note, however, that some fields, such as arch=... are not migrated correctly, so you must add Architectures: ... to your .sources file manually. Fields with multiple values are space-separated, so multiple architectures would be written as Architectures: amd64 i386.

Additional resources
3

Good! I finally found the way!

I've tested all methods to fix GPG error NO_PUBKEY and nothing worked for me.

I've deleted the entire contents of the folder /etc/apt/trusted.gpg.d

cd /etc/apt/trusted.gpg.d
sudo rm -R *
sudo apt-get update

And I use the Y-PPA-Manager method because I'm too lazy to create all pubkey's manually (too many): http://www.unixmen.com/fix-w-gpg-error-no_pubkey-ubuntu/

run sudo apt-get update again and finally everything works great now! Thanks!

Based Source : post #17 on https://bugs.launchpad.net/ubuntu/+source/apt/+bug/1263540

kellyfj
  • 105
  • 4
NeurOSick
  • 154
2

Updated version (Ubuntu 22.04 LTS)

Because apt-key is deprecated now, and you want to use /etc/apt/trusted.gpg.d/, you can use

sudo gpg --keyserver pgpkeys.mit.edu --recv-key <PUBKEY>
sudo mkdir -p /etc/apt/keyrings/
sudo gpg -a --export <PUBKEY> /etc/apt/keyrings/<your-keyfile-name>.gpg
# now go to your /etc/apt/sources.list.d/<source definition list file>, and 
# add [signed-by=/etc/apt/keyrings/<your-keyfile-name>.gpg] between deb and url like this:
# deb <add here> https://...

<PUBKEY> is the 8 character fingerprint like 210976F2 and <target name> is a name of your choice by which you will know that key.

EDIT: Updated for more security, taken from a lengthy answer

smido
  • 185
1

It is always a good idea to check who is signing the repository by inspecting the offending file(s) in /etc/apt/sources.list.d For example, examining the mysql.list file, it shows where the key is stored

### THIS FILE IS AUTOMATICALLY CONFIGURED ###
# You may comment out entries below, but any other modifications may be lost.
# Use command 'dpkg-reconfigure mysql-apt-config' as root for modifications.
deb [signed-by=/usr/share/keyrings/mysql-apt-config.gpg] http://repo.mysql.com/apt/ubuntu/ jammy mysql-apt-config
deb [signed-by=/usr/share/keyrings/mysql-apt-config.gpg] http://repo.mysql.com/apt/ubuntu/ jammy mysql-8.0
deb [signed-by=/usr/share/keyrings/mysql-apt-config.gpg] http://repo.mysql.com/apt/ubuntu/ jammy mysql-tools
#deb [signed-by=/usr/share/keyrings/mysql-apt-config.gpg] http://repo.mysql.com/apt/ubuntu/ jammy mysql-tools-preview
deb-src [signed-by=/usr/share/keyrings/mysql-apt-config.gpg] http://repo.mysql.com/apt/ubuntu/ jammy mysql-8.0

As you can see, the key is stored in /usr/share/keyrings/mysql-apt-config.gp. At this point you can download the new offending key in the proper place

gpg --keyserver hkp://keyserver.ubuntu.com:80 --recv-keys [OFFENDING KEY] && rm /usr/share/keyrings/mysql-apt-config.gpg && gpg  --output /usr/share/keyrings/mysql-apt-config.gpg --export [OFFENDING KEY]

eventually leaving away the rm /usr/share/keyrings/mysql-apt-config.gpg part if you don't have the key

0

2021 August. This is what worked for me.

cd /etc/apt/trusted.gpg.d
sudo rm -R *
sudo apt-get update

The last line will raise errors of missing keys.

What you'd then have to do is manually install each of the keys listed in the errors for example if the error is saying that your missing PUB_KEY is 9BDB3D89CE49EC21,

You can manually add the Key with the command sudo apt-key adv --keyserver keyserver.ubuntu.com --recv-keys 9BDB3D89CE49EC21

Re-run sudo apt-get update

Repeat the process for the new key raised in the error

Say if the new key was 3BDB3D89CE49EC24, Just Manually add the Key with the command sudo apt-key adv --keyserver keyserver.ubuntu.com --recv-keys 3BDB3D89CE49EC24

Re-run sudo apt-get update and repeat the process until all the errors are gone.

Then go back to the package site you were trying to install and repeat the installation process.

For my case, the error was coming while I tried installing Sublime Text Doing the above and returning to the Sublime installation guide here solved the issues.

Don't forget to upvote if this works for you. And it must do

0

I had the same problem with DynDNS's Updater client.

Turns out it was just expired keys.

Reinstalling the software (downloading a new .deb from the website, then using Software Centre to reinstall) fixed the problem.

Error message for reference:

W: GPG error: http://cdn.dyn.com stable/ Release: The following signatures were invalid: KEYEXPIRED 141943.......
kos
  • 41,268
Cranky
  • 464