Install Windows after Ubuntu on a single partition without touching the grub bootloader (without USB)
- Prepare the
NTFS partition by the Disk Utility.
- Download HBCD_PE_64.iso, extract it on this partition, and add this menu entry to
grub.cfg:
menuentry "HBCD_PE" --class windows11  {
  insmod part_msdos
  insmod ntldr
  set root='hd0,msdos6'
  ntldr /BOOTMGR
}
Replace 'hd0,msdos6' with the appropriate values. also, BOOTMGR can be replaced with bootmgr based on the boot manager name in the HBCD_PE_64.iso
Reboot to HBCD_PE from the Grub menu.
Use Windows cmd to create a 25 GB vdisk, attach this vdisk, and make it a single partition:
diskpart
create vdisk file=D:\win.vhd maximum=25000 type=fixed
attach vdisk file=D:\win.vhd
lis dis
Disk ### Status Size Free Dyn Gpt
Disk 0 Online 465 GB 1024 KB
Disk 1 No Media 0 B 0 B
- Disk 2 Online 24 GB 24 GB
sel dis 2
convert mbr
create partition primary
format quick fs=ntfs label="Windows-vhd"
assign letter="F"
active
Replace D with the appropriate letter.
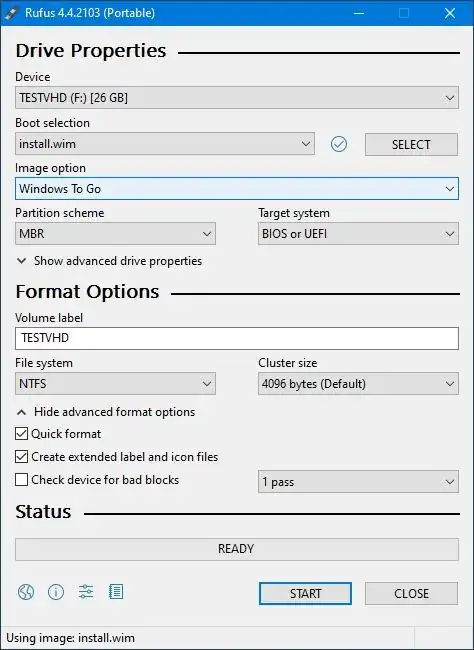
- Use
Rufus (existed in the HBCD_PE ISO, in the programes directory) to make Windows To Go from Install.wim on this vdisk, and select prevent Windows To Go from accessing the internal disk. you will find the Install.wim file in the windows ISO in sources directory.

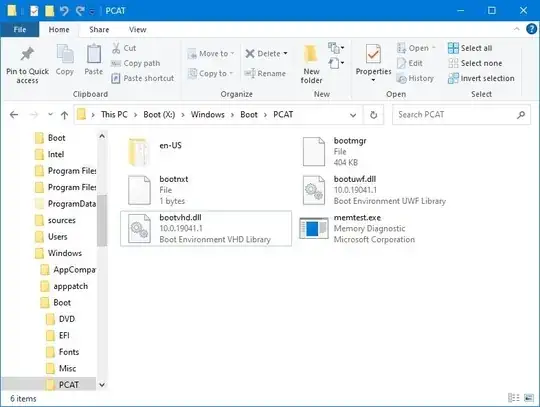
- Copy
bootvhd.dll to the boot directory on the NTFS partition. this file will help us to boot from the vdisk.
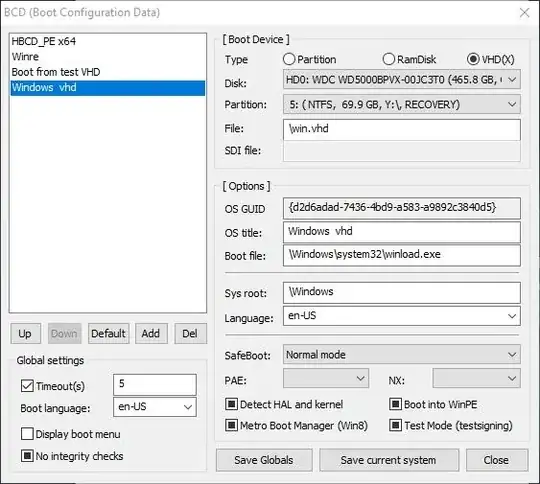
- Use
bootice.exe (existed in the HBCD_PE ISO, in the programes directory and start menu in the MBR section) to add a boot entry to the BCD file. select add, vhd entry, select the disk, the partition, and the vdisk file.
Reboot, select HBCD_PE, then select vdisk boot entry.
After Windows is configured, reach the desktop on the vdisk, reboot to HBCD_PE, attach vdisk by these commands:
diskpart
select vdisk file=D:\win.vhd
attach vdisk
, make backup.wim, and apply it to the NTFS partition.
Dism /Capture-Image /Compress:maximum /ImageFile:E:\backup.wim /CaptureDir:F:\ /Name:"WIN11"
Dism /apply-image  imagefile:E:\backup.wim  /index:1 /ApplyDir:W:
Replace E and W with the appropriate letters. you can use Dism++ to Capture and apply the wim file.
- Use
bootice.exe to add a boot entry to BCD for the Windows partition. select add, windows entry, select the disk, select the Windows partition, and edit the entry name.
Now you can access HBCD_PE, vdisk, and Windows. all of these are placed on a single partition without touching the grub or ubuntu, also you can delete HBCD_PE_64 files after applying bcdboot command:
BCDboot c:\Windows /s C: /f ALL
this command will create the BCD files for BIOS and UEFI in the same Windows partition.
The vdisk can be deleted, but retaining it is useful for installing other Windows versions if you prefer that. with vdisk files, you can make many Windows versions on the same partition.
You can access the vdisk or Windows when you select HBCD_PE from grub menu. also, you can rename this entry to Windows or windows boot manager.
Create recovery partition to install, backup, restore and repair: multi Ubuntu versions, HBCD-PE-64 and multi Windows installation without usb drive
Create USB drive contains multi Ubuntu versions, HBCD-PE-64 and multi Windows installation


