How to Play
In Bedrock Edition, How to Play is a built-in guide designed to help new players to Minecraft. It tells the player how the main aspects of the game work, some controls, and some tips to get started. The guide is located in the Settings screen, accessible from the title screen or the pause menu. A list of topic links appear on the left, with content on the right. These sections are reproduced below.
At the bottom of the sections is a button leading to the Encyclopedia. The Encyclopedia describes more specific features in the game in detail. Some tabs in the Encyclopedia can be opened from "?" buttons in some GUIs, like the inventory and the cartography table.
The Encyclopedia and the How to Play guide is sometimes missing information or outdated.
The content of this article reproduces the game's How to Play guide and Encyclopedia in its entirety, with some reformatting and internal linking as needed for optimal presentation as a Wiki page.
The How to Play guide and the Encyclopedia describe some controls. The controls differ on some devices, and the contents of the guide change with it. In this article, the default controls for Keyboard & Mouse are shown.
The table of contents includes all of the topics in the game's guide, starting with "Moving around".
Getting started
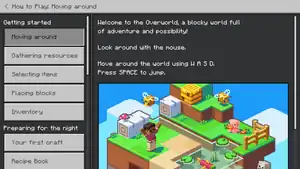
Moving around
Welcome to the Overworld, a blocky world full of adventure and possibility!
| Displayed in keyboard controls | Displayed in touch controls | Displayed in gamepad controls |
|---|---|---|
| Look around with the mouse.
Move around the world using W A S D. Press SPACE to jump. |
Touch and drag along the screen to look around.
Move around the world using Press |
Look around with Move around the world using Press |
Gathering resources
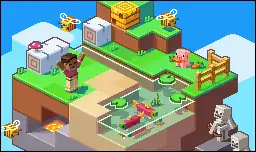
The world is full of resources, including building blocks, crafting materials, and food.
You can break blocks with your bare hands to gather resources like dirt and wood. Aim at a block, then click and hold ![]() until it breaks and the resources drop.
until it breaks and the resources drop.
Pick up any dropped resources by walking over the floating icons.
Selecting items
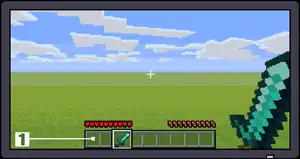
Resources you pick up will appear in your hotbar, which you'll find at the bottom of the screen.
To hold an item in your hand, scroll the mouse wheel to select the item. You can also use a number key: 1 is the first hotbar slot and 9 is the last.
Some items, like buckets, fishing rods, and bows can be used by tapping the build/use button ![]() .
.
1. Hotbar
Placing blocks
Any blocks you've picked up can be placed back into the world. This way you can build a cozy shelter or anything else you can imagine!
Choose a block in your hotbar, then press ![]() to place it.
to place it.
Don't worry if you placed something in the wrong spot - simply break it again, then pick it back up!
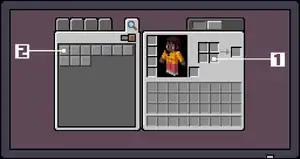
Inventory
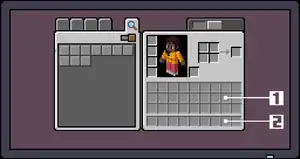
1. Inventory
Your hotbar will fill up as you gather more resources. Press E to access your inventory, where you'll have more space for everything you've collected.
2. Hotbar
Want to move something between your hotbar and your inventory? Open your inventory, click the item of your choice, then drag it to the empty item slot you'd like to move it to.
Preparing for the first night
Your first craft
1. Crafting grid
Many blocks, like wood, can be turned into useful items by crafting. To do this, you'll find a simple crafting grid on the right-hand side of the inventory screen.
For example, put a single wood log anywhere on the crafting grid, and several planks will appear in the output slot.
Simply, drag your shiny new planks to your hotbar. Now you're ready to place them into the world!
2. Crafting recipe
Some items require you to place your crafting ingredients in a certain shape - also called a recipe.
Try placing two planks above each other to create some sticks. Useful for all sorts of things!
Recipe Book
Don't worry, you don't need to remember every crafting recipe by heart. The recipe book in your inventory keeps track of blocks and items you can craft - simply click a recipe to see what you need to craft it.
Once you've gathered the required crafting ingredients, click the recipe once more, then move it from the output slot to your hotbar or inventory.
The Crafting Table
Ready to take your crafting to the next level? Place four planks in a square in your crafting grid, and you'll get a crafting table ![]() - a whole new way to craft.
- a whole new way to craft.
Place your crafting table in the world, then right-click it to open it. The larger crafting grid will let you make bigger and better things, including tools, beds, and doors.
Crafting a Tool
Tools will help you get things done faster. Some, like the pickaxe ![]() , let you mine stone and various ores. Others, like the sword
, let you mine stone and various ores. Others, like the sword ![]() , help you keep enemies at bay.
, help you keep enemies at bay.
To craft a tool, open up your crafting table ![]() by walking up to it and right-clicking it. You can craft a basic version of most tools using two sticks and a few planks - your recipe book will tell you how!
by walking up to it and right-clicking it. You can craft a basic version of most tools using two sticks and a few planks - your recipe book will tell you how!
Mining
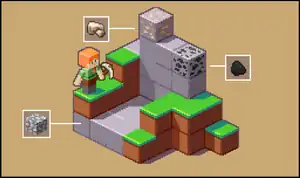
Not all crafting materials are on the surface - some may require you to dig underground or into a mountain.
A pickaxe ![]() helps you uncover all sorts of materials, such as stone, coal, iron, and precious ore - though you may need extra sturdy tools for some rarer materials!
helps you uncover all sorts of materials, such as stone, coal, iron, and precious ore - though you may need extra sturdy tools for some rarer materials!
Some raw metals will need to be smelted using a furnace ![]() . Place a fuel like coal or wood logs in the fuel slot, then add raw ore to smelt it into something useful.
. Place a fuel like coal or wood logs in the fuel slot, then add raw ore to smelt it into something useful.
Suviving the first Night
Nightfall
When the sun starts to set, it's time to get ready.
At night, the overworld is home to zombies, spiders, skeletons, and other dangerous creatures we call hostile monsters.
Crafting some torches can help you see in the dark, while also keeping mobs from spawning to close.
While holding a torch, place it into the world by right-clicking a nearby free surface.
Building a Shelter
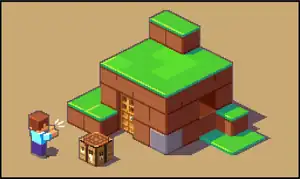
While danger comes lurking, a sturdy shelter can protect you from the threats outside.
Building a shelter is critical to surviving your first night, and it doesn't have to be hard.
You can build one with anything from dirt to stone, or even close up a cave for a makeshift lodging!
Death and Respawn
Enemies appear every night, and even the best of us can be caught off guard. If your health bar ![]() runs out, you'll die - and then respawn right where you started.
runs out, you'll die - and then respawn right where you started.
You have unlimited lives, but you drop all items in your inventory when you die. If you're quick enough, you can pick up your items back up right where you dropped them.
Getting settled
Food
You'll slowly get hungry during your adventures - fortunately the Overworld is full of food! You can gather apples from trees, meat from animals, or why not grow your own crops using a hoe?
To eat a food, select it in your hotbar, then click and hold the right mouse button. Keep the hunger bar ![]() full to regain health when you take damage.
full to regain health when you take damage.
Some raw foods are better when cooked first on a campfire or in a furnace - your tummy will thank you!
Beds
A soft bed lets you sleep through the night. You'll need wool to craft one, as well as a safe spot to place it.
Sleeping in a bed will also set your spawn point, meaning that if you die, you'll reappear right back home!
You can only fall asleep when it's cozy, like when it's nighttime or during a thunderstorm.
Improved Tools
Use your tools a lot and they'll eventually break. As you gather new materials, such as stone, you'll be able to craft better tools.
Tools of higher tier are more durable, more efficient, and able to gather more valuable resources. Go out into the world and find out for yourself!
Playing Together
Minecraft is a multiplayer game by default.
Online multiplayer
Every new world you create starts with multiplayer enabled by default. If you want to make it private, go to World Settings to turn off multiplayer.
Joining an Online Game
To play with others, go to the Friends tab to see all available Realms, Friends, and LAN games. Just select any game to join it.
When you start or join an online game, your friends can see this in their Friends tab. If they join, it'll be visible for their friends as well.
You need to be signed in to a Microsoft account with an active internet connection to play multiplayer.
Realms - The best way to play together
It's easy to play with friends using Realms.
You and up to 10 friends get 24/7 access to a world that's allways online. Explore, get creative, or try curated content from Marketplace.
All you need is a paid Realms subscription. Why not try a free 30-day trial?
Try Realms
This button takes the player to the Subscriptions tab in the Settings.
Player Permissions
You decide what people can do in your world by changing player permissions.
Open the game menu to see a list of players currently in your world, then select the permissions icon to adjust that player's permissions.
Encyclopedia
Minecraft Encyclopedia
Overworld A-Z
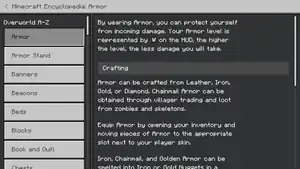
Armor
By wearing Armor, you can protect yourself from incoming damage. Your Armor level is represented by ![]() on the HUD, the higher the level, the less damage you will take.
on the HUD, the higher the level, the less damage you will take.
Crafting
Armor can be crafted from Leather, Iron, Gold, or Diamond. Chainmail Armor can be obtained through villager trading and loot from zombies and skeletons.
Equip Armor by opening your inventory and moving pieces of Armor to the appropriate slot next to your player skin.
Iron, Chain, and Gold Armor can be smelted into Iron or Gold Nuggets in a Furnace.
Shield
The Shield will block incoming damage. The Shield can be equipped in the offhand slot as well as the hotbar. Press and hold SHIFT to block with the shield.
The Shield can even block a Creeper explosion!
Disguise
You can also wear a Carved Pumpkin on your head. This won’t give you any ![]() but will make it so Endermen won’t get mad when you look at them.
but will make it so Endermen won’t get mad when you look at them.
Armor Stand
An Armor Stand holds your armor when you aren't using it.
Outfitting
Press ![]() on an Armor Stand while holding a piece of armor to place it on the Armor Stand.
on an Armor Stand while holding a piece of armor to place it on the Armor Stand.
Press ![]() on an Armor Stand with an open hand to remove something from the Armor Stand.
on an Armor Stand with an open hand to remove something from the Armor Stand.
Posing
An Armor Stand can change its pose, sneak and press ![]() on an Armor Stand to change the pose.
on an Armor Stand to change the pose.
Dancing
Armor Stands will react to a Redstone signal, try giving it different signal strengths and see what happens.
Banners
Banners are a cool way to decorate your house or castle with custom patterns and colors.
After crafting a Banner, you can put it on a Crafting Table or Loom and add different dyes to create your own unique, cool design!
Applying a Pattern
There are many different patterns that you can create with your dye such as:
- Making a triangle gives you a chevron pattern.
- Making a cross gives you a cross pattern.
- Adding a Oxeye Daisy gives you a flower pattern.
Experiment with different combinations to get even more patterns!
Multiple Layers
A Banner can also have multiple layers, allowing you to have more than one pattern on your Banner. If you don't like the last pattern you put on a Banner, you can wash the last layer off in a Cauldron.
Making Copies
If you want to copy a Banner, put it on the Crafting Table with a blank Banner.
Beacons
Active beacons project a bright beam of light into the sky.
They are crafted with Glass, Obsidian, and Nether Stars (which is obtained by defeating the Wither).
Construction
Beacons need to be on top of a Pyramid of Iron, Gold, Emerald, Diamond or Netherite blocks with an unobstructed view of the sky.
The material that the Beacon is placed on has no effect on the power of the Beacon.
Use
In the Beacon menu you can select one primary power for your Beacon. The more tiers your pyramid has the more powers you can have.
To set the powers of your Beacon you must use a Netherite Ingot, Emerald, Diamond, Gold Ingot, or Iron Ingot in the payment slot.
Once set, the powers emanate from the Beacon indefinitely. Powers are granted to all nearby players.
To change the color of the beam, place a stained glass block in its path.
Beds
Sleeping in a Bed passes the night and sets your spawn point.
Press ![]() on a Bed to go to sleep. This can only be done at night.
on a Bed to go to sleep. This can only be done at night.
If you are playing Multiplayer, everyone in the world must be in a Bed at the same time to pass the night.
If your bed is broken you return to where you first spawned into the world.
Be careful when using a bed in the Nether; it's usually too hot to sleep.
Blocks
The world of Minecraft is made from millions of blocks. Each one is breakable, collectable, and placeable. There are almost no limits to what you can build!
Most blocks you will have to find in the world, but some can only be crafted such as combining other blocks on a crafting table like a Redstone Block or smelted in a furnace like Glass.
Falling Blocks
Most blocks are not affected by gravity and can float in mid air, but some like Sand and Gravel, will fall if there is no block underneath them.
Interesting Blocks
Here are some examples of the more interesting blocks in Minecraft:
- Glass - This is a transparent block that is made by smelting Sand in a Furnace.
- Concrete - This is made by dropping a Concrete Powder block into water.
- Terracotta - This is found naturally in Badlands biomes or can be crafted and dyed from Clay that is found underwater. Terracotta can be made into Glazed Terracotta by smelting it in a Furnace.
- Magma - This is found naturally in the Nether, it gives off a little light and will burn whoever steps on it.
- Coarse dirt - This is almost like a normal Dirt block but Grass can't grow on it. It can be found in Windswept Savanna and Old Growth Taiga biomes.
Book and Quill
The Book and Quill lets you record your adventures. Tell your story by entering text into the pages. You can even change the title and the author! Sign the Book and Quill to finalize your work. The Book and Quill will be editable until it is signed.
Chests
Once you have crafted a Chest, you can place it in the world and then open it with ![]() to store items from your inventory.
to store items from your inventory.
Items in the Chest are stored there for you to put into your inventory later.
Two chests placed next to each other will be combined to form a Large Chest.
Conduits
An active Conduit gives you powers when you are underwater and when it rains.
A Conduit is crafted with Nautilus Shells and a Heart of the Sea. The Conduit draws power from Prismarine and Sea Lanterns.
Construction
Once activated, a Conduit will grant Conduit Power to anything nearby.
The more power it draws in, the further its abilities reach.
Dyes
Dye is used to change the color of many things in Minecraft.
Some Dye materials are harder to find than others. Most Dyes can be crafted from flowers, like Red Dye from a Poppy, but some Dyes are found or created in more obscure ways such as:
- Blue Dye - Mining Lapis Lazuli deep underground
- Brown Dye - Harvesting Cocoa Beans in the Jungle
- Green Dye - Smelted from Cactus
- White Dye - Crafted from Bone Meal
Farming
There are a variety of different crops that you can farm in Minecraft. Farming, while challenging, can provide an infinite food source.
Plan Ahead
Crops require light, water, and farmland to grow. You need a hoe, a water source, and seeds to farm.
The Blocks next to the water need to be converted to farmland, do this with the hoe. Water will saturate up to four blocks away.
Planting and Harvesting
Now you can plant your seeds. Make sure your crops are protected as they can easily die from being trampled or lack of water or light.
Fences can help protect your crops from hungry rabbits or trampling toes!
When the crops are fully grown they change in appearance and can be harvested.
Some plants like pumpkins and melons grow on stalks. Be careful not to harvest the stalks!
Fireworks
Fireworks are a fun way to create your own unique celebration in Minecraft!
Fireworks have two components, the Firework Rocket and the Firework Star.
Firework Rocket
To use a Firework, press ![]() on a block to send the Firework shooting into the sky.
on a block to send the Firework shooting into the sky.
Fireworks have no effect other than shooting into the sky.
Firework Stars
Firework Stars can be added to during the crafting of the Firework Rocket to give it many different colors and effects.
Firework Stars are made from gunpowder and various other items!
- Color - Adding dye of any color will make an explosion of that color.
- Twinkle - Adding Glowstone Dust will make the explosion twinkle.
- Creeper Shaped - Adding a Head will make a creeper pattern in the sky.
- Burst - Adding a feather will give explosion a burst effect.
- Trail - Adding a Diamond will give the explosion trails.
- Star Shaped - Adding a Gold Nugget will make a star shape in the sky.
Pyrotechnics
Fireworks can be fired from a dispenser. This will shoot the Firework in the direction that the dispenser is facing.
Fishing
Fishing must be done with a Fishing Rod and is an excellent way to catch some fish or other cool items from the sea.
Casting
Aim at a block of water and press ![]() while holding a fishing rod to cast the lure into the water.
while holding a fishing rod to cast the lure into the water.
Fish On!
Wait until you start to see a trail of bubbles coming for the lure.
When the bubbles touch the lure, it will bob up and down. Press ![]() to reel in the lure. Be careful not to let your fish get away!
to reel in the lure. Be careful not to let your fish get away!
Jigsaw Blocks
Jigsaw Blocks give creators the ability to generate large structures in the world by connecting multiple structure templates.
How to Obtain
To get a Jigsaw Block you must use the /give slash command. To use the Jigsaw Block, you must have Operator permissions.
Settings
Jigsaw Blocks have multiple settings that control how they join together to form a larger structure.
- Target Pool - The path of the target pool to search for a connecting structure template. The template pool should contain at least one structure that matches the Jigsaw's "Target Name" field.
- Name - The name of the Jigsaw. This is used when connecting from Jigsaws with a matching "Target Name".
- Turns Into - The type of the block the Jigsaw Block will turn into when placed in the world during structure generation.
- Selection Priority - When the parent piece is being processed for connections, this is the order in which this Jigsaw Block attempts to connect to its target piece. Jigsaws will be processed in descending priority with random ordering breaking ties.
- Placement Priority - When this Jigsaw Block connects to a piece, this is the order in which that piece is processed for connections in the wider structure. Pieces will be processed in descending priority with insertion order breaking ties.
- Joint Type - A joint can be either Rollable (default) or Aligned. If the joint type is Rollable, the target structure will be rotated randomly around the source Jigsaw Block. If the joint type is Aligned, the target structure will be placed such that the rotation of the target Jigsaw Block aligns with the rotation of the source Jigsaw Block. Note that this only applies when the Jigsaw Block is placed facing up or down.
Mounts
A player can ride any adult Horse, Donkey, Mule, or Camel. Only Horses can be armored.
Mules and Donkeys may be equipped with saddlebags (for transporting items) by attaching a Chest. These saddlebags can then be accessed whilst riding or sneaking.
Taming
Horses, Donkeys, and Mules must be tamed before they can be used. A player can tame a horse and staying on it while it tries to buck them off. Press ![]() with an empty hand to tame Horses, Donkeys, and Mules.
with an empty hand to tame Horses, Donkeys, and Mules.
When hearts appear around the horse, it has been tamed and will no longer try to knock the player off.
Riding Animals
To steer a horses and camels, the player must equip it with a Saddle.
Saddles can be bought from villagers, found inside Chests hidden in the world, or acquired by fishing. While riding a horse, open your inventory and put a saddle in the horse's saddle slot.
A camel can carry two players at the same time.
Horses and donkeys can be bred like other animals using Golden Apples or Golden Carrots.
Foals will grow into adult horses over time, although feeding them Wheat or Hay will speed this up.
Pack Animals
Llamas are another ridable mob which can be tamed and used to transport large shipments of items.
Llamas can be tamed the same as horses. However, even when tamed, the player can't control their movements while riding.
A lead can be attached to one, and when this happens, surrounding llamas (both tamed and un-tamed) will follow, making a caravan.
Llamas can be equipped with chests, giving it 3-15 slots of inventory space depending on the strength of the Llama. They can also be equipped with carpets. Each carpet color yields a different pattern.
Pigs
Pigs can be ridden as well, although they won't go where you want without a little incentive.
Equip a pig with a Saddle and point a Carrot on a Stick in the direction you want to go.
Dismount
Press SHIFT to dismount.
Navigation is an important skill that you must learn in Minecraft, because it's not always easy to find your way home.
First of all, there are some basic tools that you should know about.
A Compass will point in the direction of the first place you spawned into the world, an easy way to find where you started.
A Map lets you see the area you've explored. Put it in your offhand slot to use it like a mini-map. You can increase its size by adding more paper to the edges in a Crafting Table.
A Locator Map will show you where you are and what direction you are facing in relation to the Locator Map's origin. It also shows you the location of other players in the same world.
A Cartography Table can help you create, expand, copy and even name maps.
Place paper into the first slot to craft a Map. If you add a compass into the second slot you can craft a Locator Map. Adding Paper or a blank Map will let you expand or copy your Map.
Try to watch for landmarks as you explore. The more you play on a world, the more you will be able to remember where you are. Another good trick is to place Torches as you go so that you may find your way back home.
The sun can also tell you what direction you are facing. Remember: the sun rises in the east and sets in the west!
Explorer Maps
There are several places for you to explore. Find a village and look for a Cartographer. He will trade you Explorer Maps that will lead you to strange places far away.
Nether Portal
A Nether Portal allows you to travel to a different dimension.
If constructed correctly the Nether Portal can be lit and activated.
Example of a portal construction shown here:
Pets
Befriending Pets
There are several mobs in Minecraft that you can tame and make your pets. Each can be tamed by giving them an item that they like. Once tamed you can have them stay by pressing ![]() while looking at them.
while looking at them.
Wolves
Wolves are a neutral mob that hunt in the colder climates. They will attack Rabbits, Skeletons, and Sheep but run away from llamas. They won't attack you unless you provoke them. You can tame them by giving them Bones.
Cats
Cats are a neutral mob that can be found in villages. They will attack Rabbits and Baby Turtles. They also keep Phantoms and Creepers away. They will try to run from you so taming them can be tough. They like fish so give them Raw Cod or Salmon to tame them.
Parrots
Parrots are a passive mob that live in the Jungle. They will imitate any other mob in the area. Seeds are their favorite, give them a few to tame them. Parrots will also sit on your shoulder... Yes, you can have more than one up there.
Raids
While exploring the world you may encounter a Pillager encampment or patrol. Pillagers are always looking for villages to raid. Taking their Banners will get their attention, and they may choose to attack a nearby village.
Be sure to defend your village, the attack will stop when you defeat all the raiders.
I Need A Hero
Villagers are most likely to be grateful when you have saved them from the raiders. Be sure to check back with them, you might get a good deal.
Ranching
In Minecraft, you can have your own ranch filled with livestock! Ranching provides lots of resources such as wool, eggs, and raw meat.
Growing Your Herd
In order to keep your livestock growing, you have to make baby animals. Adult animals must enter Love Mode for this to happen. Feed the animals their preferred food to get them to enter Love Mode.
When two like animals are nearby and in Love Mode, they kiss for a moment and then a baby animal will appear! The baby animal will stay with their parents until they grow into an adult. After having a baby, adult animals must wait 5 minutes before entering Love Mode.
What Do Mobs Eat?
Cows, Mooshrooms, and sheep all eat Wheat. Pigs can eat Carrots or Beetroot. Chickens love Seeds of any kinds. Rabbits will eat Carrots, Golden Carrots, or Dandelions. Ocelots enjoy Raw Cod or Salmon. Wolves like to eat any kind of meat.
Animals will follow you when you hold their desired food item. This will help you lead them to your ranch or another animal.
Scaffolding
Reach For The Sky
Scaffolding can help you create huge structures safely! You can walk inside scaffolding and stand on it. You can travel upward by standing in the scaffolding and pressing SPACE. If you want to travel downward you can press SHIFT.
Support Your Build
Scaffolding needs support. You can place only so many scaffolding horizontally without touching a different block. When you attempt to place too many scaffolding blocks without proper support, it will fall. Scaffolding can be placed like normal blocks, but it can also be placed on its own foundation to quickly build a tall tower.
Break It Down
When Scaffolding is broken, it will also break every Scaffolding block that was being supported by it. This will let you quickly clean up your scaffolding by breaking only the supporting blocks!
Structure Blocks
Structure Blocks give creators the ability to copy and save out sections of their world into structures. Saved structures can then be pasted back into the world.
How to Obtain
To get a Structure Block you must use the /give slash command. To use a Structure Block, you must have Operator permissions.
Modes
Structure Blocks have 4 modes that can be switched between with the Mode dropdown: Save, Load, Corner, and 3D export.
Save mode saves an area of the world as a structure.
Load mode loads a structure into the world. Only structures saved in the world or included in a behavior pack that is applied to the world can be loaded.
Corner mode is used with save mode's detect button to automatically set the area you want to save. See the Corner Mode section below for more details.
3D Export exports a 3D model file on supported platforms.
Preview Window
On the right side of the Structure Block screen, a preview of the area you have selected or the structure to load will appear depending on the mode the block is in.
Press ![]() and drag, to rotate the 3D preview.
and drag, to rotate the 3D preview.
Redstone Activation
Redstone can be used to activate a Structure Block. This will cause it to either save a structure out or load a structure into the world, depending on the mode of the block and its settings.
Integrity and Seed
You can change how much of the structure is loaded in by changing the values for Integrity and Seed.
Integrity - the percentage of blocks to load in from the structure, accepted values are 0 to 100. Blocks will be chosen randomly if a Seed is not specified.
Seed - the value entered here will determine which blocks to remove when using Integrity. Leave this field blank if you want the blocks to be chosen randomly.
Structure Void Blocks
When a structure with Structure Void blocks is loaded into the world, any block that would have been removed where the structure void block is loading into, will instead stay in the world.
Example: loading an empty shipwreck into the bottom of the ocean will normally copy air over the water blocks. If the shipwreck was filled with structure void, then the water will stay, and you will have a shipwreck filled with water.
Detect and Corner Mode
To automatically select the area you want to save, you can place Corner Mode blocks around your structure and name them with the save name as the structure you want to save.
Pressing the Detect button in Corner Mode will find all of the Corner Blocks with the same name and create a selection so that it will save everything inside of the volume those Corner Blocks make.
Tools
There are many tools in Minecraft that will allow you mine blocks faster than your fist. Tools can be crafted from Wood, Stone, Iron, Gold, Diamond, or Netherite.
Using the right tool for the job will not only mine that block faster, but will also cost less durability. More complex tools must be created in order to mine rarer resources.
Tools that Break Stuff
- The Pickaxe is good at breaking hard blocks like Cobblestone, Iron, or Furnaces.
- The Axe is good at breaking wooden blocks like Logs, Planks, or Crafting Tables.
- The Shovel is good at breaking loose blocks like Dirt, Sand, and Gravel. Shovels can also create a path by pressing
 on grass blocks.
 - The Hoe is required for tilling Dirt to plant crops. Press on Dirt or Grass blocks to turn them into Farmland.
Other Tools
There are even more tools to aid you on your adventure:
- A Bucket will allow you to collect things like Water, Milk, Lava, and even Fish.
- Flint & Steel allows you to light fires... be careful in densely wooded areas!
- A Fishing Rod lets you catch fish and other loot from water blocks. It can also be used to pull other players and mobs. Fishing Rods can also be enchanted!
- Shears are very handy for collecting items like Wool, Leaves, and Cobwebs.
Transportation
There are many ways to get around other than walking or riding a mount or flying.
Minecarts
Minecarts are ridable carts that roll on Rails. You can make the Rails go wherever you want by placing them next to each other. Place a Minecart on the Rails and you are ready to ride.
Boats
Boats let you travel across water. Place one on a water block and you are ready to go.
Villager Trading
Trading can be done in villages. Each villager has a profession; they can be Farmers, Butchers, Blacksmiths, Cartographers, Librarians, or Priests. Some professions trade for items that other professions cannot. Explore and trade with many villagers to find all the trades.
Goods for Emeralds
You can find out what a villager is offering as trade by interacting with them. A villager may adjust the price of a trade whenever a player trades with it. A villager may run out of stock, temporarily disabling the trade if it is used too frequently. Trades usually involve buying or selling items for emeralds.
As you trade with villagers, they will get better at their profession and start to offer better and more valuable trades.
Take care of your villagers, they need to rest, work, and eat to thrive.
Weapons
Sword
The sword is the primary melee weapon in Minecraft. It can be made from Wood, Stone, Iron, Gold, Diamond, or Netherite. Jump attacks do critical damage!
Press ![]() with a Sword in your hand to attack.
with a Sword in your hand to attack.
Bow
The Bow is the primary ranged weapon in Minecraft. Press and hold ![]() to draw the bow back. Release
to draw the bow back. Release ![]() to fire an arrow. The bow requires arrows to fire.
to fire an arrow. The bow requires arrows to fire.
Bows do more damage the further they are pulled back, make sure to pull it all the way back.
Crossbow
The crossbow is an alternate ranged weapon. Press and hold ![]() to load the crossbow. Once the Crossbow is loaded, it will stay loaded until it is fired. Press
to load the crossbow. Once the Crossbow is loaded, it will stay loaded until it is fired. Press ![]() to fire an arrow. The Crossbow requires arrows to load.
to fire an arrow. The Crossbow requires arrows to load.
Trident
The Trident is a dual-purpose melee and ranged weapon. Press ![]() to attack. Press and hold
to attack. Press and hold ![]() to draw the trident back. Release
to draw the trident back. Release ![]() to throw the trident. The Trident is the best weapon underwater.
to throw the trident. The Trident is the best weapon underwater.
Enchanted Weapons
The Sword, Bow, Crossbow, and Trident have specific enchantments that you can get from the Enchanting Table or Anvil that will improve damage, durability, and even light mobs on fire!
Stands & Tables
Anvil
Experience Levels can be used to repair, enchant, or rename items with the Anvil.
Renaming and Applying Enchantments
All items can be renamed, although only items with durability can be repaired or enchanted with Books on the Anvil.
Repairing
An item can be repaired by placing it in one of the input slots on the left, along with either some raw materials of the item, like Iron Ingots for an Iron Sword, or combined with another item of the same type.
Combining items is more efficient when done with an Anvil.
There is a chance that the Anvil will be damaged with each use and after enought usage it will be destroyed.
Brewing Stand
Brewing potions requires a Brewing Stand. Every potion starts off with a bottle of water, which is made by filling a Glass Bottle with water from a Cauldron or water source.
Know your Brewing Stand
A Brewing Stand has three slots for creating different potions. One ingredient can be used over all three bottles, so always brew three potions at the same time to best use your resources.
Ingredients and Potions
Putting Nether Wart in the top position of the Brewing Stand will give you an Awkward Potion. This doesn't have any effect by itself, but creates a base potion that can be used to create more advanced potions.
There are many potion effects to discover, experiment with different ingredients and combinations to become a true alchemist.
Cauldron
The Cauldron is a container that can hold buckets or bottles of liquid.
Filling
Press ![]() on a Cauldron while holding a Bucket of Water or a Potion to fill the Cauldron with its contents.
on a Cauldron while holding a Bucket of Water or a Potion to fill the Cauldron with its contents.
A Potion will only partially fill a cauldron, so you will have to use multiple Potions to fill it up completely.
Dipping Arrows
Press ![]() on a Cauldron with your Arrow in your hand to create all kinds of different arrows.
on a Cauldron with your Arrow in your hand to create all kinds of different arrows.
Dyeing Armor
To dye Leather Armor or Leather Horse Armor, press ![]() on a Cauldron filled with water while holding the desired dye. This will change the color of the water inside of the Cauldron. Then dip your armor into the Cauldron by pressing
on a Cauldron filled with water while holding the desired dye. This will change the color of the water inside of the Cauldron. Then dip your armor into the Cauldron by pressing ![]() with armor in your hand.
with armor in your hand.
If you want to wash the dye off, dip the dyed item into a Cauldron of undyed Water.
Crafting Table
The Crafting Table will let you craft more complicated recipes.
Place it in the world, then press ![]() on the Crafting Table to use it.
on the Crafting Table to use it.
Enchanting Table
The Experience Points collected by picking up Experience Orbs can be used to enchant Weapons, Armor, Tools, and Books.
Enchanting
When an enchantable item is placed in the slot below the book in the Enchantment Table, the three buttons to the right of the slot will display some enchantments with their Experience Level cost and Lapis Lazuli cost.
The actual enchantment applied is randomly selected based on the cost displayed.
Stronger Enchantments
If the Enchantment Table is surrounded by Bookshelves (up to a maximum of 15), with a one block gap between the Bookshelf and the Enchantment Table, arcane glyphs will be seen going to the book on the Enchantment Table and the potency of the enchantments will be increased.
Enchanting Books
Enchanted Books are used at the Anvil to apply enchantments to items. This gives you more control over which enchantments you would like on your items.
Furnace
A Furnace allows you to cook or smelt items. For example, you can smelt Iron Ore into Iron Ingots.
Place the furnace in the world and press ![]() to use it.
to use it.
You need to put some fuel into the bottom of the Furnace, and the item that you want smelted in the top. The Furnace will then fire up and start working. Lots of things can be used as fuel; try experimenting with anything burnable!
Loom
The Loom is a fast and efficient way to apply patterns to Banners. The Loom only uses one Dye to apply a pattern. It can also use Loom patterns to apply special patterns.
Weaving
By placing a Banner into the Loom's first slot, and any color dye into the second slot, patterns can be added to the Banner. Once a pattern is selected, take it from the output slot on the right and move it to your inventory.
A Banner can have multiple layers allowing you to experiment with many different banner possibilities. Up to 6 patterns can be applied to a Banner to create a unique design.
Loom Patterns
Adding a Loom Pattern to the loom's third slot allows the crafting of special patterns like a creeper face or a flower pattern. You will not lose your Loom Patterns when you apply these patterns to your Banners.
Smithing Table
Want to get the most out of your equipment? You'll need a Smithing Table.
Use it to make all kind of changes, for example by upgrading Diamond equipment to Netherite, or by making cosmetic changes with Armor Trims.
Smithing Templates
In order to upgrade your equipment, you'll need a Smithing Template. You can find a large variety throughout the world, which can be used for all kinds of upgrades.
Place a Template into the leftmost slot of a Smithing Table to see which items you need for the upgrade.
For example, to upgrade Diamond equipment to Netherite, you need a Netherite Upgrade Smithing Template, which you can find in Bastion Remnants. Then, place the Diamond equipment in the equipment slot and a Netherite Ingot in the ingredient slot, and you're done!
Item properties such as enchantments and armor trims will be retained, but the Smithing Template will be consumed when you upgrade your equipment. Don't worry - you can craft copies of them with your Crafting Table.
Armor Trims
Get creative and customize the look of your armor with Armor Trims. You'll need an Armor Trim Smithing Template to get started, which you can find throughout the world.
Place a Template into the leftmost slot of a Smithing Table to see which items you need for the upgrade. Then place a piece of armor in the equipment slot and a crystal or ingot in the ingredient slot. Done!
Only certain crystals and ingots can be used for Armor Trims. Try different kinds like Iron, Gold, or Lapis to create unique designs!
Redstone Engineering
Droppers
When powered by Redstone, Droppers will drop a single random item contained within. Press ![]() on the Dropper to open it and then you can load it with items from your inventory.
on the Dropper to open it and then you can load it with items from your inventory.
Usage
If a Dropper is facing a Chest or another type of container, the item will be placed into that instead. Long chains of Droppers can be constructed to transport items over a distance.
Dispensers
Dispensers are used to shoot out items. You will need to power each Dispenser with a redstone signal (for example, with a lever) to trigger it.
To fill a Dispenser with items, press ![]() on the Dispenser, then move the items that you want to dispense from your inventory to the Dispenser.
on the Dispenser, then move the items that you want to dispense from your inventory to the Dispenser.
Usage
Whenever you power a Dispenser, an item will shoot out.
Dispensers can also be used to place items as well, such as Pumpkins on Iron Golems and equipment on Armor Stands.
Hoppers
Hoppers are used to automatically move items. Hoppers can be attached to some other items like containers such as Chests or Jukeboxes.
Hoppers will continuously remove items out of a container placed above them and move them into the container they are pointing to.
Usage
To make a Hopper point to a particular block, place the Hopper against that block while sneaking.
If a Hopper is powered by Redstone, it will become inactive and stop moving items.
Jukebox
The Jukebox will play Music Discs that you have found.
Get the Party Started
Press ![]() on a Jukebox with a Music Disc in your hand to play it. Press
on a Jukebox with a Music Disc in your hand to play it. Press ![]() the Jukebox again to eject the Music Disc.
the Jukebox again to eject the Music Disc.
Redstone
When a Jukebox is playing a Music Disc, it will power Redstone Dust.
Try different Music Discs for a different power level.
See what happens when you let it play to the end.
A Hopper can put a Music Disc in for you, and take it out when it's done playing.
Finding Music Discs
There are a couple of Music Discs that can be found in Chests around the world.
Others are more difficult to come by; Creepers secretly appreciate music.
Redstone
Redstone Dust comes from Redstone that transmits an electrical signal. When it has power it lights up and transmits its signal to other Redstone items that are next to it.
Redstone Power
In order for one of these items to be powered, it needs a power source such as a Lever, Button, or Pressure Plate. Experiment to find them all!
Place some Redstone Dust next to a power source and turn it on to power it.
There are many items that use a Redstone signal to do something, such as a Hopper or a Piston.
Redstone allows for endless possibilities! Try creating something useful for yourself like an automatic farm!
The End Dimension
The End
The End is another dimension which can be accessed through an active End Portal. The End Portal can be found in a Stronghold, which is deep underground in the Overworld.
Every End Portal frame block is missing something mysterious to bring out the power within.
The Other Side
Once the portal is active, jump into it to go to The End.
The End is home to the dreaded Ender Dragon. She is a fierce and powerful enemy and seems to draw power from strange crystals. Her breath and fireball attacks leave lingering acid across the battlefield. Bring some friends to ensure your victory!
If once wasn't enough, add four End Crystals to the exit portal corners to reawaken the Ender Dragon.
Eye Of Ender
Eyes of Ender are mysteriously connected to the End and will behave strangely when used.
Rumor has it that they can lead you to open another dimension.
End Cities
After killing the Ender Dragon, an End Gateway will appear. Throwing an Ender Pearl into the portal will teleport you to the outer islands.
This alien new landscape must hide something interesting, and maybe something to bring back with you.
Elytra
Elytra are an item that can be equipped to allow gliding. Elytra are equipped in the chest armor slot.
Elytra cannot be crafted, but are found in Item Frames in rare End Ships, guarded by fearsome Shulkers.
Learn to Fly
When equipped with Elytra, a player can press SPACE while falling to start gliding. Note that you need to be quite high to really get the full effect.
While gliding, you can steer by looking around. If you look downwards, you'll move faster - but you'll also hit the ground sooner. If you look upwards, you'll gain some height - but do it for to long and you'll stall, falling instead of rising!
Your Elytra will slowly lose durability while flying, and if they break mid-flight you'll fall. You can repair them by combining them with Phantom Membrane at an Anvil.
Rocket Powered Flight
Firework Rockets that have no effects can be used to extend Elytra flight. You will be if you use a Firework Rocket that has effects to extend flight.
Shulkers
Combine two Shulker Shells with a Chest to create a Shulker Box. Shulker Shells are dropped by Shulkers found in End Cities. Unlike other containers, Shulker Boxes keep their items when broken. Shulker Boxes will break and drop as an item if pushed by Pistons, and can be placed using Dispensers.
Options & Cheats
Game Settings
When creating a world, you have many options. Below are the various settings that can be used to fine tune your experience. Don't worry if you didn't set them when you created the world, they can be changed at any time.
- World Name: This is where you can name your world.
- Default Game Mode: This is the gamemode that all new players to the world will start with. You can have players start in either survival or creative mode. Selecting creative mode will turn cheats on.
- Difficulty: This setting affects how difficult the world will be. You can choose Peaceful, Easy, Normal, or Hard.
World Preferences
- Starting Map: If this setting is turned on, every player will start with a map in their hotbar.
- Bonus Chest: If this setting is turned on, there will be a chest with some starting loot near your initial spawn location.
- World Type: This setting controls the way the world is created. Select Infinite or Flat from the drop down menu to change the world type.
- Infinite worlds go on and on forever.
- Flat worlds do not have any hills or trees, just an infinite flat area to fill with your creations.
- Seed: This is a unique number for the world. By entering a seed when you make a new world, you can control how it is created. You can also use a word or phrase for the seed and the game will convert it to a number for you.
Cheats and Gamerules
- Activate Cheats: This setting allows players to use commands. When a world is created with this setting on, all achievements are disabled.
Below are gamerules, cheats must be turned on to use them:
- Always Day: Night will never fall when this setting is turned on.
- Do Daylight Cycle: The time will not advance when this setting is turned off.
- Keep Inventory: This setting allows players to keep their inventory when they die.
- Mob Spawning: This prevents all mobs from spawning when this setting is off.
- Mob Griefing: Prevents mobs from destroying the world.
- Entities Drop Loot: Controls whether things like minecarts and armor stands drop themselves when they are broken.
- Weather Cycle: The weather will not change when this setting is turned off.
Difficulty
Minecraft has varying levels of difficulty so you can tailor the game to your level.
Peaceful
No hostile mobs will spawn except for Shulkers and the Ender Dragon, but they won't do any damage to you.
Easy
Hostile mobs spawn but deal less damage. Hunger bar depletes and drains health down to 5 hearts.
Normal
Hostile mobs will do normal damage to you, and if your hunger level drops to zero your health will begin to drop, but you won't die.
Hard
Hostile mobs will do more damage, zombies will break through doors, and if your hunger level drops to zero, your health will drop and you could die.
Adventure Mode
Adventure Mode is a gamemode for world builders. In Adventure Mode, players must use special tools to place or break blocks.
To get these specual tools, you must use /give with canplace or candestroy parameters while in creative mode.
Creative Mode
Creative Mode is there so you can build the land of your dreams mob free!
Unlimited Building
The creative mode interface allows any item in the game to be moved into the player's inventory without the need for mining or crafting the item. The items in the player's inventory will not be removed when they are placed or used in the world, and this allows the player to focus on building rather than resource gathering.
If you create, load, or save a world in Creative Mode, that world will have achievements and leaderboard updates disabled for that world, even if it then loaded in Survival Mode.
Flying
To fly when in Creative Mode, press SPACE twice quickly. To exit flying, repeat the action. To fly faster, press W twice in rapid succession, or press CONTROL while flying. When in flying mode, you can hold down SPACE to move up and SHIFT to move down.
Commands
Commands can be executed from Chat. Type / before you type the command.
There are multitudes of commands that will allow you to do amazing things. There are many sources out there that provide you with all of the info that you'll ever need.
Host and Player Options
When playing with cheats on, host options will allow you to teleport yourself or friends, change the weather, set the time of day, and change the entry point or world spawn of your game. Once cheats are enabled, you can find these options in the chat window by pressing the [/] button next to the chat bar.
Command Blocks
Command Blocks are a powerful tool for map creators. They store and execute commands upon receiving a Redstone signal.
To get a command block you must use /give.
When a command block has either executed or failed to execute its stored command, it sends a Redstone signal from the side where the arrow is pointing.
You can set the name of the command block in the Hover Note field.
Block type - There are three types of command blocks, each with their own color and behavior:
- Impulse - Only executes the stored command when the block receives a redstone signal.
- Chain - Executes the stored command when the command block behind it has or has not executed its command.
- Repeat - Once activated, this Command Block will continue executing its stored command as long as it exists.
Condition - There are two conditions, each will affect the behavior of the Command Block:
- Unconditional - Executes the stored command even if the Command Block behind it failed to execute its command.
- Conditional - Executes the stored command only if the Command Block behind it succeeded in executing its command.
Redstone - There are two redstone settings, each will affect the behavior of the Command Block:
- Needs Redstone - Requires a redstone signal to activate.
- Always Active - Does not require a redstone signal to activate.
A Command Block also shows you its previous output. This will help you figure out if a Command Block failed to execute its command and why.
Realms
Realms Stories
A social hub for you and all the members on the Realm. Share your adventures and creations by posting stories to the Story Feed, like and comment to celebrate stories posted by other members.
Tell your story
Clicking the ADD STORY button on the Story Feed will let you write a story of your own. You can choose to include a screenshot or text (or both!). Clicking the POST button will post your text/screenshot to the Story Feed for all the Realm's members to enjoy. If you don't have any screenshots to post, use the camera ![]() on the game menu to capture the moment.
on the game menu to capture the moment.
Stay up to date
Whenever there is a new story in the Feed that you haven't read yet, a number will appear on the REALMS STORIES button. You'll always know when there is something new to read from your Realm's community. If you like what someone shared, go ahead and leave them a like or comment on their story!
Organize play
See who's playing and when in the Timeline. Scroll through the members of the Realm to see when they played last and who they played with. Use this information to set up time when you can all play together.
Know who is on the Realm
Get to know who is part of the Realm by using the Members tab. It's a list of all the players who can play here. You can see who the Realm owner is, who the operators are, and who has joined Realms Stories for this Realm. There are search, sort, and filter options to help you find exactly who you're looking for.
Connect from anywhere
Realms Stories is available in the game menu when you're playing in the Realm and on the Realms tab. You can keep up to date and tell your story from anywhere you are, even when you aren't playing. From your console, computer, and mobile device, Realms Stories is available everywhere.
Marketplace
Minecoins
Explore a world of possibility with Minecoins: Minecraft's in-game currency! Minecoins let you add variety to your gameplay across supported Minecraft games.
Once redeemed, your Minecoins are linked to your Microsoft account, so you can access your coins and purchases on other supported devices, too!
Get Minecoins
This button takes the player to the Minecoins purchase screen in the Marketplace.
Disclaimer
*Minecoins require a version of Minecraft: Bedrock Edition with Minecraft Marketplace. Minecoins are not compatible on PlayStation®. For compability information see minecraft.net/minecoins.
Add-Ons
Add-Ons are a content type available in the Minecraft Marketplace that lets you add custom blocks, items, mobs, recipes, and other game content to your world.
Add-Ons allow you to modify your existing worlds and Realms through the Edit World screen and the Create New World screen.
Stacking Add-Ons
Stacking, or adding multiple Add-Ons, can increase loading times, and could result in unexpected results.
We recommend that you save a copy of your world or Realm before adding or removing Add-Ons.
For more information about how you can make the most out of your Add-Ons, you can visit our FAQ page.
Add-On FAQs
This button takes the player to this page in the Minecraft Help Center.
Worlds
Worlds in the Minecraft Marketplace are Minecraft levels where our partners have altered the terrain and placed new blocks to create amazing structures and terrain for you to explore and enjoy.
Worlds can also include new items, mobs, blocks, and even custom gameplay.
All of the content in the Marketplace is created by our professional commiunity [sic] creators.
Worlds can do so much, we've created several Sub-Categories to help describe what they can do:
Mini-Games
Mini-Games are smaller worlds that include new game mechanics, challenges, or rules.
These games are made with multiplayer in mind, letting you test your skills and have fun with your friends.
Survival Spawns
Survival Spawns let you start playing in a custom-built world, while still enjoying the classic survival mechanics of Minecraft.
Just like in Survival mode you will have health and hunger, and need to find dangerous mobs.
Adventure Maps
Adventure Maps let you use Minecraft to play a totally different kind of game.
You can not break blocks or place new blocks in these worlds.
Dynamic Worlds
Dynamic Worlds allow you to explore the creative designs of our marketplace creators in a randomly generated map.
Worlds can have new biomes, customized structures (randomly generated buildings), new blocks, textures, and mobs.
Textures
Texture packs visually transform the game's appearance, applying a fresh coat of paint to your Minecraft world.
Skins
Put on some fresh pixels and express yourself with a huge variety of different looks.
Mashups
Explore thrilling themed worlds, parceled up with matching skins, textures and more!
Education
World Builder
To place or use certain Education Edition blocks or items, a player must possess a special ability called "world builder".
With cheats activated, the host can enable or disable the world builder ability for any players in the world.
To grant world builder ability to all players in the world, run the following command: /ability @a worldbuilder true
To quickly toggle your own World Builder ability, run either of the following commands: /worldbuilder or /wb
To query your World Builder ability, run the following command: /ability @p worldbuilder
Permission Blocks
In Minecraft Education, special blocks make it easier for teachers to create and employ lessons. Only players with World Builder ability can place and destroy these blocks. Only players without World Builder ability are subject to the restrictions imposed by these blocks.
Allow and Deny
Allow and Deny blocks control where players can build in a world.
Players can place or destroy blocks above Allow blocks. Players cannot place or destroy blocks above Deny blocks.
Allow and Deny blocks do not affect the area below them.
An Allow block with a Deny block somewhere below it prevents players from building in the space between the two blocks. Above the Allow block, players can place and destroy blocks.
Border
Border blocks provide a force field that extends infinitely upward and downward, regardless of the presence of other blocks. Players cannot move through, over, or under a border block. Players cannot place or destroy blocks that are above or below a border block.
Chalkboards
Chalkboards are used to display text in the world. Chalkboards display more text than signs, can be edited after they have been placed, and come in three sizes: slate, poster, and board. The lock toggle allows you to prevent non-World Builders from destroying or editing your chalkboards.
| Displayed in keyboard controls | Displayed in touch controls | Displayed in gamepad controls | Displayed in the Oculus Rift | Displayed in Windows Mixed Reality |
|---|---|---|---|---|
| Press :_input_key.use: on an existing chalkboard to edit it. | Tap an existing chalkboard to edit it. | Press :_input_key.use: on an existing chalkboard to edit it. | Press :_input_key.use: on an existing chalkboard to edit it. | Press :_input_key.use: on an existing chalkboard to edit it. |
Chemistry
Students can simulate real world chemistry by using the Chemistry Equipment blocks. Build any of the 118 different elements by adjusting the sliders in the element constructor or view the composition of elements by placing them in the element constructor. Combine elements in the compound creator to produce chemical compounds. Put elements and compounds into the lab table to create Minecraft items. Reduce blocks to their component elements with the material reducer.
Download the chemistry journal from the Minecraft: Education Edition website for a comprehensive guide to chemistry in Minecraft.
Non-player characters
A non-player character (NPC) can provide additional lesson information, hints, or instructions.
Only world builders can place, delete, name, or edit NPCs. NPCs can execute commands and link to websites. Commands can be assigned to buttons in the NPC's dialog window; website links always have a button.
NPCs have a variety of skins to choose from and are immobile.
Camera
The camera allows players to take pictures in the world.
Pictures can be viewed in the portfolio or inserted into the book and quill.
| Displayed in keyboard controls | Displayed in touch controls | Displayed in gamepad controls | Displayed in the Oculus Rift | Displayed in Windows Mixed Reality |
|---|---|---|---|---|
| To take a picture from your point of view, press :_input_key.use:. To take a selfie, place a camera and press :_input_key.use: on it. | To take a picture from your point of view, tap and hold, then release. To take a selfie, place a camera and tap the Take Picture button. | To take a picture from your point of view, press :_input_key.use:. To take a selfie, place a camera and press :_input_key.use: on it. | TTo take a picture from your point of view, press :_input_key.use:. To take a selfie, place a camera and press :_input_key.use: on it. | To take a picture from your point of view, press :_input_key.use:. To take a selfie, place a camera and press :_input_key.use: on it. |
Portfolio
Pictures you have taken appear in the portfolio.
When viewing the portfolio, you can add captions to pictures, delete pictures, or export pictures as a series of images.
| Displayed in keyboard controls | Displayed in touch controls | Displayed in gamepad controls | Displayed in the Oculus Rift | Displayed in Windows Mixed Reality |
|---|---|---|---|---|
| Press :_input_key.use: to view the Portfolio. | Pictures you have taken appear in the Portfolio. Tap and hold to view the Portfolio. | Pictures you have taken appear in the Portfolio. Press :_input_key.use: to view the Portfolio. | Pictures you have taken appear in the Portfolio. Press :_input_key.use: to view the Portfolio. | Pictures you have taken appear in the Portfolio. Press :_input_key.use: to view the Portfolio. |
Classroom Mode
Classroom mode is an external application that provides educators with features designed to facilitate interaction with students. You can download classroom mode from the Minecraft: Education Edition website.
As the host of a world, use the command /classroommode to launch the classroom mode app and connect it to Minecraft: Education Edition.
Code Builder
Code builder allows players to explore, create, and play in Minecraft by writing code using familiar learn-to-code platforms.
| Displayed in keyboard controls | Displayed in touch controls | Displayed in gamepad controls | Displayed in the Oculus Rift | Displayed in Windows Mixed Reality |
|---|---|---|---|---|
| Launch Code Builder by pressing :_input_key.codeBuilder: or by using the command /code. | Launch Code Builder by tapping :code_builder_button: or by using the command /code. | Launch Code Builder by pressing :_input_key.codeBuilder: or by using the command /code. | Launch Code Builder by pressing :_input_key.codeBuilder: or by using the command /code. | Launch Code Builder by pressing :_input_key.codeBuilder: or by using the command /code. |
History
External links
| Editions |
| ||||||
|---|---|---|---|---|---|---|---|
| Development |
| ||||||
| Technical |
| ||||||
| Multiplayer | |||||||
| Exclusive features |
| ||||||
| Removed | |||||||
| |||||||||||||||||||
| |||||||||||||||||||