Tutorial:Beginner's guide
Note: New beginner's guide, still needs polishing.
This is a beginner's guide provided to help you start out in Minecraft. This guide will teach you all about the basics of Minecraft Survival mode.
Before continuing, make sure you have bought and downloaded the game. You must create your world before starting this tutorial.
This tutorial mostly assumes that you are playing using a keyboard and mouse. That is, either on Java Edition, or Bedrock Edition on a PC. However, there will still be parts where other methods of controls are mentioned. The tutorial will mostly describe mechanics and other features of the game as they are in Java Edition, but Bedrock Edition will be mentioned if the feature in the two editions differ significantly.
This tutorial also assume you are playing in Normal difficulty. Some mechanics in Easy difficulty and Hard difficulty may differ from those in Normal difficulty.
The basics of Survival mode
In Survival mode, your character can die when you take enough damage and your health gets depleted to zero. Your health bar can be found at the bottom of your screen, indicated by red heart symbols. You have 20 HP (10 hearts, ![]()
![]()
![]()
![]()
![]()
![]()
![]()
![]()
![]()
![]() ). Dying does not end your game unless you are in Hardcore mode. The most basic way to restore health is by eating food and increasing your hunger (
). Dying does not end your game unless you are in Hardcore mode. The most basic way to restore health is by eating food and increasing your hunger (![]()
![]()
![]()
![]()
![]()
![]()
![]()
![]()
![]()
![]() ).
).
On death, you will drop any item you were holding in your inventory on death and lose them when you respawn, and you will respawn at the world spawn. You can then retrieve your items by returning to where you died, provided they have not despawned yet.
Initially, every death will respawn you at the world spawn, but you can change your respawn location. You may do so with some blocks, one of which is with a bed.
Keeping your items after death
If you wish to keep your items in your inventory after you die and you have not created your world yet, click on "Create New World", then select the "More" tab. After that, click on "Game Rules" and scroll until you see the option "Keep inventory after death", and click on the button to the right of the text such that it says "ON".
If you already have an existing world and have commands enabled or have your world opened to LAN, press the T key to open the chat, then type the following: /gamerule keepInventory true. If you want to disable it (to the default state), type the following instead: /gamerule keepInventory false.
Basic controls
Knowing how to control your movement and the game itself is extremely important if you actually want to play the game. There are a few essential keys you will need to play the game, but there are also multiple others that will help you in the game.
| Default control (key) | Action | Remarks |
|---|---|---|
| W | Move forward | Ctrl + W or double-tap W to sprint. |
| S | Move backward | |
| A | Strafe left | |
| D | Strafe right | |
| Space | Jump | |
| Left Shift | Sneak/crouch | |
| E | Open/close inventory | |
| Q | Drop item | Ctrl + Q to drop a stack of items at once. |
| Esc | Pause and open pause menu | F3 + Esc to pause the game without opening the pause menu. |
| Default control (mouse) | Action | Remarks |
|---|---|---|
| Attack/hit | ||
| Use/interact with/place block | If the block you are looking at has a GUI, press Left Shift + | |
| Turning your character / aiming | ||
| Picking block from inventory | If the block you are looking at exists in your hotbar, it will move your current selected hotbar slot to the slot with the block; if the block you are looking at exists in your inventory, it will swap the item you are currently holding with the block you looked at; if the block doesn't exist anywhere within your inventory, it will do nothing. | |
| Scrolls through chat when opened, otherwise, it scrolls through the hotbar, provided there is no GUI open. |
There are also some other useful controls you might find helpful. You may skip this part if you do not feel like remembering more controls.
| Default control (key) | Action | Remarks |
|---|---|---|
| T | Open the chat | Pressing / does the same, except it automatically enters / at the start of your message for you to perform a command.
|
| 1 - 9 | Go to corresponding hotbar slot when no GUI is opened | 1 corresponds to the first slot, 2 corresponds to the second, etc. 0 has no corresponding slot. |
| F3 | Open the debug menu | The debug menu is especially useful for obtaining information like your coordinates, your current biome and the block you are currently looking at. You can close the debug menu by pressing F3 as well. |
| F2 | Take a screenshot of what your current screen | |
| F5 | Toggle your current perspective | Toggles between first person (the default), third person from the back and third person from the front. |
Customizing your controls
Controls can be customized according to your liking. Here are a few examples:
- If you're left-handed, you can customize your keys for moving from WASD to something towards the right of the keyboard, e.g.: IJKL or UHJK. Note that you may have to unbind some other controls for them, e.g. advancements, which defaults to L.
- As the default key for throwing items, Q, is right next to the default key for moving forward, W, you can customize it to be away from your movement keys, e.g. O or K.
- If you'd like to play fully with a keyboard, you can set your key for attacking/hitting and your key for using/interacting with/placing blocks (
 Left Click /
  Right Click) into any key, e.g. V and N respectively, though this will make it less convenient to play with as you will lose access to the mouse, which is required to move your character around.
More about controls — controller & touchscreen
Most of the article assumes you are using a keyboard and mouse. Here's a brief summary for other control methods like game controllers or touchscreens:
Mining, attacking, and using items all involve targeting a spot on the screen. While many versions of the game use a cursor at the screen center for targeting, touchscreens allow players to tap on the screen for targeting. Only blocks near you can be targeted, with a highlighted outline or brighter appearance indicating selection. Your selection affects how these actions are performed. Using depends on what you're looking at and holding, while attacking and mining also use the same selection method.
The buttons for attacking and mining are consistent, but attacking only requires a tap while mining requires you to press. These actions can consume blocks, change tools, and vary based on your held item.
If you would like a list of controls on these devices, read the control page for controllers or touchscreen.
Before you start
Before you actually begin playing, you'll need to consider where your world spawn is.
Biomes — an introduction & special cases
The Minecraft world is divided into different areas called "biomes". Different biomes contain different blocks and plants and change how the land is shaped. There is an advancement that includes finding all the biomes, though you won't need to worry about them for now. Biomes affect you, especially at the beginning of the game, but you mostly do not need to worry about specific biomes until you have learned how to play the game. There are a few spawning biomes you'll have to take note of, as they will affect how you play in the early game.
| Biome | Image | Hints you're in the biome | Things to do / note |
|---|---|---|---|
| Desert | 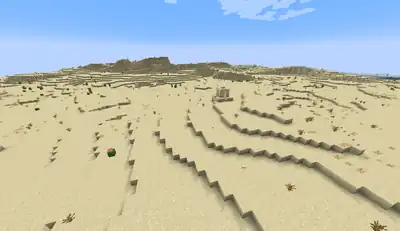 |
A lot of sand and cacti | Climb to high ground and search for vegetation. If you don't see any greenery, consider restarting, as deserts lack crucial resources like wood and stone needed for a good start.
If you insist on playing when starting here, you may find this article helpful. |
| Dark Forest | 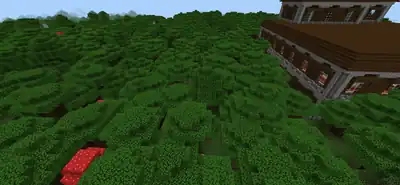 |
Darker oak-like trees, darker grass color, large mushrooms | Move to more open ground to avoid hostile mob spawns in shaded areas during the day. Once equipped, the dark forest becomes a resource-rich area for materials and food. |
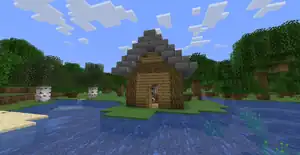
| Swamp | 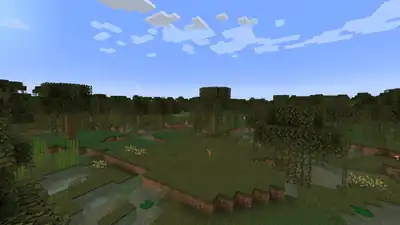 |
Oak trees with vines, lily pads, large amounts of green-gray water | As a swamp can be quite small, you may want to leave the swamp if you're close to other biomes. However, if you choose to stay, beware of the wooden huts within the biome, as there will be residents there that may harm you. |
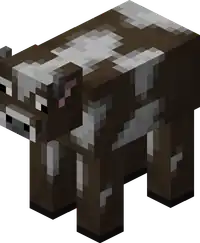
| Mushroom Fields | 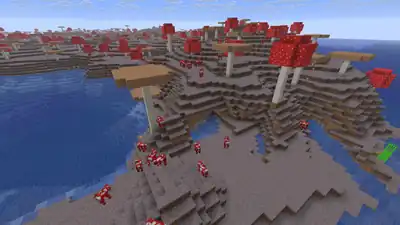 |
Purple-gray "dirt", "cows" with mushrooms attached to them | Hostile creatures do not spawn here, making it a safe location to establish a base. While you'll need to find wood and other resources, this biome offers a stable starting point for beginners. |
| Area | Image | Things to do / note |
|---|---|---|
| Island |  |
Head to the highest point and look for nearby land. If you spot a larger landmass with trees and animals, swim towards it. Otherwise, if you're isolated on an ocean spawn, you might want to start a new world for an easier beginning. |
Structures & how they affect your game
Villages If you see houses and other buildings nearby, it means that you are near a village, which is a good thing. In fact, a village lets you skip past much of the first and second-day activities (due to ready-made shelter and beds) but it requires a bit of care. It's worth exploring the village and looting any chests you find; if you happen to find any emeralds, you might even be able to buy some useful items from the villagers. Besides providing equipment, food and other resources, a village also lets you collect the seeds for all four of the basic crops up front, from their farms, and you can also take one of their beds with you when you leave. You can even grab a few blocks of wood or cobblestone from their houses, but try not to damage the village too much, since cobblestone takes longer to mine compared to normal stone in caves. — your best bet may be to disassemble one of the smaller houses for the wood and move its bed to one of the intact houses. (Don't bother doing this in a desert village, the sandstone is pretty but fragile, and you can't make tools out of it.)

If you see an iron golem trundling around, be careful — If you attack it or the villagers, it becomes hostile to you. It drops iron when killed, but make sure to be in a high place or at least 3 blocks higher than the golem before attacking it, since it deals 7.5 to 21.5 damage per hit, easily killing a player without armor in 2 hits.
![]() Right click on the villagers to open the trading interface. Do not attack them as they become upset, raising their prices. If an iron golem notices you, they may become hostile at you.
Right click on the villagers to open the trading interface. Do not attack them as they become upset, raising their prices. If an iron golem notices you, they may become hostile at you.
As you originally encounter them, villagers can sell useful early-game items like iron tools, armor and weapons, but remember that eventually you can mine for your own iron and such. Don't bother buying stone tools unless you're in a desert, and maybe not even then. You can also harvest wheat and vegetables from village farms, but, unless there is a farmer villager to replant the crops, be sure to replant them afterward so they grow back over time. You can even sell the crops you harvested back to the farmers. You can also harvest any hay bales from the vicinity and craft them back into wheat, and sell the wheat to any farmer you find (or make bread out of it for yourself).
Any time you are near a village, you can sleep in one of their beds overnight, as soon as night falls. Trying to stay up overnight can expose the village to attacks by monsters, which can easily wipe out the villagers. It's okay if a villager has already claimed the bed — trying to use the bed the first time simply kicks the villager out, and then you can use the bed again for yourself. If you have a village, you should probably travel some distance from it (say, fifty or a hundred or so blocks from the edge) to make your own lair, to avoid having monsters appear overnight due to your presence. If monsters (such as illagers) do appear during the day, your best bet at this point is to ring one of the bells in the village, and hope that the village's iron golem can deal with the invasion. It is difficult to repopulate a village that has been wiped out.
Certainly remember where the village was, because as you accumulate more resources, the trading becomes more exploitable. For the first day, the most obvious tricks are:
- Take any food or other resources from the chests. Some items like obsidian or horse armor may not be immediately useful, so you can leave those for later.
- Collect any hay bales and harvest any crops that are ripe. Try to replant what you harvest, but make sure you keep seeds for at least three of the four crops (wheat, carrots, potatoes, beetroot — optional). If there are pumpkins or melons around, collect samples of those.
- The hay bales can be turned into wheat, which, along with any harvested crops can be sold back to the farmers, or crafted into bread. If you have a fair bit of extra wood, and can find a fletcher, you can turn the wood into sticks (see below) and sell those, getting 1 emerald for 4 logs' worth of wood. With those emeralds and any you find in the chests, you may be able to buy a couple more useful items, most likely iron armor or iron tools. Do not bother about leather armor, it is weak and easy to craft with the leather from cows. If you manage to get enough emeralds, level up the fletcher, the weaponsmith and the armorer. This way, they can trade a crossbow, a diamond sword or enchanted iron sword and diamond armor or enchanted iron armor. If you do buy the crossbow, also remember to buy at least a stack of arrows.
| Ingredients | Crafting recipe |
|---|---|
| Hay Bale |
- If you really need wood or stone, try harvesting a few logs or cobblestone from above head height in the houses, so as to minimize the damage.
- Sleep in a bed overnight, and take it with you when you go.
After you've found a good spawn location
After you've found a location that you think is good for you, we can begin the tutorial by getting our first resources. This tutorial will assume that you begin in a plains or forest biome, with taiga, birch forest, savanna, jungle, dark forest, mangrove swamp, and pale garden content embedded. It is, of course, recommended that you start off in a plains or forest, as the resources there can ensure that you can start off your first days in the game.
Your first day
Wood & basic crafting
To start, find a nearby tree. Punch a log until it breaks and turns into an item. It should enter your inventory. Do that for the entire tree. Do not leave any trees floating.
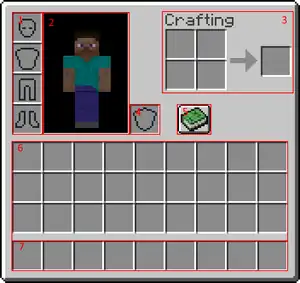
1. Player's armor
2. Character
3. 2×2 crafting grid
4. Offhand slot
5. Recipe book.
6. Inventory
7. Hotbar (part of inventory)
Open your inventory by clicking on E. Hover over the logs and ![]() left click on them. Move you mouse until the logs are above the crafting grid, then
left click on them. Move you mouse until the logs are above the crafting grid, then ![]() left click again. Some planks will appear in the grid to the right of the 2×2 grid. You can either
left click again. Some planks will appear in the grid to the right of the 2×2 grid. You can either ![]() left click on the planks to make them "attached" to your mouse again, or you can press Left Shift +
left click on the planks to make them "attached" to your mouse again, or you can press Left Shift + ![]() left click to automatically move it back to your hotbar or inventory, if your hotbar is full. Do the same for a crafting table — an extremely important block for crafting, and essential for most recipes, as the crafting grid for a crafting table is 3×3, instead of 2×2.
left click to automatically move it back to your hotbar or inventory, if your hotbar is full. Do the same for a crafting table — an extremely important block for crafting, and essential for most recipes, as the crafting grid for a crafting table is 3×3, instead of 2×2.
| Planks | Crafting Table | |
|---|---|---|
After you've crafted your crafting table, place it down, and you can start crafting your first tools. Optionally, you can craft some sticks in your 2×2 crafting grid, as it is essential for tools.
First tools & stone
After placing down your crafting table, ![]() right click the crafting table to open its GUI. From there, craft your first tool — the wooden pickaxe. Optionally, you can craft a wooden axe as well. The other tools — the sword, shovel and hoe are not recommended to be crafted during the wooden tier.
right click the crafting table to open its GUI. From there, craft your first tool — the wooden pickaxe. Optionally, you can craft a wooden axe as well. The other tools — the sword, shovel and hoe are not recommended to be crafted during the wooden tier.
| Wooden Pickaxe | Recipes | ||||||||||
|---|---|---|---|---|---|---|---|---|---|---|---|
|
The pickaxe allows you to mine underground blocks like stone faster, while the axe allows you to mine/chop logs and other wood-related blocks like planks faster. There are 6 tiers of tools like pickaxes and axes, wooden being the lowest tier. However, you will eventually be able to progress into better tiers as you progress in the game. Some blocks have tool and tier requirements, which will make you unable to obtain items from mining a block if the tool you mine with does not match the required tool or tier of tool you mine with. For example, stone requires a wooden pickaxe to mine, which means you won't be able to obtain any cobblestone if you simply mine it with your fist.
After you've obtained your first tools, break some dirt near you (about 10), then dig down into the ground until you see a light gray block that seems to be too hard to mine — that is stone. As mentioned above, you'll need a pickaxe for this. Dig 2 blocks of stone straight down, then mine straight or around you. Mine stone until you have 14. Go back to the surface, then craft some new tools and blocks. This time, you'll need a stone pickaxe, a stone axe, and a furnace.
| Stone Pickaxe | Recipes | |||||||||||||
|---|---|---|---|---|---|---|---|---|---|---|---|---|---|---|
|
After you've crafted your items, collect about a stack of logs and another stack of cobblestone in case you need them. If you find a coal vein, mine the entirety of the vein. This also applies for iron veins, but this will be discussed later.
Obtaining food
With your basic tools obtained, your hunger bar is probably quite low. We'll need to find some basic sources of food in order for us to be able to continue playing the game normally. Hunger is quite important as it allows you to sprint (faster walking) and swim, which you will not be able to do if your hunger reaches 6 or below (![]()
![]()
![]()
![]()
![]()
![]()
![]()
![]()
![]()
![]() ). If your hunger bar depletes to 0 (
). If your hunger bar depletes to 0 (![]()
![]()
![]()
![]()
![]()
![]()
![]()
![]()
![]()
![]() ), you will start losing health from hunger until you reach half a heart (
), you will start losing health from hunger until you reach half a heart (![]()
![]()
![]()
![]()
![]()
![]()
![]()
![]()
![]()
![]() ).
).
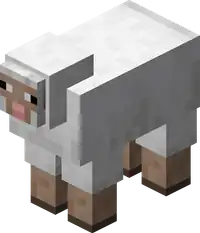
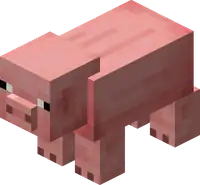
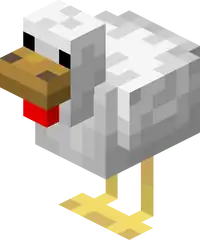
To start, find some farm animals, like pigs, cows, sheep, and chickens. They are great early-game sources of food. Once you find them, move close to them and hit them with your axe. Do that until you have about half a stack of raw meat. For this tutorial, we will assume you killed sheep for mutton, and some wool as well, as that will be extremely helpful. Specifics on killing mobs and combat in general will be discussed later as well. There are more ways of obtaining food; they will also be discussed later.
Making shelter
Once you've obtained your first food, find a location nearby for your base. With the stack of logs and cobblestone you collected, build a starter base for you to live in.
You will need the following:
- 1
 Crafting Table
 - 1
 Furnace
 - 1
 Bed
Bed
- Any color works. At this stage, the following colors are viable:
To craft a colored bed, simply put any color of bed and the corresponding dye into a crafting table or your inventory crafting grid.
| Name | Ingredients | Crafting recipe |
|---|---|---|
| Matching Bed | Any Bed + Any Dye |
Any base is fine. If you run out of materials, feel free to go and chop more trees or mine more stone for them. In fact, you can use anything. You can make a wooden shack, a dirt hut, or even a base made out of minerals, even though it is not recommended. Just make sure you finish it before night.
The following blocks may also be useful:
Useful crafts
There are a few things the player can craft that are particularly useful when making a shelter. In all cases, see their respective pages for more details. For all but the chest, the planks you use must all be of the same type (the ladder uses no planks).
 Doors make a 2-high entrance that can be quickly opened or closed. Depending what wood they're made of, you may be able to see through them a little, but regardless they let light through, which can tell you when dawn comes even if they have no transparent parts.
 Trapdoors are the vertical version of doors, providing a one-block entrance in a floor or ceiling. (Ladders are helpful here, see below.) They likewise let light pass through, but you may or may not be able to actually see through them.
 Fences are a versatile barrier; placed in a line on the ground, they block most monsters (and animals). While they look like they're only one block high, they are in fact 1.5 blocks high, which is too high to jump over. One drawback is that spiders can climb such fences, like other blocks. If placed in a wall (that is, surrounded by blocks on all sides including the top), fences can provide a cheap window, since you can see through them (but monsters can't). Make sure the fence is visibly joined to all blocks on each side; they do not join to doors, trapdoors or glass. You can also make similar walls out of cobblestone or other kinds of stone, but these don't provide visibility.
 Fence gates are a cross between doors and fences. They are 1.5 blocks high like fences, but can be opened and closed.
 Ladders are flat blocks that you can place against a wall to let you climb them. If you leave the bottom block (against the ground) un-laddered, you need to jump to get onto the ladder, but monsters can't climb after you. As usual, spiders can still climb the wall.
 Glass is smelted in a furnace from sand and are useful to look at the outside and illuminate your shelter without torches. You can use them to craft
  glass panes, which may look better and use up less space than a full glass block.
- A
 chest isn't really necessary at this stage, but it's a convenient way to stash items you don't want to carry around. If you get killed, anything in the chest remains there, waiting for you rather than scattered around your death site. It needs to be placed as a block, then use the block to open its GUI and get at the contents. If you break a chest, everything that was inside spills out as loose items, along with the chest item itself. Two chests next to each other can combine into a large chest.
| Name | Ingredients | Crafting recipe |
|---|---|---|
| Wooden Door | Matching Planks | |
| Wooden Fence | Matching Planks + Stick |
|
| Fence Gate | Stick + Matching Planks |
|
| Wooden Trapdoor | Matching Planks | |
| Ladder | Stick | |
| Chest | Any Planks |
You will learn more about how to build shelters safely below.
The first night
Before nightfall, collect some more wood to prepare.
Light & mob spawning
Monsters — hostile mobs — can't spawn within 24 blocks of you, but huddling in the dark is no fun — and when you do leave your home, you don't want to come back to find a monster has spawned or moved in. The usual way to fend off monster spawning is by light — daylight or artificial. So, before night falls, you need to light up your space, and at this point, the only light sources you have are torches. If you have any coal from the day, craft about a stack of them.
| Ingredients | Crafting recipe |
|---|---|
| Coal + Stick |
If you don't have any coal, use your furnace and smelt some logs into charcoal using planks — they function exactly the same as coal.
| Ingredients | Smelting recipe |
|---|---|
| Any Log + Any fuel |
| Ingredients | Crafting recipe |
|---|---|
| Charcoal + Stick |
Torches are extremely powerful in preventing mob spawning: they completely prevent monsters from spawning (naturally) anywhere within reach of their light. This light stretches for 13 spaces of taxicab distance; each square east, west, north, south, up, and down, counts independently. This means if you have a torch at head height at one corner of a large room, the safe area stretches 6 spaces diagonally on the floor (one space downward from the torch). On a hill, the light can stretch 4 blocks diagonally and up- or down-hill. Most solid blocks also block light — light can often travel around blocks, but any detour counts against its range.
What to do during the night
During the night, there are a few things you can do.
Skipping the night
Using your bed obtained from the day, just place it down, and ![]() right click on it to sleep. Wait for a few seconds, and you've skipped the night, and the second day has begun.
right click on it to sleep. Wait for a few seconds, and you've skipped the night, and the second day has begun.
Mining
From your base, dig down to collect materials. You can find coal, iron, and more stone, along with some variants, like andesite, granite, and diorite. When going down, make a staircase, so that you can return to the surface easier when you're done.
Food & farming
Sources of food
We have discussed obtaining food from animals above.
Even though you probably aren't hungry yet, collecting some food up front, and arranging for more, is a good thing. Just now, there are three things you can do about that:
- You can find apples and sweet berries, which are immediately edible, but these are not good food, and also don't warrant much further discussion. Grab them as you find them, eat them if you need to.
- You can start a crop farm, which does not provide food immediately, but it pays off well later, as a head start toward a permanent food supply.
- You can kill spiders to get string, from which you can craft a fishing rod to catch fish, which you can cook for good food.
As with your health bar, you start with a full hunger bar, with 10 icons ("shanks") representing 20 hunger points. After you have been moving around (and perhaps fighting) for a while, the hunger bar begins rippling and starts decreasing. If the hunger bar drops below ![]()
![]()
![]()
![]()
![]()
![]()
![]()
![]()
![]()
![]() , you cannot regenerate health, and if it gets to
, you cannot regenerate health, and if it gets to ![]()
![]()
![]()
![]()
![]()
![]()
![]()
![]()
![]()
![]() , you can't sprint. If the hunger bar goes down to empty, you begin losing health. Your health will then drop to 1 HP, which leaves you extremely vulnerable.
, you can't sprint. If the hunger bar goes down to empty, you begin losing health. Your health will then drop to 1 HP, which leaves you extremely vulnerable.
The primary drain on hunger is from healing damage, and for quite some time eating will be your only way of healing. Fighting mobs, sprinting, and jumping are all food-intensive as well. You have a little grace period (saturation) when starting the game and after eating, but when that's exhausted, your food bar starts to ripple, after which healing damage or getting too athletic starts to drain your hunger bar.
If you are staying at full health, and not fighting, sprinting, jumping, swimming long distances, or mining many blocks, then you use almost no food. Walking at normal speed does not use up food. Neither does rowing a boat. Thus, if your character has a secure place to stay, you can just stay put to conserve food while waiting out the night, a storm, or crop/animal growth.
A first look at farming
To start, break some short grass to obtain wheat seeds. After you have collected some, you can find any water source (e.g. a river) with dirt or grass nearby at the water level. Use your hoe on the dirt or grass, within 4 blocks of the water itself (diagonals count). Wait a moment to make sure the new farmland darkens instead of reverting back to dirt, then plant your seeds, one per block (you may save up some excess seeds for chickens). Later you can make a more organized farm, but for now, you have just gotten a head start on a permanent food supply. When you come back here tomorrow or the next day, the seeds may have grown into wheat, which you can use to make bread or to lure and breed cows. You also get extra seeds from harvesting the wheat, which you can use to plant more wheat, or to lure and breed chickens.
It is recommended to light up your farm to ensure no hostile mobs spawn.
Animals
Above, we have discussed about animals and how to obtain food from them.
Passive mobs never attempt to harm the player. The majority of passive mobs are traditional domesticated farm animals that usually ignore the player. If harmed, they flee for a short time. Some animals (such as rabbits or foxes) run straight away from players who get too near.
The common farm animals can be lured with food (seeds for chickens, wheat for cows and sheep, and carrots or potatoes for pigs). Unless you found a village, you don't yet have the wheat you'd need to lure cows and sheep, nor the root vegetables that pigs prefer, but you might perhaps be able to use dandelions to lure rabbits into a secure pen. If you have carrots, use them to breed pigs, since they can not be cooked. Cook potatoes and use wheat to make bread until you have cows.
It is not recommended to swim into rivers or oceans to kill fish for food, as you may drown if you aren't careful enough, and drowned holding tridents may spawn, which are extremely dangerous, and even experienced players may die from them if they can't escape the body of water quick enough.
The basics to combat
At the start, an axe is recommended. It is recommended to get a stone, or copper axe (if you can find copper) at this stage, as it deals more damage than a diamond sword.
To deal damage to mobs, simply ![]() left click on a mob. Do not spam the button &emdash; it is better to wait for a little bit before hitting the mob a second time. You can also deal a critical hit to mobs by pressing Space before
left click on a mob. Do not spam the button &emdash; it is better to wait for a little bit before hitting the mob a second time. You can also deal a critical hit to mobs by pressing Space before ![]() left clicking.
left clicking.
Specific strategies on killing common hostile mobs can be found below.
After the first day
If you see the sun come out and you've been waiting in a base, you can leave your base, but before that, make sure to watch out for any remaining mobs.
If you see a creeper, your best option at this point is to run at least 16 blocks away from it and wait for it to go away. If you don't have time to leave, place a block in front of you before it explodes so that you don't take as much damage.
If you see any skeletons or zombies hiding under trees or in water, stay away from them — skeletons can still shoot at you if you are too close (16 blocks or so), and either skeletons or zombies may come out from shade to attack you even as they burn. If a burning zombie attacks you, they have a chance to set you on fire If this happens, flee and jump into any nearby water source. Once you're out and clear of monsters, look around for and collect bones, arrows, or rotten flesh that may have been dropped by dead skeletons and zombies.
If you see spiders, don't panic, they likely have become neutral in the sun, and you can try to kill them for their strings.
Clearing out remaining mobs
If it's raining, zombies and skeletons won't burn. You have three options:
- Stay in your base until the rain stops;
- Leave your base and take out the remaining mobs; or
- Continue doing whatever you're doing.
Zombies can be easy to kill by themselves, but in a pack, they can overrun you — and if attacked, they can call any other zombies in the area to join the fight. At night or during a storm, they can summon new zombies.
A skeleton is pretty accurate with its bow. It can be difficult to dodge the arrows. Also, you become an easier target the closer you get. If you get too close, it can kill you in only a couple of shots, because you have no armor. It's best to have a bow (or at least a shield) of your own before facing skeletons. If you don't have a bow or shield and they see you, try to run up to them and get in a few hits with your sword before you get shot too many times. If you're far enough from the skeleton, you can dodge their arrows. A skeleton's aim improves at higher difficulty.
The end of your day
Assuming you made it out of the shelter, congratulations! You've survived your first night in Minecraft. Within the next day or two, you should have acquired some copper or iron armor and better weapons, which remove much of the terror from nighttime. You can also make a more secure shelter (including a safe place for your bed), and start fencing off and lighting territory for farming. You may have even acquired diamonds.
What next?
After your first day, you have a lot more things you can do. There are infinitely many options, but in general, here's a few options.
Home safety
By the end of the first day, your shelter is likely to be primitive and small. In the days afterward, you can build a better home, in any of various forms. Some natural extensions include a back door, windows, a surrounding fence, and even traps for monsters. Others are beautiful houses. If you build one and you don't like it, just build a different one. Remember that any time you pick up your bed, your spawn point reverts to the default (that is, random within 20 blocks of the world spawn point), until you not only place but sleep in (or at least "use") a bed again. For this reason, if your home is not near the world spawn point, you should eventually use a compass to locate the exact point, and build a shelter there, or keep enough wool and planks to build new beds in new locations to keep your respawn point nearby as you explore the world.
Further mining
Eventually, you must venture below ground to gather iron and other resources. While there are much more advanced mining techniques, the most basic way to find ores is by entering a cave and exploring. Remember, if you are mining, "never dig straight down" is a great rule to follow as you might fall in lava or in a group of monsters. You can, however, dig down in a 2×1 pattern, standing in the middle of the 2 blocks. This allows you to have a "safe block" in case there is lava beneath you. Or you can dig your shaft a few blocks at a time and put in ladders as you go, or just dig a staircase down instead of a straight shaft.
Caves & cave exploration
You have no problems if you have just spent your night in a cave. If you haven't, the easiest way to do so is to roam the Overworld a little and look out for exposed cave entrances. Mountain biomes have caves inside them, the advantage to finding caves in mountains is that iron spawns extremely often up in high places, and that includes mountains, and the same thing applies to coal ore, but it shouldn't be too high or else coal spawns less. Iron can also easily be found in caves close to the surface but it's generally recommended to just go to mountains for iron because it's safer. However, for most ores you want to find a deep cave via an opening into the ground and head downward. Sometimes such caves end not very far down, but almost always they continue into big cave systems. If they seem to end right away, sometimes there is a continuation to another cave about a few blocks farther through the cave's end. Digging away gravel or dirt can also expose cave extensions, but you may go through a few shovels that way. If you can't find any all day, just sleep away the night, replenishing your resources like wood and food as you use them. If you hear suspicious, hostile noises, just try to listen and follow them.
Cave exploration is pretty straight forward: you light up your way with torches, mine up ores as you see them, and kill enemies as you encounter them. Some important techniques might not be obvious to a new player, such as using waterfalls to descend into shafts, and/or swim back up from them. There are also many options for marking your trail and not getting lost. Also, note that sneaking prevents you from falling over the edge of a block, and as such it is useful if you are caving near a long drop, especially a drop into lava. There are also open ravines, which can be explored by daylight, a bit more safely than underground caves. If you have spent a long time in a cave, be wary of coming back to the surface at night — at night there can be more monsters on the surface than there were in the caves, and if you spent long enough down there, there might even be phantoms. If there are, then try to avoid them or bring a spare bed with you while mining so you can sleep and get rid of them.
Tutorial videos
External links
- "Exploring the Overworld in Minecraft" – Minecraft.net, September 22, 2023.
- Click here to proceed to the second day.