Tutorial:Creating a data pack
This tutorial shows how to create a data pack. Data packs can be used to add or modify functions, loot tables, structures, advancements, recipes, tags, dimensions, predicates and world generation.
Setting up your data pack
To create a data pack, start by navigating to the datapacks folder of your world. The location of the folder varies depending on your operating system and the type of world:
Finding the world directory
To create a data pack, you will need to find the datapacks folder of your world. The location of the world folder depends on your operating system and the type of world:
- In Singleplayer:
- For Windows, press Alt + D in File Explorer (or ⊞ Win + R) and navigate to
%APPDATA%\.minecraft\saves\(your world). - For macOS, press ⌘ Cmd + ⇧ Shift + G in Finder and navigate to
~/Library/Application Support/minecraft/saves/(your world). - For Linux, press Ctrl + L in Files and navigate to
~/.minecraft/saves/(your world).
- For Windows, press Alt + D in File Explorer (or ⊞ Win + R) and navigate to
- In Multiplayer:
- Find the root directory of your server (where server.properties is located), then navigate to
world.
- Find the root directory of your server (where server.properties is located), then navigate to
Once you are in the datapacks folder, create a folder with a name of your choice. This will be your data pack's name. Enter the data pack folder.
Folder structure
A data pack needs to follow a specific folder structure. Every content in your data pack has its own place.
 /
/ <data pack name>
 pack.mcmeta: Metadata of the data pack. This is the only mandatory file.
- pack.png: The picture to display next to the data pack in the data pack selection screen in game.
- data
- <namespace>: Folder of the namespace to use. More than one directory for different namespaces may exist.
Creating a pack.mcmeta file
To create this file, right click within your data pack folder and create a new text document. Name this file pack.mcmeta.
Note: Make sure that the file extension is .mcmeta and not .txt when you rename it, as otherwise the data pack will not be readable by Minecraft! You may be warned that changing a file name extension could make the file unusable. However, this actually indicates that you have renamed the pack.mcmeta file correctly.
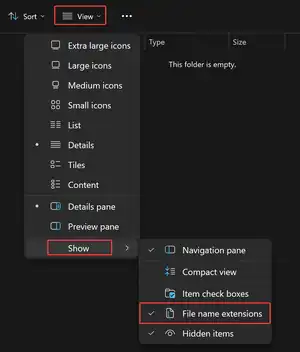
If you cannot see file extensions, you will have to turn them on. For Windows 11, you can turn them on by open the "View" dropdown menu, then hover over the "Show" option, then turn on the "File name extensions" option. For Windows 10, you can turn them on by going to the View menu of the file explorer and checking the check box for file name extensions. For Windows beneath Windows 10, you can uncheck "hide extensions" in folder settings.
Formatting pack.mcmeta
Open pack.mcmeta in the text editor of your choice and type or copy and paste the following:
{
  "pack": {
    "description": "This is the description of your data pack",
    "pack_format": 71,
    "supported_formats": [71,71]
  }
}
Be very careful not to forget any braces {}, commas ,, colons :, quotation marks "", or square brackets []. Missing one of these can lead to your data pack not being readable by Minecraft.
Description
The text following description is required and can be any string or a raw JSON text. It will be displayed in game when hovering over the data pack in the output from /datapack list, as well as under the pack title in the data pack selection screen when creating a new world. In pack.mcmeta, it is possible to use the § symbol (see Minecraft Formatting codes) in the description of pack.mcmeta and the data pack name.
Pack format
The number next to pack_format is required and tells Minecraft what release the data pack is designed for. All valid data pack formats with their corresponding Java Edition versions that can be used for this pack_format property are presented in the table below.
Starting with Minecraft 1.20.2, in addition to this property, a data pack can also specify a range of pack formats it is compatible with. For more information on this topic, see the "Pack format range" section.
Pack format range (optional)
The supported_formats property introduced in Minecraft 1.20.2 is optional and was designed to be used to specify a range of pack formats that the data pack is compatible with, something that was not possible with the legacy pack_format property. All valid data pack formats with their corresponding Java Edition versions that can be used for this supported_formats property are presented in the table below.
This property can be represented in one of the following three forms:
- a single number (example:
18) - a list that contains two numbers, where the first one denotes the start of the range and the second one the end, both inclusive (example:
[18, 48]) - an object that contains two children —
min_inclusiveandmax_inclusive— to specify the start and end of the range, similarly to the list above (example:{ "min_inclusive": 18, "max_inclusive": 48 }).
Note: Even though this property somewhat replaces pack_format, the latter is still required and has to be specified in order for the data pack to be read correctly by Minecraft. Also, if supported_formats is present, it must contain the value declared in pack_format.
| Value | Releases | Significant/Breaking Changes |
|---|---|---|
| 4 | 1.13 – 1.14.4 |
|
| 5 | 1.15 – 1.16.1 |
|
| 6 | 1.16.2 – 1.16.5 |
|
| 7 | 1.17 – 1.17.1 |
|
| 8 | 1.18 – 1.18.1 |
|
| 9 | 1.18.2 | |
| 10 | 1.19 – 1.19.3 |
|
| 12 | 1.19.4 |
|
| 15 | 1.20 – 1.20.1 |
|
| 18 | 1.20.2 |
|
| 26 | 1.20.3 – 1.20.4 |
|
| 41 | 1.20.5 – 1.20.6 |
|
| 48 | 1.21 – 1.21.1 |
|
| 57 | 1.21.2 – 1.21.3 |
|
| 61 | 1.21.4 |
|
| 71 | 1.21.5 |
|
| 80 | 1.21.6 |
|
| 81 | 1.21.7 – 1.21.8 |
|
UPDATE: New Table listing "pack_format":
Wiki Page: Pack format – Minecraft Wiki[1]
Pack icon
If an icon is not specified, a generic cobblestone icon appears next to the data pack in the data pack selection screen in game when creating a new world. If you would like to use your own pack icon instead, you need to name it pack.png and place it inside your data pack folder right next to the pack.mcmeta file.
The file must be in the PNG format in any resolution and with a 1:1 aspect ratio (in other words, square-shaped), but a resolution of 128×128 px is recommended, as this is what Mojang itself uses in the default built-in resource and data packs.
Testing your pack
Once you have created your pack.mcmeta, try testing it out in-game! Open the world or, if you are already in the world, type /reload, then type /datapack list. It should list two entries. One of the two should appear as [file/(your data pack's name) (world)], where your data pack's folder name goes at (your data pack's name). When you hover over your data pack's entry, you should see the description of your data pack as you have written in [String][NBT Compound / JSON Object] description of your pack.mcmeta.
When your pack shows up, you are ready to move on.
Troubleshooting
If you don't see your pack in the list, make sure your pack.mcmeta file is correct and saved. Look for any missing braces {}, commas ,, colons :, quotation marks "", or square brackets []. Remember that for each open brace, quotation mark, or square bracket, you must have a corresponding closing bracket, quotation mark, or square bracket respectively. If you still don't see your pack, make sure it's in the right folder.
Adding content to your pack
Naming
Make a folder called data in your data pack folder, where you have placed the pack.mcmeta file in. In this data folder you have to create one or more folders which will act as your namespaces.
Entries in data packs have resource locations in a fashion of namespace:path. The corresponding file would be located at data/namespace/(data_type)/path.(suffix). Note that / characters in the path will be translated into directory separators.
A few examples:
- an item tag of ID
dummy:foo_proof/barwould be located atdata/dummy/tags/item/foo_proof/bar.json - a function of ID
foo:handler/bar_callwould be located atdata/foo/function/handler/bar_call.mcfunction
Legal characters
Namespaces, paths and other folder and file names in the data pack should only contain the following symbols:
0123456789NumbersabcdefghijklmnopqrstuvwxyzLowercase letters_Underscore-Hyphen/minus/Forward Slash/Directory separator (Can't be used in namespace).Period
The preferred naming convention is lower_case_with_underscores, called lower snake case.
Namespaces
Most objects in the game use namespaced resource locations to prevent potential content conflicts or unintentional overrides.
For example, if two data packs add two new minigame mechanisms to Minecraft and both have a function named start. Without namespaces, these two functions would clash and the minigames would be broken. But if they have different namespaces (remember, no spaces!) of minigame_one and minigame_two, the functions would become minigame_one:start and minigame_two:start, which no longer conflict.
Most of the time when Minecraft requires an ID, such as for /function, you should provide the namespace in addition to the path. If you don't specify the namespace, it will fallback to minecraft.
Make sure to always use your own namespace for anything new that you add, and only use other namespaces if you're explicitly overriding something else, or, in the case of tags, appending to something else.
For example, Minecraft uses the minecraft namespace, which means that this namespace should only be used when the data pack needs to overwrite existing Minecraft data or to add its entries to vanilla tags.
Functions
Functions are a set of commands that can be run in order.
To add functions, first create a folder named function inside the namespace folder. Then, create a file named (function_name).mcfunction in this folder or in any of its subfolders. This will be your function file. Your function will be named in the game as (namespace):(name) or (namespace):(subfolder1)/(subfolder2)/.../(name) when the function file is located in a subfolder.
Loot tables
Loot tables will tell Minecraft what should be dropped when a mob dies or what should be generated inside containers, like chests, when opened for the first time, they can also be called by the /loot command.
To add loot tables, first create a folder named loot_table inside the namespace folder. Then, create a file named (loot_table_name).json in this folder or in any of its subfolders. This will be your loot table file. Your loot table will be named in the game as (namespace):(name) or (namespace):(subfolder1)/(subfolder2)/.../(name) if the file is located in a subfolder. All the vanilla loot tables are in the minecraft namespace.
Here is an example of a cow's loot table, it can be used as a reference:
{
  "type": "minecraft:entity",
  "pools": [
    {
      "rolls": 1,
      "entries": [
        {
          "type": "minecraft:item",
          "functions": [
            {
              "function": "minecraft:set_count",
              "count": {
                "min": 0,
                "max": 2,
                "type": "minecraft:uniform"
              }
            },
            {
              "function": "minecraft:looting_enchant",
              "count": {
                "min": 0,
                "max": 1
              }
            }
          ],
          "name": "minecraft:leather"
        }
      ]
    },
    {
      "rolls": 1,
      "entries": [
        {
          "type": "minecraft:item",
          "functions": [
            {
              "function": "minecraft:set_count",
              "count": {
                "min": 1,
                "max": 3,
                "type": "minecraft:uniform"
              }
            },
            {
              "function": "minecraft:furnace_smelt",
              "conditions": [
                {
                  "condition": "minecraft:entity_properties",
                  "predicate": {
                    "flags": {
                      "is_on_fire": true
                    }
                  },
                  "entity": "this"
                }
              ]
            },
            {
              "function": "minecraft:looting_enchant",
              "count": {
                "min": 0,
                "max": 1
              }
            }
          ],
          "name": "minecraft:beef"
        }
      ]
    }
  ]
}
Structures
Structures can be used with structure blocks and jigsaw blocks and/or can overwrite how certain vanilla structures look in Minecraft. It is saved in an NBT format. You can create an NBT file by using a structure block or by exporting a build using a third party program such as MCEdit.
To add structures to a data pack, first create a folder named structure inside the namespace folder. Then, put your structure file in this folder or in any of its subfolders. Your structure will be named in the game as (namespace):(name) or (namespace):(subfolder1)/(subfolder2)/.../(name) if the file is located in a subfolder.
World generation
Custom world generation allows your pack to change how the world generates. This is particularly useful in conjunction with custom worlds.
To change world generation, first create a folder named worldgen inside the namespace folder. Then, put your noise_settings file in this folder or in any of its subfolders. Your changes will be named in the game as (namespace):(name) or (namespace):(subfolder1)/(subfolder2)/.../(name) if the file is located in a subfolder.
Advancements
Advancements can be completed by players and give various rewards.
To add advancements, first create a folder named advancement inside the namespace folder. Then, create a file named (advancement_name).json. (Note: You can't put spaces in the file name. Use lowercase letters in the file name in this folder or in any of its subfolders.) This will be your advancement file. Your advancement will be named in the game as (namespace):(name) or (namespace):(subfolder1)/(subfolder2)/.../(name) if the file is located in a subfolder.
Enchantments
An Enchantment is a set of core properties like level ranges and cost together with some effects. Most effect types also support a set of conditions, making it possible to apply them only when certain criteria are met.
Enchantments can be added in the registry enchantment. All Vanilla Enchantments can be found in the vanilla datapack in the client and server jar files.
Recipes
Recipes are used to let players craft items.
To add recipes, first create a folder named recipe inside the namespace folder. Then, create a file named (recipe_name).json in this folder or in any of its subfolders. This will be your recipe file. Your recipe will be named in the game as (namespace):(name) or (namespace):(subfolder1)/(subfolder2)/.../(name) if the file is located in a subfolder.
ATTENTION: Prior to Java Edition 1.21 the folder recipe was named recipes! Data packs written prior to this may need to be updated to still work properly.
Also recently the string required after result was changed from "result": {"item": to "result": {"id":! Data packs written prior to the release of Java Edition 1.20.5 may need to be updated to still work properly.
Shaped crafting
The first common type of crafting is shaped crafting.
{
  "type": "minecraft:crafting_shaped",
  "pattern": [
    "123",
    "231",
    "312"
  ],
  "key": {
    "1": "Resource location of the item",
    "2": "Resource location of the item",
    "3": "Resource location of the item"
  },
  "result": {
    "id": "Resource location of the item",
    "count": Number of items produced
  }
}
This is a rough example of a shaped crafting recipe, as specified by the crafting_shaped type. pattern is a list used to specify the shape of the crafting recipe. It contains a maximum of 3 strings, each string standing for one row in the crafting grid. These strings then contain a maximum of 3 single characters next to each other, each character standing for one spot in the crafting grid. You don't need all 3 strings, nor do you need to have 3 characters in each string. But each string should contain the same amount of characters. You can use spaces to indicate empty spots.
key is a compound used to specify what item should be used for which character in pattern. This can either be specified using as an item ID or a hash-prefixed item tag.
The result compound speaks for itself, it specifies what the resulting item should be. count is used to specify how many of the item should be given.
This is the original recipe for a Piston for reference:
{
  "type": "crafting_shaped",
  "pattern": [
    "TTT",
    "#X#",
    "#R#"
  ],
  "key": {
    "R": "minecraft:redstone",
    "#": "minecraft:cobblestone",
    "T": "#minecraft:planks",
    "X": "minecraft:iron_ingot"
  },
  "result": {
    "id": "minecraft:piston"
  }
}
Shapeless crafting
There's another common type of recipes, a shapeless recipe. The list with multiple items allows alternatives for the given slot such as Oak Plank and Birch Plank.
{
  "type": "crafting_shapeless",
  "ingredients": [
    "<item ID>",
    "<item ID>",
    [
      "<item ID>",
      "<item ID>"
    ]
  ],
  "result": {
    "id": "<item ID>",
    "count": 5
  }
}
As specified by the crafting_shapeless type, this is a recipe without a pattern. The ingredients can be put in the crafting grid in any shape or form. In the example, there's a list inside the ingredients compound. This means any of the items in this list can be used.
This is the original recipe for Fire Charge for reference:
{
  "type": "crafting_shapeless",
  "ingredients": [
    "minecraft:gunpowder",
    "minecraft:blaze_powder",
    [
      "minecraft:coal",
      "minecraft:charcoal"
    ]
  ],
  "result": {
    "id": "minecraft:fire_charge",
    "count": 3
  }
}
It is also possible to create new smelting recipes.
{
  "type": "smelting",
  "ingredient": "<item ID>",
  "result": {
    "id": "<item ID>"
  },
  "experience": 0.35,
  "cookingtime": 200
}
This is a rough example of a smelting recipe. "ingredient" is used to specify the item you are going to smelt. "result" is going to specify the result. In "experience", you are able to choose the amount of xp gained for smelting, and in "cookingtime" the amount of time that it will take for the item to smelt, which in this case is 10 seconds (200 ticks = 10 seconds).
This is the default smelting recipe for a diamond ore:
{
  "type": "smelting",
  "ingredient": "minecraft:diamond_ore",
  "result": {
    "id": "minecraft:diamond"
  },
  "experience": 1,
  "cookingtime": 200
}
Tags
Tags are used to group blocks, items, entities, or functions together. Additionally, the minecraft:tick function tag is used to run functions every tick and the minecraft:load function tag is used to run functions every time the world is (re)loaded.
To add tags, first create a folder named tags inside the namespace folder. Inside this folder, create folders named block, item and function. Then, create a file named (tag_name).json in one of these folders or in any of their subfolders. This will be your tag file. Your tag will be named in the game as (namespace):(name) or (namespace):(subfolder1)/(subfolder2)/.../(name) if the file is located in a subfolder.
Predicates
Predicates are technical JSON files that represent the conditions for loot tables, /execute if predicate command, or predicate target selector argument.
To add predicates, first create a folder named predicate inside the namespace folder. Then, create a file named (predicate_name).json (You can't put spaces in the file name. Use lowercase letters in the file name). in this folder or in any of its subfolders. This will be your predicate file. Your predicate will be named in the game as (namespace):(name) or (namespace):(subfolder1)/(subfolder2)/.../(name) if the file is located in a subfolder.
Dimensions
Dimensions are JSON files used to specify all the dimensions a world contains.
To add dimensions, first create a folder named dimension inside the namespace folder. Then, create a file named (dimension_name).json (You can't put spaces in the file name. Use lowercase letters in the file name). in this folder. This will be your dimension file.
Custom dimensions can be accessed in game using /execute in (namespace):(dimension_name)
Utilities
Many utilities have been created in order to make programming data packs easier. This is a reference list for utilities such as transpilers or syntax highlighting plugins. Please exercise caution when installing third-party programs onto your computer, as they are not actively monitored and may contain malware.
| Name | Editor | Description | Last Version Supported |
|---|---|---|---|
| syntax-mcfunction | Visual Studio Code & Sublime Text | Syntax highlighting for mcfunction files | 1.21.3 |
| Datapack Helper Plus by Spyglass | Visual Studio Code | Heavy language features for data pack files | 1.21.3 |
| Datapack Icons | Visual Studio Code | A fancy, minecraft-styled icon theme, designed specifically for datapack devs | 1.21.3 |
| Minecraft Command DevKit | IntelliJ IDEA | Used in combination with a mod to debug mcfunctions | 1.21 |
| MCFunction.xml | Notepad++ | Syntax highlighting | 1.13.3 |
| Name | Description | Last Version Supported |
|---|---|---|
| Beet | Minecraft pack development kit and Python-based transpiler. | 1.21.1 |
| MC-build | Data Pack pre-compiler language | 1.21.3 |
| Sandstone | Minecraft Datapack library in Typescript | 1.20.6 |
| TMS Transpiler | A python tool that can assemble indented mcfunction code into valid files. | 1.21.3 |
| ObjD | A dart framework for creating data packs to minimize the repetitive work to be done. | 1.20.4 |
| Minity | Another scripting language that compiles into data packs using a Node.js compiler. | 1.18 |
| Minecraft Script | A language based on JavaScript that can be compiled into a working data pack using a Node.js compiler. | 1.13.3 |
| Name | Type | Description | Last Version Supported |
|---|---|---|---|
| MCreator | Program | A easy-to-use, fully featured graphical tool for creating data packs and mods. | 1.21.4 |
| Misode's Data Pack Generators | Website | JSON Generator for Minecraft Data Packs | 1.21.3 |
| MCStacker | Website | A collection of command generators. | 1.21.3 |
| Datapack-Editor | Program | An offline program to create, edit and validate data packs. | 1.20.6 |
| MCDatapacker | Program | An offline program to create and edit data packs | 1.20.4 |
| NBTData Pack Generator | Website | An online generator for a raw data pack framework without any functions. | 1.20.2 |
| Minecraft Recipe Generator | Website | An Online Generator to create data packs for custom recipes. | 1.20.1 |
| Recipe Generator | Website | An Online Generator to generate the JSON files required for crafting. | 1.20 |
| Datapack Creator | Program | An IDE for creating data packs with some useful tools | 1.17 |
| Minecraft Tools Recipe Generator | Website | An Online Generator to generate the JSON files required for crafting. | 1.12 |
| Origin Creator | Website | A fully featured webtool for creating data packs. | Unknown |
See also
| |||||||||||||||||||||||||||||||
| |||||||||||||||||||||||||||||||
| |||||||||||||||||||||||||||||||