Tutorial:Mob switch
Mob spawning can be irritating and dangerous; however, with the creation of a mob switch, you can disable mob spawning in a certain area without lighting anything up, or covering everything in slabs. In Java Edition, mob spawning can even be disabled in an entire dimension with the help of chunk loading. Without further ado, let's look into the mechanics of how to create one in your world or server!
Java Edition
Basic mechanics
In Minecraft Java Edition, there is a global mob cap for each dimension: in a singleplayer world, the mob cap for hostile mobs is at 70, meaning there can only be 70 hostile mobs loaded in a dimension, and no more hostile mobs may spawn until enough mobs despawn or die, so that number gets below 70; this is to ensure that the world is not flooded with mobs. On multiplayer servers, the mob cap increases by 70 for each player online, unless it is altered through commands.
The basic premise of a mob switch is to keep a certain number of hostile mobs loaded in the world, so that the game fails to spawn more hostile mobs. This mechanic can already be demonstrated by passive mobs: In a singleplayer world, the mob cap for passive mobs is 10, but normally there are way more than 10 animals within the player's render distance, meaning it is practically impossible for passive mobs to spawn naturally after a chunk has been loaded. Passive mobs in Java Edition don't despawn, but count towards the mob cap, meaning their presence acts as a natural "mob switch" for passive mobs.
Unlike passive mobs, it is very difficult to create or find a hostile mob that doesn't despawn, but also counts towards the mob cap. This is because mobs no longer count toward the mob cap if they are marked persistent. The most common way to prevent a mob from despawning is to use a name tag on a mob, but doing so removes the mob from the mob cap, and therefore cannot be used in a mob switch. Similarly, a mob may pick up an item or enter a minecart or boat, all of which prevents it from despawning but also removes it from the mob cap. Only a few hostile mobs are exempt from this rule: for more information, see the "Usable entities" section.
Note that the mob switch is specific to each dimension, depending on the dimension that the mobs are stored in.
Options for chunk loading
Spawn chunks
The spawn chunks are a 7×7-chunk area around the world spawn point, where the chunks are constantly loaded as long as the player is in the Overworld, or at all times on multiplayer servers. If enough persistent mobs are placed in the spawn chunks, mobs are prevented from spawning elsewhere in the Overworld.
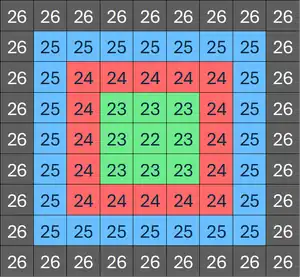
The best place to store mobs in Overworld is on the edge of the spawn chunks, so that mobs can be moved in and out of the spawn chunks, turning the mob switch on or off. On the image to the right, the mobs need to be stored in the light blue colored chunks, and moved into the gray colored chunks to turn the mob switch off.
Advantages
- Can be easier to set up, especially if there is a village near the world spawn point (for the zombie villager method).
- More reliable than nether portal chunk loaders, as there is a chance for the latter to fail.
- Does not create more lag, as the spawn chunks are loaded by the game anyway.
Disadvantages
- Only exists in the Overworld.
- In servers with spawn protection, cannot be constructed by players without the admin's permission.
- Since the spawn chunks are frequently visited by players on a server, this can create a lot of lag.
- Mobs need to be physically moved in and out of the spawn chunks for the mob switch to be turned on or off, which is difficult for dangerous mobs such as withers and wardens.
Nether portals
Another alternative to the spawn chunks is loading the area with nether portals. This section will not describe how nether portal chunk loaders work; for more information, please see the article above.
The best place to store the mobs used in the mob switch is on the border of the 7×7-chunk loaded area: When mobs are placed in the 3×3 chunks centered on the portal, their AI is constantly loaded, which adds a lot of lag to the server. When they are stored in the outermost ring of chunks in the 7×7-chunk area (indicated by the chunks numbered 25 at the image above), their AI is no longer processed, but they still count towards the mob cap.
To turn the mob switch off, simply turn off the chunk loader. The mobs will be unloaded, and hostile mobs are again able to spawn in the dimension they are located in.
Advantages
- Can be placed anywhere in the world, meaning it can be strategically built in an area not visited frequently by players, saving them from the lag, and preventing them from accidentally despawning the mobs in a lazy mob switch.
- Easier to turn on or off, as it doesn't involve moving mobs physically, allowing shulkers (and withers) to be used.
- Works in both the Overworld and the Nether, depending on the dimension the mobs are stored in. This makes it the only way to build a mob switch in the Nether.
Disadvantages
- Nether portal chunk loaders are banned on certain servers.
- There is a chance for the chunk loader to fail, especially during server restarts, or when a singleplayer world is closed and opened again.
Usable entities
As mentioned above, most hostile mobs are removed from the mob cap once they are marked persistent, meaning they can't be used for the mob switch. However, some mobs are an exception to this rule, and can therefore be used in a mob switch. They are zombie villagers, shulkers, wardens and withers.
Zombie villager
Normally, zombie villagers despawn like other hostile mobs do. However, due to the bug MC-182304, zombie villagers that have been traded with do not despawn, but count towards the mob cap.
To build such a mob switch, you will need a villager breeder, a job site block, and a zombie to zombify the villagers. Make sure to put blocks over the head of zombie villagers, so they do not burn in the sun (unless they are stored in water).
A zombie villager mob switch usually consists of a large room to contain at least 70 zombie villagers. If built around the spawn chunks, there needs to be a system that pushes the zombie villagers in and out of the spawn chunks; water is usually the best method, as zombie villagers don't drown unlike normal zombies, and the water additionally prevents them from burning in the sun. Once the first zombie villager is put into the holding chamber, it is typically faster to move more villagers directly into the holding chamber, so that they can be zombified by the zombie villagers already there.
Precautions
- Make sure the game is in Hard difficulty while building the mob switch, so that villagers have a 100% chance of being zombified.
- Boats and minecarts can be used to transport the villagers or zombie villagers during the mob switch's construction, but make sure that they are not in any boats or minecarts when the mob switch is in its finished state, as that removes them from the mob cap.
- Do not use name tags on any villagers or zombie villagers. This removes them from the mob cap.
- Do not let the zombie villagers pick up any items, as that removes them from the mob cap.
- To be safe, once the mob switch is finished, do not break any blocks around the holding chamber, as doing so might risk some zombie villagers picking up the dropped items.
Advantages
- Easy to set up, especially if the player already has the infrastructure for breeding and zombifying villagers.
- Works for both the spawn chunk method and the nether portal method.
- Zombie villagers are the least dangerous out of all four types of mobs, as they only deal melee damage to the player.
- Zombie villagers are much easier to transport than the other three types of mobs.
Disadvantages
- At least 70 villagers have to be used, which can take a lot of time and food for the villager breeder to produce.
- Utilizes a bug unlike other mob switch designs, meaning it might be patched in future updates.
Video
Shulker
Shulkers are special in that they count towards the hostile mob cap, but do not despawn naturally. This makes them perfect for mob switches. A shulker-based mob switch usually consists of a large chamber where at least 70 shulkers are stored, enclosed on all sides so they do not see nearby players.
To set up a shulker mob switch, one has to transport at least one shulker from the End to the Overworld, transport them to the location where the mob switch will be built, and duplicate them in a shulker farm. More information about transporting and duplicating shulkers can be obtained from the shulker farming tutorial mentioned above.
As with other mobs used in mob switches, make sure not to name tag the shulkers, or keep them in boats or minecarts when the mob switch is finished.
Advantages
- Can be set up as a by-product of a portal-based shulker farm, even loaded with the same portal chunk loader that loads the farm.
- Does not utilize a glitch unlike the zombie villager design, so is unlikely to be patched soon, as shulkers have been behaving this way since they were added to the game.
- Works in both the Overworld and the Nether.
- If built between a lazy spawn chunk and outside the spawn chunk area, it can be extremely simple to toggle with the correct design without the need of chunk loaders, which stop working after the player rejoins a world while being too far away.
Disadvantages
- Takes a lot of effort to set up, as shulkers need to be transported from the End and duplicated before the mob switch can be built.
- Shulkers can start shooting and killing each other if the player isn't careful.
Warden
Wardens are another type of mob that counts toward the hostile mob cap, but can be prevented from despawning. The way to do so is to constantly distract them: when a warden does not detect any vibrations, it despawns after one minute; however, when a vibration is detected nearby, the warden refreshes its despawn timer, and will not despawn for another minute. This behavior can be utilized to create a mob switch.
A warden-based mob switch typically involves a warden farm that produces wardens, a way to transport the warden away so new wardens may spawn, and a holding chamber where a vibration source (such as a note block or a piston) is constantly triggered to distract the wardens and keep them from despawning. The wardens can then be loaded with a nether portal chunk loader. For more information on creating a warden farm, see the warden farm tutorial mentioned above.
An essential component of a warden-based mob switch is a way to remotely turn off the vibration source and kill the wardens, if the player wishes to get rid of the wardens and repurpose the area for something else. It also ensures that if something goes wrong in the building process, the player can safely remove the wardens and rebuild the mob switch without risking getting killed by wardens.
Advantages
- Can take a very small amount of effort to set up, if the player knows what they are doing.
- When set up correctly, the player simply needs to AFK on top of the sculk shrieker for long enough until there are enough wardens.
Disadvantages
- Wardens are extremely dangerous mobs, so building the mobs switch doesn't allow for much room for error.
- Vibration source may be loud and/or laggy.
- Can only be built in and around a deep dark biome, unless the player intends to transport wardens for long distances.
- Wardens cannot be transported by minecarts, so water streams and bubble columns have to be used.
Video
Wither
This mob switch variant isn't practical, because withers are extremely dangerous mobs to deal with without care. They need to be completely surrounded by bedrock so they don't destroy any encaging block by any chance (because of dangerous wither skulls, which are able to destroy any breakable block, including water and lava), and, if you don't know what you're doing, the withers may wreak havoc.
It is really expensive to get all 210 wither skeleton skulls without a wither skeleton farm, thus one either needs to encounter the perfect bedrock pattern to spawn withers without any of them escaping nor dying, which might not be an easy task, or use glitches to obtain bedrock in older versions to allow a less complex setup, which is very risky.
Lazy mob switch
This variant generally uses silverfish, found in strongholds or by using potions of infestation. It is not recommended in later game stages.
Advantages
- Requires only a few materials.
- Fairly easy to build.
Disadvantages
- One must not visit the switch or else all the mobs there despawn.
- Because one must not visit the switch, it must be built to a faraway location that won't be visited frequently, which requires a lot of exploration.
- This mob switch turns off once the player leaves the game, so one must turn it on every single time and travel a long way to have it working again.
Video
Bedrock Edition
Unlike in Java Edition, there is not a global mob cap in Bedrock Edition, and it is not possible to load chunks permanently, meaning a global mob switch cannot be created. However, by trapping a certain amount of mobs in an area, the local mob cap can be filled, preventing more mobs from spawning nearby.
There are two types of local mob caps: a surface and cave cap. The surface cap affects mobs that spawn directly exposed to skylight and the cave cap affects mobs that spawn without that exposure. There are also different categories of mobs, each having their own mob cap.
A local mob switch is constructed by containing the (mob cap number) of mobs for the chosen categories (monsters, animals, aquatic, etc) in a single chunk. This works best when both the surface and cave caps are contained, as cave mobs can spawn “on the surface” when under conditions that they are not directly exposed to sunlight (due to random floating blocks, overhangs, etc). The mobs that are part of the mob switch must not be able to despawn but must still count towards the mob cap. This can be done with zombies by giving them armor and animals by tempting them with food.
Surface monsters for the mob switches are most easily gathered by using zombie or skeleton spawners (although they are only found in caves, the mobs that monster spawners spawn count towards the surface cap). Zombies can then be converted to cave mobs by turning them into drowned, and skeletons by turning them into strays.
In order to properly work, mob switches must be entirely located within a chunk. When correctly set up, it will prevent mob spawning within a 9x9 chunk area centered on the chunk that the mob switch is in.
Note: If you relog, you must travel within simulation distance of the mob switch, otherwise the game will not recognize its presence, and will spawn mobs as if it is not there.
P.S: the statements above have been tested and verified, however more testing is needed to provide more clarity on this subject.