Tutorial:Animal farming
This tutorial aims to explain the common methods of farming for passive mobs in the Overworld.
For egg (chicken) farming, see Tutorials/Egg farming
Players may find themselves in need of cooked meat, leather, feathers, wool, eggs, rabbit hides or rabbit's feet in large quantities, or have the need to gain experience from animals. A quick hunt across a large area may temporarily provide a player with these, however, due to the passive mob spawning mechanics in Minecraft, mobs may not spawn quickly or plentifully enough to meet these demands in a short period of time. This may force players to hunt elsewhere in further new chunks, an unsustainable method that costs much time and energy.
To prevent this issue, players can herd a small quantity of livestock into a fenced-off or otherwise secure area, breed them to produce offspring, and then cull a proportion of the adult population whenever new materials are required. Manual slaughter farms also provide a modest amount of experience from breeding and killing animals, but this should not be the main focus of a farm due to the many more efficient methods of farming for experience. For players interested in farming experience quickly for enchanting or other needs, hostile mob farms should be a focus.
This tutorial page aims to explain some methods used to manually, semi-automatically, and automatically farm some of the most common types of passive mobs.
Farming basics
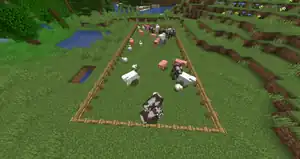
- Lead at least two animals of the same kind into a pen. Fences are most useful for this purpose.
- In Java Edition, players should be careful of entity cramming where mobs suffocate to death. This mechanic can be exploited to create certain types of farm, like a cow crusher.
- Rabbits can jump off a two-block deep gap, but they can't if the hole is at least three deep.
- Breed them using their preferred food until there is a population you are satisfied with.
- Cull a proportion of the adults to obtain their resources. Take care to not kill all of them, as this makes it harder to breed more animals.
To lead animals into the area you want them, you need to hold the same food that you breed them with in your hotbar or use a lead. Leads can be obtained by killing trader llamas or by crafting them, using string and slimeballs.
- Wheat attracts cows, mooshrooms, goats and sheep.
- Carrots, beetroots, or potatoes can attract pigs.
- Seeds of any type attract chickens.
- Carrots, dandelions and golden carrots may be used to attract rabbits.
The animals breed when two of them in close proximity are fed. They can be led into a pen to force them to be near one another. Experience orbs are granted on successful breeding. Both animals cannot breed for five minutes afterward. Two adults create one baby animal upon breeding, which take about 20 minutes to grow up and do not drop any items or experience upon death before then.
Chickens can also lay eggs that can be thrown for a chance to produce one or more baby chicken. This process can also be fully automated with the use of dispensers to create a fully automatic chicken farm.
Shearing a sheep yields 1-3 blocks of wool instead of the usual singular block obtained from killing the sheep. This process can also be automated with dispensers. However, sheep must graze off a grass block in order to regrow their wool after shearing, meaning a large pen with plenty of grass blocks is required in order to recover their wool after shearing. Large amounts of sheep grazing can turn all of the grass inside of the pen into dirt, which can be avoided by placing a few grass blocks out of reach of the pen, allowing the grass to regrow.
It is recommended to light up your animal pens to prevent the spawning of hostile mobs.
Entity cramming farm
Only 24 living entities may occupy a single block before rapidly taking damage and dying from entity cramming. If there is a mix of adult and baby animals, the adults die first, which allows for construction of a farm that relies on entity cramming. This does work for pigs and sheep, but cows are usually chosen for access to leather.
- Prepare a two-deep hole with solid blocks on all four sides, and a hopper at the bottom pointing under the blocks on one side. Whichever way the hopper points becomes the front of the crusher.
- Place a chest connected to the hopper, and replace the block over it with an upside-down stair so you can get at the chest.
- Put a water source at the bottom of the hole, and lead two or more cows to fall into it.
- Place a fence or wall over the hole to keep the animals in the hole and other things out.
- Feed the animals until the entity cramming limit is reached.
- While less effective in that it loses out on experience and looting, it automates the process and drastically reduces the amount of time it takes to farm animals.
Breeding tips
Breeding twice doubles the population of the animals if the offspring are not included in the equation. Culling half of the animals after breeding keeps the population stable with maximum product.
When breeding large amounts of animals in a fenced pen, it can be difficult to leave the pen without animals escaping. Some ways to deal with this are:
- Leading the animals using their preferred food to the opposite end of the pen before you leave.
- Placing carpets on a fence, allowing players to get in and out through jumping without mobs doing the same.
- A double gate can give you a chance to intercept any animals that follow you through the first gate.
Automated animal farming

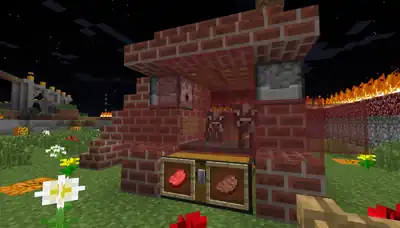
Most of these farms include a killing mechanism, a cooking mechanism for the meat and an item collector, usually a hopper. The cooking mechanism and killing mechanism are often combined, in the form of lava or fire.
Lava blade
This design is mostly used with cows, pigs and sheep. It uses a sticky piston water gate to control the amount of animals to be cooked. They drop through a "lava blade", which enables their meat to be cooked efficiently. Note that this does not work on rabbits due to their small size and jumpiness.
Simple redstone activated cooked meat farm
- Function: This is an easy farm to setup that just requires breeding and can be activated with the press of a button, making the process highly efficient, cooking directly meat and collecting it. This farm works for cows, sheep and pigs.
- Construction:
- Construct a holding area with flowing water for the adults, a collection area for the baby animals with a 1 block high entrance and a sign to block the water flow from the adult area
- The collection area should be only 1 block in area, consisting of a hopper connected to a chest, and a dispenser holding a bucket of lava facing into the collection area, with two separate redstone wires connected to it.
- One redstone wire must be connected to three repeaters set to 4, 4 and 3 ticks. On the other wire, there must be only one set to default (one tick). Both of the leads must connect up to a stone button.
- Preparation:
- Lead animals into the holding area before adding flowing water.
- Breed them until you have the correct amount. This amount can be adjusted, however, adding too many adults may impede progress of babies being swept into the collection area.
- Usage:
- Breed the amount of animals you need. Let them fall into the collection area and wait until they grow. Activate the dispenser and collect the drops from the chest.
Fully automatic chicken cooker
- Function: This machine is inexpensive and fully automatic, making it a great source of cooked chicken and feathers.
- Construction:
- Dig a one block wide, two blocks deep hole in the ground. Place a chest on the bottom and a hopper over it. On top of the hopper, place a non-flammable slab and build non-flammable walls around the slab, at least 3 blocks high.
- Remove a block in the wall next to the slab and place a dispenser, connected to a power source, such as a comparator to detect eggs inside and fire them. Place at least one hopper on top of the dispenser. It should reach as high as the wall surrounding the slab.
- Place lava onto the block above the slab.
- Place a hopper connected to the dispenser, and build a roof, making sure to put torches inside of the area before closing it off. Add a trapdoor to add chickens.
- Preparation:
- Gather as many eggs as you can, the more the merrier.
- Open the trapdoor and throw all of the eggs in. Some of them should hatch into baby chickens and start wandering above the hopper.
- How it works: The chickens above the hopper, when grown up, start laying eggs, which are transported through the hopper into the dispenser, which shoots them onto the slab, hatching them. The baby chickens are not tall enough to get burnt by the lava that is directly above their heads, so the chickens don't get burned until they mature. The drops are picked up by the hopper under the slab and deposited into the chest below.
Steakatron 2000
- Construction:
- Start with a double chest at the desired front. Place a 2×2 grid of hoppers pointing into the chest behind it. Above the chest, place a 2×2 of glass or other transparent block.
- Make a rear wall of glass. For each side, add two pillars of opaque blocks 3 high.
- Make the top front block on each side a dispenser pointing inward with a button on front of it. Place a water bucket inside the left one, and a lava bucket in the right one.
- Place signs inside at ground level on the 4 internal walls of the blocks. This holds the lava above the heads of the animals.
- Make stairs running up to the roof for the left side. Add a roof made by ring of stairs around the outside and attaching four trapdoors to the bottom of the side stairs directly above the internal space.
- Preparation:
- Lead your cows inside by holding wheat and standing on top opposite the stairs with the trapdoors open, then close all trapdoors and get down. Kill any remaining cattle by hand.
- Usage:
- Pick wheat off the chest and breed all the cows. Close all trapdoors when done.
- Decide whether you want raw beef (for trading with butchers) or steak (also known as cooked beef on BE) (for eating). Press the appropriate button, wait for the adults to die, then press the button again. If you need experience, you can open the trapdoors and slaughter them by hand.
If cattle is needed elsewhere, leave the trapdoors open and hit the water button until a sufficient number have escaped.
Cruddly's Porkatron 3000

It greatly speeds up the production of raw porkchops and cooked porkchops by utilizing a gap made by a repeater with a block above to separate the pigs and piglets.
- Construction:
- Killing chamber:
- Cooking selection:
- Connect one hopper behind the top hopper, and another to the top of the chest, which selects between modes.
- To the left of the "selector" place a solid block, with a lever on it. When the lever is off, it produces raw meat. When it's on, it produces cooked meat.
- This steps may be skipped if only one kind of meat is planned to use.
- Separator:
- Behind the collection hopper, connect two more in a line. Use these to create a 2 deep containment pit. It is advisable to use glass on the right side to make it easier to check if the pigs have died.
- Remove the rear lowest wall block to extend the hopper line and place a fence gate. On the outside of the block left to the gate, place a lever to control it. Behind the gate, place a repeater with a solid block above it. This creates a gap that baby pigs can pass through, but adult pigs cannot.
- Finishing up:
- Behind the slaughterhouse create a 2 deep containment pit. From this pit have steps wind their way clockwise to level with the top of the slaughterhouse. Wrap the stairs in non-flammable solid blocks, to avoid any accidents. Glass makes it easy to see the piglets later.
- Place a downward facing dispenser in the rear top of the containment pit and put a water bucket into it, and a button on the outside of the block to the left. In front of the dispenser, at the bottom of the top block, place a trapdoor. In front of it, on top of the block at the top front of the “slaughterhouse”, place a gate, and ensure the walls for pig containment connect with the dispenser, trapdoor hole, and gate.
- It's possible to swap the water bucket with a lava bucket. This produces cooked meat without using a furnace. If you need only raw meat, skip the furnace and the selector. If you want to use both kinds of meat, follow this method. Alternatively, a method similar to the Steak-a-tron 2000 may be applied to this machine.
- Place another gate on top of the dispenser.
- Extend the area behind the previous gate for 3 blocks and create stair access from the right side.
- Preparation:
Lead your pigs via the operator stairs and gate into the slaughterhouse.
- Usage:
It is advisable to note these instructions on signs near the machine.
- Select options: raw or cooked.
- Open side gate, close top gate. This allows piglets to escape and be unable to re-enter the slaughterhouse.
- Open the trapdoor and breed the pigs, then close the trapdoor, and still holding the carrots, move to the rear of the machine to attract piglets out of the slaughterhouse. Once all piglets are out, put the carrots away.
- Return to the operator gate and look out to the left of the machine for the drowning button and press it. Wait until all pigs have died and press the button again to retract the water.
- Close the side gate, hold your carrots again, and open the top gate to attract piglets into the slaughterhouse again. Once all of them are in, close the trapdoor and collect your food from the chest. If using the cooked option, expect some delay while the furnace cooks all the food. If playing above 1.14, use a smoker to speed up the process.
- Modification notes:
Adult pigs cannot fall through a single trapdoor. A single water source dispenser does not drown pigs in any block more than 1 square away. It is possible to use redstone dust to relocate all controls to the front of the machine or the operator gate area if so desired. It is also possible to use an inverter circuit to ensure the top gate and side gate are always in opposite states.
Simple one minute sheep farm
- Video
- Function
This machine is able to produce stacks of wool while being built in an effortless minute.
- Construction
Collection system:
- Find a flat patch of grass
- Dig a 2 block long and 2 block deep hole
- Dig out the side 4 blocks
- On the end of the short side of the L shape, place a chest and then place a hopper running into it on the side
- place above the chest a flicked lever
- place powered rails within the long side of the L and then place in a minecart
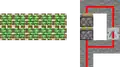
These steps are illustrated below.
-
 Dig 2×2 hole
 -
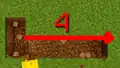 Dig out the side 4 blocks
Shearing system:
- Place above the powered rails dirt and then place on the short side of the L more dirt next to it
- Place on the one end of the dirt an observer running out from the dirt block
- Place in front of the observer a block and then two blocks next to it
- Run down 5 blocks on the side and then place dispensers on top of that
- Place redstone on top of all stone brick and dispensers
- Create a holding cell for the sheep with slabs above the dirt blocks so that they can grow
- Put shears into each dispensers
These steps are illustrated below.
-
 Place observer
 -
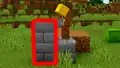 Blocks in front of observer
 -
 Sheep holding cell
- Usage
Make sure the dispensers are well filled with shears and the machine automatically collects wool for you. Flick the lever to turn off
- Modification notes
You can easily expand this design to add more dispensers by lengthening it on the side. You can also breed sheep inside this farm to give more opportunities to shear wool.
Falling auto-spawn trap
- Video
- Resources
You need:
- A light source, such as torches or glowstone
- Trapdoors
- Signs
- Fences
- A redstone loop
- Dispensers
- Hoppers
- Water buckets
- Stones
- Chests
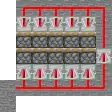
- Step 1

Choose any place and put fences here, the fenced area can be bigger, but it's recommended to be big. In this tutorial, the fenced area is small.
- Step 2

Make a 2×2 hole. It's recommended to be deep, but if it's smaller, read the optional part later.
- Step 3
Place a trapdoor and open it.
- Step 4

Place four hoppers.
- Step 5

Place four more hoppers and make a hole in the wall.
- Step 6

Place two dispensers at the front of the hopper, then place water and a double chest.
- Step 7

Make a redstone loop.
- Step 8

Close the hole in the wall, where the redstone loop is.
- Step 9

Close another hole in the wall. If you have a little hole or you want cooked steak, read the optional steps.
- Optional steps
 Place two signs.
 Then place lava.
Hoglin farming
Hoglins are hostile Nether mobs found only on Crimson Forests and a great source of pork and leather, but they deal massive amounts of damage and knockback to unprepared players, sometimes even knocking off players to lava. However warped fungus repels hoglins. Make a platform for the hoglins to spawn (in a Crimson Forest), place the fungus near the edges with a fence on top to prevent the hoglins from getting stuck.
Then build simple killing chamber with campfires or lava, a storage system and finally some trapdoor.
For starters, you can utilize Shulkercraft's design. It's a fairly simple build and even with its small size it can produce 1700 porkchops per hour.
However, if you want a better and faster farm, you can build this layered farm built by Somecallmetimm.
Semi-automated farming
Sheep farm
This design can shear 100+ sheep in a minute.
- Construction
First, you need to make a flowing water wheat farm, but with higher sides and about 12 blocks wide.
- Create a dirt/grass platform 5×8 blocks. The outside grass blocks, built around this platform, act as walls, built up 3 blocks so the sheep don’t jump out.
You can use any solid block (can’t use fences or glass panels as sheep get stuck), but you need a way for the grass to grow in the farm. Otherwise, the sheep don’t regrow their wool. Build an extra level around with grass blocks. - Build another level, same dimension (5×8), with the smaller length touching the previous platform. One block above that, place a piston facing down. This allows you to manage the water flow.
- Cover the water area with a solid block and have redstone repeaters facing the pistons. Connect them up with a line of redstone and drag it to the other end of the structure. Use a lever to turn them on and ensure all the pistons go down and are powered. If not you may need a few redstone repeaters to keep power going. When all the pistons are powered you can put in the water blocks behind the pistons and ensure the water flows down the first level but stops just before the hole.
- You need a bridge 2 blocks high and 5 long with half-slabs at the other end. This is where your sheep fall into. Build a 3 block high wall around this area and at the end, place half slabs. The half slabs allow you to gather the wool without gates and stops the sheep from jumping out of your farm.
- On one side of your sheep farm, the water supply makes the sheep bounce. Build a 3×4 outline using solid blocks that connects to your outer wall, but one block below. Below this, build 2 pistons between the water blocks and the sheep platform. Ensure there is a block below the water holding area. Next, connect up the pistons with redstone.
- One level below that build 2 rows of sticky pistons that face upward in the middle of your sheep collecting pit. Place grass blocks on these.
- Point repeaters to all the pistons and connect up with redsone.
- Move all your levers and redstone paths for easy access, ensuring the lines don’t switch up and power something they shouldn’t, then label them. You should now have one switch powering the water source, another that raises and lowers the platform at the bottom, and the last that turns on and off the water source that makes the sheep bounce. Test to ensure they are all working then go get yourself some sheep!
Warning: If the gathering switch is turned on, ensure the harvesting/other water is off. If they are both on together, the sheep bounce over each other and escape.
Remember, if one water is on, the other must be off. The procedure is as follows:
- Lower the platform.
- Turn on water torrent.
- Wait until all the sheep are in the hole.
- Turn off the gathering switch.
- Turn on the harvesting switch.
- Grab your shears, right click and point to a sheep. As they bounce, you collect wool. Ensure you get all sheep by moving around a bit.
- Turn off the water and raise the platform.
- Jump in and collect all the wool.
- Notes
- The solid blocks can be switched around to make different designs. The only important ones are the grass blocks in the center.
- This design has been tested with 100 sheep successfully but with that many problems arise. If some of your sheep are missing, they may have glitched through a wall or suffocated due to the maxEntityCramming gamerule.
- Max time between harvesting: Unknown
- Max number of sheep possible: Unknown
- Max number of water levels you can create: Theoretically infinite
- If you would like it to be wider, you can mirror the design and have two water bodies joining together. However this is the widest combination because you have to be able to control the water.
As you can now use shears in dispensers, fully automated wool farms designs are now available.
-
 Layer 0
 -
 Layer 1
 -
 Layer 2
 -
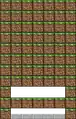 Layer 3
 -
 Layer 4, connects to the top of layer 3.
 -
 Layer 5
 -
 Overhead Blueprint.