Tutorial:Menu screen/Bedrock Edition
This tutorial will help you understand and navigate through all of the menu screens of Minecraft: Bedrock Edition. All menu screens, options and buttons are explained in detail, with the help of images. Although it is mostly self-explanatory, some things may need explaining, especially if you are a new player. If you need help navigating a menu screen or understanding a setting, simply find the appropriate section of this tutorial. This tutorial starts with a short explanation on getting started the first time you enter Minecraft.
For a tutorial on the menu screens of Java Edition, see Tutorial:Menu screen/Java Edition.
Get started
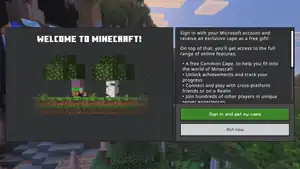
After starting Minecraft: Bedrock Edition the first time after downloading, a variant of the title screen opens and welcomes the player with a pop up message, offering them to sign in with or create a Microsoft account. The welcome message is automatically translated into the language set in the device settings. Press the green 'Sign in now' button to sign in with your Microsoft account, press 'Maybe later' to enter the game without a Microsoft account.
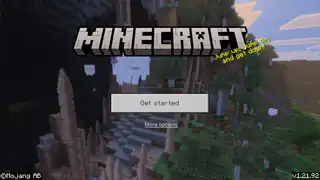
Next, you can view the "Get started" screen. The screen opens up for first time installation of the game. It looks like the normal main menu, except for the 'Get started' button which opens a world creation menu. Below this button, there is a small text, 'More options', which opens the normal main menu when pressing it.
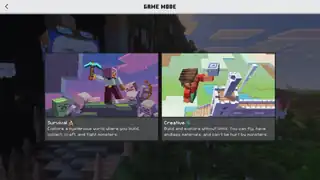
Upon clicking the 'Get started' button, the game opens up a world creation menu for the first time. Here, you can choose between Survival and Creative game mode. After choosing Survival, the game takes you to a new screen where you can choose the difficulty between Peaceful, Easy, Normal and Hard. When you choose Creative as the game mode, you can't select the difficulty, but the world will always be created in Normal difficulty.
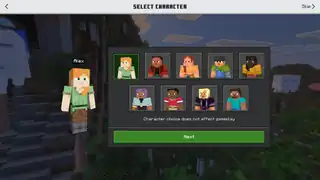
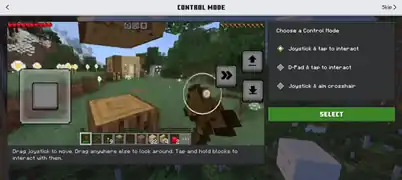
After selecting the difficulty or Creative game mode, you can select a character if you didn't sign in with an account with pre-selected skins. You can select any of the 9 basic characters. Press 'Skip' to skip the character selection and use Alex instead. On touch devices only, you can then select the touch control mode. This can be set to Joystick & tap to interact, D-Pad & tap to interact, or Joystick & aim crosshair, and there is a short video demonstrating the select control mode on the left. For more information about these control modes, see § Touch below.
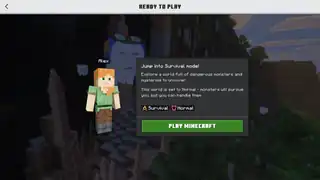
Next, you can see some information about the selected world options and the character you're about to play with. Press 'Play Minecraft' to create the world and start playing.
The world is created with the default world options, which is in most cases enough to get you started.
-
 The "Get started" main menu.
 -
 The "Game Mode" screen.
 -
 The "Survival Difficulty" screen.
 -
 The "Select Character" screen.
 -
 The "Control Mode" screen (touch devices only).
 -
 The "Ready To Play" screen.
Main Menu
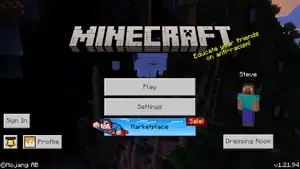
The main menu is what you first see when you enter the game anytime later. The background is a moving panorama of a landscape relating to the latest major update. The UI appears with the game's logo in the top-middle with a splash to its bottom-right. There are four buttons underneath, three profile-related buttons on the left, a friends button on the top-right, and a player miniature looking at the cursor with a button below on the right side. The version number is shown on the bottom-right of the screen.
Sometimes, a new message pops up, informing the player about a new update or Marketplace pack. This message can almost always be found afterward in the inbox.
This menu allows you to go to the world selection screen, purchase Realms, access the game settings, the Marketplace, or quit the game. Furthermore, there are buttons to access the dressing room, the player's profile, the inbox, and sometimes, there is a button to join in-game live events.
| Option | Description |
|---|---|
| Takes you to the "Play" screen, where you can enter or create worlds, Realms, join friends or join servers | |
| Takes you to the "Settings" screen, where you can change some general settings. | |
| Takes you to the "Minecraft Realms" screen, where you can purchase a new Realms subscription. This button is only available when signed in, and when the player is not subscribed to Realms. | |
| Takes you to the Marketplace, where you can buy worlds, resource packs, skin packs, and other community-created content. The button is sometimes textured and animated, depending on what's currently being promoted on the Marketplace. | |
| Opens the "Friends" sidebar, where you can see the profiles of your friends, search for new friends, and join online multiplayer games. The number shows the amount of online friends. This button is only available on certain devices. | |
| Takes you to the Dressing Room, where you can select, create and buy skins and emotes. | |
| Takes you to the "Sign In" screen (if not signed in), or it will automatically sign you in. | |
| Takes you to the "Profile" screen, where you can view achievements, statistics, screenshots, friends, open the dressing room or manage your account. | |
| Takes you to the "Inbox" screen, where you can view news, Realms invites, Realms news, Marketplace Pass news and go to the feedback page.
If there are any new messages, a red dot appears at the top-right corner of this button. |
By pressing Esc (on keyboard controls), the device's back button (on touch controls), or ![]() /
/![]() (on controller controls), a pop-up screen appears with the text 'Do you want to exit Minecraft?'. Press 'OK' to close the game.
(on controller controls), a pop-up screen appears with the text 'Do you want to exit Minecraft?'. Press 'OK' to close the game.
Play
The 'Play' button, located at the top of the group of buttons on the main menu, leads you to the "Play" screen, where you can start playing Minecraft.
This menu has three tabs, and a button on the top-right of the screen:
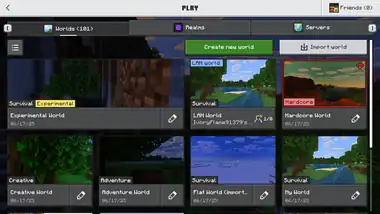
- Worlds, with a number showing the amount of your own worlds. This tab allows you to join, create, or edit local or LAN worlds.
- Realms. This tab allows you to join and play Realms servers or create a new Realm.
- Servers. This tab allows you to join external servers or add a new server.
- Friends, with a number showing the amount of online friends. This opens the friends sidebar where you can see and join your friends.
Worlds
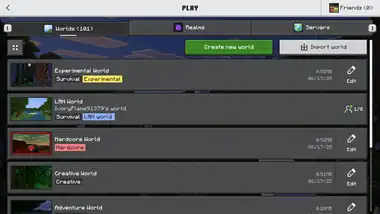
From this screen, you can either enter your worlds, create a new one, import worlds, or enter the world options menu of one of your worlds. When a player enters this screen without signing in, and Marketplace worlds are stored in the folders, these worlds will be hidden.
There are four buttons and a list of worlds. The first button on the top-left influences the worlds list.
| Option | Description |
|---|---|
 
|
Toggles the world layout between list and gallery. In grid mode, four worlds are shown per row, with a large thumbnail, the name and gamemode of the world, and an edit world button.
In list mode, only one world is shown per row. There is a small thumbnail on the left, and the name, some data, and the edit world button on the right. This button is only available on screens with a higher resolution. |

|
Takes you to the "Create from..." screen. This screen allows you to create new worlds or create worlds downloaded from the Marketplace. |

|
Opens the folders app of your device. Selecting a .mcworld file imports it to the Minecraft files and it will show up as a world in the worlds list below, with "(imported)" added to the name. Only available on Windows devices. |
Worlds list
In the worlds list, every world has a large button which opens the world. The 'Edit' button next to it, or below in gallery mode, takes you to the edit world screen of that world. When using a controller, you need to press ![]() /
/![]() on the selected world to edit the world. The worlds are sorted from newest to oldest (last edited). To change the order, simply open the edit world screen of a world you want to place at the top, and change one option, which you can change back afterwards.
on the selected world to edit the world. The worlds are sorted from newest to oldest (last edited). To change the order, simply open the edit world screen of a world you want to place at the top, and change one option, which you can change back afterwards.
Up to 12 worlds are shown per page. At the bottom of the list, you can open the next or the previous page, or select one. Note that opening a new page will send you back to the top, so double-clicking results in joining a world instead of quickly navigating to a new page.
The world button shows a world thumbnail on the left side (list), or the top (gallery). This is a screenshot taken automatically when you exit that world. It can be changed to a custom (in-game) screenshot in the edit world screen. Next to the thumbnail, the name of the world is shown. Below the name, the game mode is shown (Survival, Creative, or Adventure), and a tag shows if the world is Hardcore or experimental. On the right side of the button (list only), the size of the world is shown. Below, the date is shown when the world was last edited.
When a world is opened for LAN, anyone on the network can join and players don't have to be friends. LAN worlds show up above other worlds in the worlds list with the name of the player hosting the world below it, and the amount of active players on the right.
Simply press a world button to open the loading world screen and start playing.
Create from...

From this screen, you can create new worlds, or download Marketplace worlds. The button 'Create new world' at the top takes you to the "Create New World" screen where you can create a new world yourself.
Below, there are three tabs of Marketplace content.
- Marketplace Pass. This tab shows worlds or add-ons from the Marketplace Pass. A featured picture is shown for each template, and the name and rating below. Pressing one takes you to the screen of that content in the Marketplace, where you can buy or download it. If you are subscribed to the Marketplace Pass, pressing a pack immediately starts the download and opens the "Create New World" screen with some settings locked by the creator. The 'Discover new templates' button below takes you to the search screen in the Marketplace showing featured Marketplace Pass packs.
- Featured creators. This tab shows official worlds or add-ons from the Marketplace. Pressing one takes you to the screen of that content in the Marketplace, where you can buy or download it. The 'Discover new templates' button below takes you to the search screen in the Marketplace.
- Owned by me. This tab shows worlds or add-ons you have ever bought, including Marketplace Pass content if you are subscribed. Templates that are not downloaded on your device are grayed out and show a download icon in the thumbnail. Pressing one instantly starts downloading the pack to your device. Pressing a downloaded template takes you to the "Create New World" screen with some settings locked by the creator. Pressing 'Create' directly after creates the world the way the creator intended it, or press 'Unlock settings' to change it.
You can search for templates at the top of the screen, or sort it from ascending names or descending names. You can also filter the packs between All, Downloaded, Imported, and Purchased.
Press 'Import templates' to import a .mctemplate file from your device's folders (only available on Windows devices).
Press 'Load more results' to load more templates, and press 'Back to top' to go to the top of the list.
Below each downloaded template is a 'Rate' button. This opens the purchase screen of the template in the Marketplace with the option to rate the pack.
Create New World
The "Create New World" screen is the beginning of your new Minecraft world. A menu which lets you select an options screen, or create the world shows up on the left side. This menu begins with a thumbnail of the world you are creating, by default a picture of a forest and a lake (probably not the actual world you are creating). It could also be a picture of the seed template or the Marketplace content you create it from. Below this picture, there is a green button, 'Create', which takes you into the world.
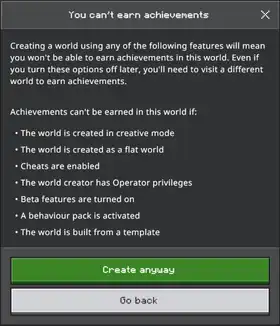
Keep in mind that changing some world options below may disable achievements. When an option is changed so that achievements are disabled, a text message appears at the top of the screen. Press 'Read more' to see what settings need to be changed to enable achievements. If a world is created with achievements disabled, there is no way to enable achievements again, so you have to make a new world.
When leaving the Create New World screen without creating the world, a warning pops up to inform you that if you leave the screen, the options will not be saved.
Create on Realms
Below the create button, there is a purple button, 'Create on Realms', which opens the "Choose a Realm Server" screen. This screen shows a list of Realms you can create the world on, or you can add a Realm. The purple 'Add a 10 player Realm' button takes you to the Realms Plus purchase screen in the Marketplace if you do not have Realms Plus. The 'Add a 2 player Realm' below takes you to the normal "Create a Realm Server" screen. See Buy Realms Core below for more information.
By pressing a Realm's button, you can select a slot to replace with this world. This will upload the world to the Realm and you instantly join the world.
Below, there are 7 buttons to open the matching world options tab on the right. Most of these options can also be toggled with commands such as /gamerule.

General
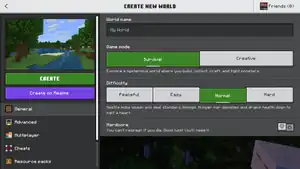
These are the general world options.
| Setting | Description | Default |
|---|---|---|
| World Name | This is a text box where you can type in a world name (can always be changed afterward). When creating a world from a Marketplace template, the name defaults to the name of that Marketplace content. | My World |
| Game Mode | This is the game mode you start with. There are two buttons: Survival and Creative. This can always be changed afterward, including into Adventure and Spectator mode. The selected button is highlighted in green. The in-game description below summarizes the main aspects of these game modes:
|
Survival |
| Difficulty | This is the game difficulty you start with. There are four options: Peaceful, Easy, Normal and Hard. This can always be changed afterward. The selected button is highlighted in green. There is an in-game description for every button:
|
Normal |
| Hardcore | This switch turns on Hardcore mode. There is a description below: 'You can't respawn if you die. Good luck! You'll need it.'
This option can not be reversed without use of third-party software, so your world will be in Hardcore forever. When you die, you can not respawn and you can only enter the world in Spectator mode (another player can still join if it is in multiplayer). Enabling Hardcore locks some options. The gamemode is Survival, the difficulty is Hard and cheats are disabled. The switch has a grey hardcore heart on it. Turning on the switch plays a burning sound, surrounds the world picture with a red edge and shows a hardcore heart with some animated smoke particles in the middle below in the picture. Turning off plays the animation in reverse with an extinguish sound. When pressing 'Create' with Hardcore enabled, a warning message shows up, with a green button to start playing and a button to go back. There is also a button to stop the message from showing again. |

Advanced
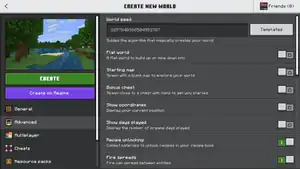
These are the advanced world options, where you can change settings like the world seed, the bonus chest, fire spreading, immediate respawn, and the simulation distance. It is not necessary to look at these when creating a new world, but they could be helpful.
Options that are important or might need some explanation are described here. For a description of every option, see World Options § Advanced.
| Setting | In-game description | Description | Default |
|---|---|---|---|
| World seed | Guides the algorithm that magically creates your world | A text box where you can enter the world seed, which randomly creates a world. This can consist of any character, characters that are not numbers and large numbers are converted into a number of at most 20 digits. | random number |
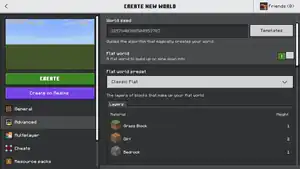
| Flat world | A flat world to build up or mine down into | The world generation gets overruled and the world will generate as a completely flat surface with a few layers of blocks. Enabling flat world shows a flat world preset menu below, where you can choose how the world will be generated. | |
| Flat world preset | The layers of blocks that make up your flat world | Customize the blocks that generate in the flat world. There are 8 different options, and every layer of blocks is shown below, with the height next to it. The picture on the left changes to represent the selected flat world. | Classic flat |
| Bonus chest | Spawn close to a chest with items to get you started | Close to the world spawn, a bonus chest generates with four torches surrounding it. The chest contains wood, tools, foods, and some other random items. | |
| Natural regeneration | Gain or lose health based on your hunger | When the hunger bar is low, your health does not increase. To regain health, the hunger bar needs to be almost full. | |
| Required Sleeping Players | How many players must sleep in bed to skip the night? | A slide indicating the percentage of players in the world needed to skip the night. When below 100%, the night can be skipped without some people sleeping. | 100% |
| Immediate respawn | Skip "You died!" menu and immediately respawn | When you die, you will immediately respawn at your respawn point. In Hardcore mode, you will immediately go into spectator mode if you die. | |
| Respawn blocks explode | Respawn anchors and beds can explode | When on, setting your spawn point on a bed or a respawn anchor in the Nether or the End will explode it, dealing massive damage to entities, destroying surrounding blocks and spread some fire. | |
| Respawn radius | Respawn within this block radius when you die and no respawn point is set (max 128) | A text box where you can change the spawn radius. The player respawns randomly within this radius of the world spawn point. It has a maximum of 128 blocks. | 10 |
| Simulation distance | The game loads and applies changes within a range of 64x64 blocks from the player | Mobs spawn in a circle around the player depending on the simulation distance. Higher simulation distances increase the range of mobs spawning. Furthermore, the game processes ticks within this area, meaning that blocks and mobs outside of this area will not be loaded at all. It can be set to 4, 6, 8, 10 or 12 chunks, although some devices are limited to 8 or 10 chunks. | 4 chunks |
Seed Templates

Next to the world seed text box, there is a button called 'Templates'. This opens the "Seed Templates" screen, where you can select a specific world seed. There are 25 seed templates, each one comes with a name and a picture of the world. If you want to spawn in a specific landscape or near a specific structure, select a matching seed template. The world seed will change into the seed of the template and the picture on the left will change to the template's picture.

Multiplayer
There are a few multiplayer options that influence the game when played by more than one people.
| Setting | In-game description | Description | Default |
|---|---|---|---|
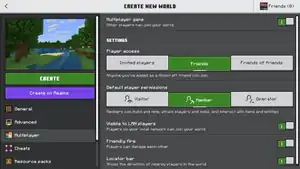
| Multiplayer game | Other players can join your world | Other players (depending on the settings below) can join this world when you are playing it. To join the world, they have to click the join button next to your profile in the friends sidebar. | |
| Player access |
|
This setting changes what type of players can join your multiplayer worlds. When set to Invited players, other players need a invitation you can send from the pause menu to join. When set to Friends, all of your in-game friends can see and join the world you are playing in in the friends sidebar. When set to Friends of friends, this includes friends of your friends. | Friends |
| Default player permissions |
|
This setting changes which player permissions other players have when they join your world. These permissions can be changed and specified more detailed in the "Player Permissions" screen in the pause menu by the world owner. | Member |
| Visible to LAN players | Players on your local network can join your world | Players on the same WiFi network can join your world, even if they are not friends. | |
| Friendly fire | Players can damage each other | Players can attack other players. | |
| Locator bar | Shows the direction of nearby players in the world | Enables the locator bar on the HUD while in multiplayer. |

Cheats
Changing the following settings is considered cheating and disables achievements. For a more 'natural' experience, cheats should be turned off.
| Setting | In-game description | Description | Default |
|---|---|---|---|
| Cheats | Customize the game with cheat settings | When turned on, all other cheat settings are unlocked, disabling achievements for this world. This also enables commands. | |
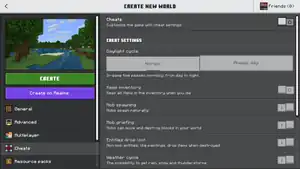
| Daylight cycle |
|
This setting changes the day and night cycle in-game. When set to Normal, the sun and moon move across the sky and day and night pass. When set to Always day, the time is locked and the sun stays in the middle of the sky. | Normal |
| Keep inventory | Keep all items in the inventory when you die | When enabled, players do not drop their items after death but respawn with all their items in their inventory. | |
| Mob spawning | Mobs spawn naturally | When disabled, mobs do not spawn at all. Existing mobs do not despawn directly after disabling this and mobs can still be summoned using commandsm or spawn eggs. | |
| Mob griefing | Mobs can move and destroy blocks in your world | When enabled, mobs like villagers, creepers, the Wither, the Ender Dragon and endermen can pick up, destroy and place blocks. | |
| Entities drop loot | Non-mob entities, like paintings, drop items when destroyed | When enabled, entities like armor stands, boats, minecarts and paintings drop as an item when destroyed. | |
| Weather cycle | The possibility to get rain, snow and thunderstorms | When enabled, the game randomly changes the weather between clear, rain/snow and thunder every few minutes. When disabled, the weather stays the same as it was before. | |
| Command blocks | Use commands to program these blocks | Enables the placement and obtaining of command blocks, used to execute commands automatically. | |
| Education Edition | Optimized for desktop devices | Enables some features from Minecraft Education in this world, like chemistry. When enabling this after world creation, it is recommended to make a copy of the world, since it can corrupt some chunks. | |
| Random tick speed | Affects the behaviour of certain blocks, like the speed of vegetation growth and decay (max 4096) | Controls the speed of random processes, like the growth of vegetation, spreading of grass, and cauldrons filled by rain, snow or dripstone. Higher values of the random tick speed may cause some lag. | 1 |

Resource packs
This settings screen allows the player to enable and disable resource packs.
| Setting | In-game description | Description | Default |
|---|---|---|---|
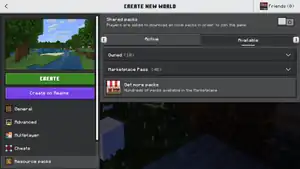
| Shared packs | Players are asked to download all local packs in order to join the game. | When other players join your multiplayer world with resource packs and they do not have them installed, a message pops up asking to install the resource packs. When other people join the world without these resource packs, they might get a different experience. |
Below, there are two lists of resource packs.
Active
When selecting 'Active', all resource packs activated for this world are shown below in two sections. The first list, Local, shows the activated resource packs that are downloaded on this device. There are a few things to keep in mind when enabling resource packs.
- The order of the resource packs. Activated resource packs are applied in the order shown in this list (there are numbers showing it on the left). When certain resource packs overrule each other, they will be applied from the lowest number to the highest (example: if there are two resource packs changing the textures of grass enabled, only the first one will be applied). The order can be changed by grabbing a resource pack on the left side, and placing it in another spot between other resource packs.
- The resource packs have a name, icon (on the left side), and description. Clicking on a resource pack will show the description, size in MB or GB (on the right side), and there are links to other screens: 'More details', which takes you to the purchase screen of the resource pack in the Marketplace (if bought from the Marketplace), and 'Technical details', opening a Pack Info screen.
- The "Pack Info" screen shows, below the information of that resource pack, the Pack ID (this is a UUID, make sure that this is not the same as other resource packs), the Pack version (this is not a Minecraft version, but the version of that specific resource pack), the File location, this is where you can find the resource pack on your device, and an error list. If everything is good, it says: 'No errors were found', and there are no issues listed below. If there is an error, it says what type of error it is (like Warning) and the issues are listed below. The button on the right side copies the error to the clipboard.
- To remove resource packs, press the 'Remove' button on the right side of the resource pack.
Below the Local resource pack list, there is a list of enabled Global resource packs, which are disabled when 'Shared packs' is turned on. Global resource packs can be activated and deactivated in the settings. The 'Minecraft texture pack' is enabled by default. It shows the icon of a 3D grass block and a description below: 'The default Minecraft graphics, now updated with stylish new textures!'
Available
When selecting 'Available', all disabled resource packs are shown. There is a list of owned resource packs showing all resource packs that are stored locally or ever bought from the Marketplace, with a number indicating the amount of packs next to the header. This list shows the same as the 'Local' list described above, except these resource packs are not applied to your world. To apply them, press the 'Activate' button on the right. This will move the resource pack to the active resource pack list. If the resource pack is not downloaded yet, a message appears asking to download the resource pack. Press the green 'Download and activate pack' button to start the download and the message indicates the process.
Below the list of owned resource packs, there is a list of Marketplace Pass resource packs. If you don't own the Marketplace Pass, a description appears with a button, 'Learn more'. Pressing this button takes you to the purchase screen of the Marketplace Pass. If you own the Marketplace Pass, resource packs featured from the Marketplace Pass are shown here, and you can download and activate them with the button on the right.
Below, there is a button called 'Get more packs'. This button redirects you to the "Search" screen of the Marketplace.
Activating and deactivating resource packs plays a notification sound, and a short message pops up at the bottom of the screen.

Behavior packs
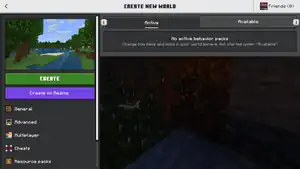
This settings screen works fairly the same as the Resource packs screen, except there are only local (enabled) behavior packs and owned (available) behavior packs. Behavior packs are often part of a resource pack. Enabling the resource pack with the same pack UUID will enable the behavior pack.
Unlike resource packs, behavior packs permanently disable achievements for a world.

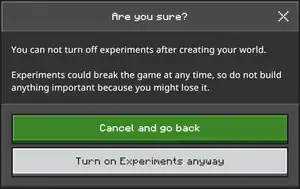
Experiments

This settings screen allows the player to enable experimental features for this world. Experiments can not be turned off after creating the world and might damage parts of the world. A warning appears at the top of the screen: 'Experiments are potential new features. Be careful as things might break.'
All experiments are turned off by default.
| Setting | In-game description | Description |
|---|---|---|
| Gameplay | Change the way your world works | The settings below are potential upcoming features. |
| Villager Trade Rebalancing | Contains updated trades for villagers for the purpose of rebalancing | This experiment overhauls the villager trading system (for example: the addition of biome-related trades). For more info, see Villager Trade Rebalance. |
| Add-on creators | For the creators of game packs and other add-ons | The settings below are technical features, allowing to modify add-ons more easily. |
| Custom biomes | Create custom biomes and change world generation | |
| Upcoming Creator Features | Includes actor properties and adjustable fog perimeters | |
| Beta APIs | Use "-beta" versions of API-modules in add-on packs | |
| Experimental Creator Camera Features | Enables the use of the latest custom camera features. | |
| Render Dragon Features for Creators | Enables the deferred rendering pipeline, a set of cross-platform graphics features for creators. This also enables point lighting in Vibrant Visuals. This experiment is only available in Minecraft Preview. | |
| Data-Driven Jigsaw Structures | Loads Jigsaw Structures from the behaviour pack worldgen folder |
When enabling experiments, a warning message pops up, warning the player for the possible dangers of experiments.
Edit World
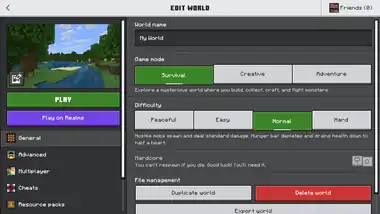
By pressing the 'Edit' button next to a world (list mode)/below a world (gallery mode) in the 'Worlds' tab, you can change the world's options. The "Edit World" screen is roughly the same as the "Create New World" screen, although there are a few differences. Some options like the world seed can not be changed, and a few new options like 'Delete World' appear. The differences are listed below.
Play on Realms
The purple 'Play on Realms' button opens a screen similar to the "Select a Realm" screen which opens from the "Create New World" screen. After selecting a Realm, this will upload a copy of the world to the Realm, but you do not enter it.
Adventure
Under the game mode setting, a new button appears which activates Adventure mode. The description below summarizes it: You get to set your own rules through in-game commands on how you and other can interact with the game.
By default, players in Adventure mode can not break or place any blocks in the world. They can, however, use other features of the game such as interact with blocks and entities.
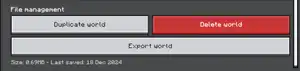
File management
Under the 'General' options tab, a new section called 'File Management' appears. Three new buttons and some information relating to the world's file are found here.
| Option | Description |
|---|---|
| This makes a copy of the world. The name is the same as the old name, with the number of the copy in brackets behind it ('(1)' or '(2)' etc.). | |
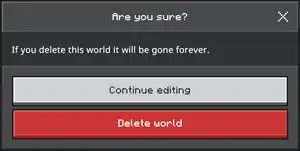
| This deletes the world. An "Are you sure?" message pops up before you can delete it. | |
| This button takes you to the "Export world" screen, where you can export the world and move it to other directories. Only available for Windows devices. |
Below these buttons, the size and date of latest save is shown.
Exportation settings
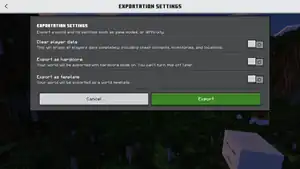
After pressing 'Exportation Settings', this screen opens. There are a few settings that can be changed before the world will be exported.
| Setting | In-game description | Description | Default |
|---|---|---|---|
| Clear player data | This will erase all players data completely, including chest contents, inventories, and locations. | Erasing player data is recommended when sending the world to someone else, but only do it when you are not going to play this world again. You can also make a copy before exporting. | |
| Export as hardcore | Your world will be exported with hardcore mode on. You can't turn this off later. | Enables Hardcore mode for the world, even if it has been created with Hardcore mode off. | |
| Export as template | Your world will be exported as a world template. | Exports the world as a .mctemplate file instead of a .mcworld file. World templates can't be imported with the regular import world feature, instead, you need to import it in the "Owned by me" tab in the "Create from..." screen. |
By pressing the green button, the world will be exported as a .mcworld or .mctemplate file. You can choose in which directory the file will be saved.
 World thumbnail

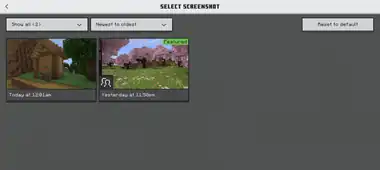
In the Edit World screen, the world thumbnail appears in the top-left (picture). This is by default an automatic screenshot made after saving and quitting the game. Press the edit button to open a pop-up screen. Here, you can reset it to default (the latest automatic screenshot), or change it into another screenshot. Press 'Change thumbnail' to open the "Select screenshot" screen. In this screen, all in-game screenshots (made by pressing F2 or the screenshot button in the pause menu) are shown with the date and time. Up to 48 screenshots are shown per page, you can navigate between pages at the bottom of the list.
Press the button on the top-left to select which screenshots are shown. There are four options:
- Show all. This shows all screenshots.
- Showcased. This shows all screenshots you have selected in your showcase gallery.
- Unmarked. This shows all screenshots without a tag.
- Featured. A screenshot can be featured when it is selected as your profile image.
Press second button to sort the screenshots, either from newest to oldest or oldest to newest.
You can view and edit these screenshots from the screenshot gallery accessible from your profile.
It is recommended to pick a thumbnail from the same world, or at least something that has to do with the world, to prevent disorder.
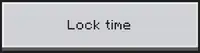 Lock time
Under the setting 'Daylight cycle', a new option appears. When selected, the in-game time will be locked in the current time.
Not changeable
Some options can no longer be changed after creating the world. These include:
- World seed. The world seed is visible but can not be changed. The 'Templates' button is replaced with a 'Copy seed' button, which copies the seed to the clipboard.
- Hardcore
- Flat world
- When the world has been created as a flat world, the flat world option shows which preset has been selected and which blocks the world is made of.
- Starting map
- Bonus chest
- Disable experiments (that were enabled before)
Additionally, if any options that disable achievements have been changed before, changing them back will not enable achievements again (unlike what the message at the top of the screen says). When changing these options the first time, the message at the top shows which settings currently disable achievements.
Save your changes
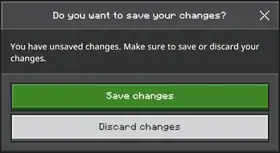
When leaving the edit world screen, a message pops up that lets you save the edits, or discard them. The edits will be saved automatically when pressing the Play button.
Realms
Without access to a Realm
When you don't have access to a Realm, this screen functions roughly the same as the Realms screen accesible from the main menu. However, you can also join other Realms servers from this screen. There are three buttons.
The 'Try free' button opens the purchase screen of Minecraft Realms. See Realms below for more information.
The 'Invitations' button opens the Realms invites tab of the inbox. You can join a Realm from an invite.
Press 'Join a realm' to open a screen where you can enter the invite link you received from an invite. Press 'Join' after entering the link and you can start playing. From this screen, there is also a button to see invitations in the inbox. There is also a help button which opens this page in Minecraft.net.
Invite links always begin with realms.gg/, followed by a code. If you've entered a valid invite link, a screen opens where you can see more information about the Realm. There is a purple button below to join the Realm.
You can also join a Realm by entering https://realms.gg/ followed by the invite link in your browser's search bar. When you've entered a valid link, you can launch Minecraft from here and instantly join the Realm.
With access to a Realm

When you have access to at least one Realm, either by owning the Realm or by having an active invite, this screen shows all Realms servers as well as the option to play in a Realm. You can also access Realms Stories from here, and change a Realm's settings.
On the left side of the screen, two lists of Realms are shown. The first list shows all of your owned Realms, and the second list shows all Realms you joined. Press a Realm to view more information and options on the right side of the screen. Press the 'Add/join Realm' button below to open a menu where you can join a Realm or add a new subscription.
On the right side of the screen, you can view information about the Realm. You can see how many players are currently playing, whether it is your own Realm or a Realm you've joined, how many players are allowed to join the Realm, when you've played the Realm for the last time, the Realm's description, and world tags from the active world on the Realm (Survival, Creative, Hardcore, etc.).
This screen has a few buttons:
| Option | Description |
|---|---|
Opens a menu with the options to add a new Realms subscription, join a foreign Realms server, or open the Minecraft Realms information screen.
| |
| Opens the Realms loading world screen and joins the world that is currently set to active. | |
| Opens the Realms Stories menu. | |
| Opens the "Edit Realm" screen where you can activate or edit worlds, or manage the Realm's settings. Only available for the Realm's owner. | |
| Opens the Members tab in the "Manage Realm" screen where you can add or remove members from the Realm. Only available for the Realm's owner. | |
| Opens a pop up message with an option to leave the Realm. Only available for members of the Realm. |
Realms Stories
Realms Stories is a social hub for all players who joined the Realm. You can post messages, comment, and view activity on the Realm from here. This screen has three tabs, and a settings button on the top-right of the screen.
Story Feed
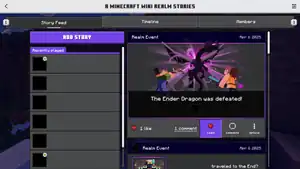
This tab shows all stories posted on the Realm, from newest to oldest. On the left side of the screen, you can view all players who have been recently active. Press on a player's button to open their profile. See Profile and Profiles from other players for more information.
Press the purple Add Story button to add a new story. In this screen, you can write a message, and select a screenshot which can be included in the story. Press 'Add screenshot' to add a screenshot from your screenshot gallery. You can change or remove this screenshot afterward. Press the purple Post button to post the story. To add a story, it must contain at least one character in the message box, or a screenshot. After posting, the story will be visible for all players who have joined the Realm.
On the right side of the screen, a list of stories is shown. Each story shows the sender, the time when the story has been sent, and the message. If the story contains an image, you can click on it to view it in fullscreen. Below each story, you can see how many likes the story has, and how many comments. There are also a few buttons.
Press 'Like' to like the comment. If you've already liked the comment, this will 'unlike' the comment. You can also like your own comments.
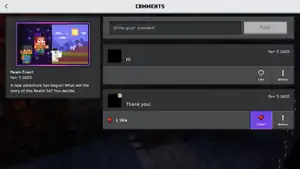
Press 'Comments' to open the Comments screen for that story. You can see the story on the left side on the screen, and a list of comments on the right side. You can write a comment in the text box above, and post it with the button next to it. For each comment below, you can see when it was posted, who has posted it, and how many likes it has. You can also like the comment, and open the options menu for that comment. The options menu has the same options as the options for stories.
Press 'Options' to open a menu with a few options for this story:
- Delete Story. Only available for your own stories, or if you are the Realm's owner. This will delete the story for everyone.
- Notify Realm owner. Only available for members, for stories not made by the owner. This will send a notification to the Realm owner about the story.
- Report to Xbox Enforcement. This will open a variant of the "Report Bad Behavior" screen, with a few less options you can select as reason. The report will be sent to Xbox instead of Mojang Studios.
At the bottom of the list, there are arrows and number buttons to navigate to a page. You can select a page by pressing a page number button, and you can select the next/previous page with the arrow buttons.
Timeline
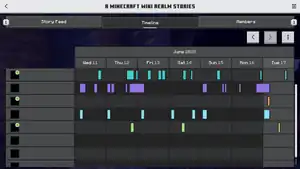
In the Timeline, you can see the activity of all members. To see the timeline and let others view your timeline, you need to opt in. Press 'I want to opt in' to join the timeline.
The Timeline consits of a table with the seven last days, and a row for each player. The moments a player has played on the Realm are colored, for each player a separate color. Press on a player to open their profile. You can view older weeks in the timeline by pressing the arrows buttons above.
Press the options button in the top-right to open the options menu for the Timeline. There are a few options:
- About Timeline. This shows some information about the Timeline. Press 'Learn more' to open the Realms Stories tab in the Encyclopedia.
- View opted out members. This shows a list of members that have not opted in to the Timeline.
- Opt out from Timeline. This will remove your access to the Timeline. You can always opt in again.
Members
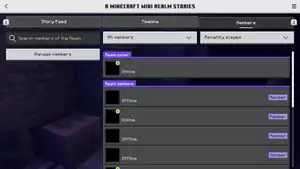
This tab shows a list of members of the Realm. You can search for members in the text box on the left side. You can filter the list between all members, online members, and members currently playing on the Realm. You can sort the list between player names or recently played, ascending or descending.
The list of members shows the Realm owner at the top, and the members below. Press on a player's button to view their profile.
For the Realm owner, there is also a button to manage the members on the left. This will take you to the Members tab in the "Manage Realm" screen.
Realms Stories settings
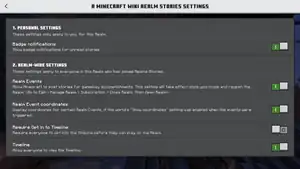
The Realms Stories settings are divided into two sections. The second section is only available for the Realm owner.
| Option | In-game description | Default |
|---|---|---|
| Personal settings | These settings only apply to you, for this Realm. | |
| Badge notifications | Show badge notifications for unread stories. | |
| Realm-wide settings | These settings apply to everyone in this Realm who has joined Realms Stories. | |
| Realm Events | Allow Minecraft to post stories for gameplay accomplishments. This setting will take effect once you close and reopen the Realm. (Go to Edit > Manage Realm > Subscription > Close Realm. Then Open Realm) | |
| Realm Event coordinates | Display coordinates for certain Realm Events, if the world's "Show Coordinates" setting was enabled when the events were triggered. | |
| Require Opt in to Timeline | Require everyone to opt into the Timeline before they can play on the Realm. | |
| Timeline | Allow everyone to view the Timeline. This setting is locked to ON if "Require Opt in to Timeline" is enabled. |
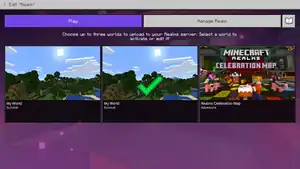
Edit Realm
From the "Edit Realm" screen, you can select the active world, open the Realm's settings, and open the world's settings. There are also buttons to start playing and open Realms Stories.
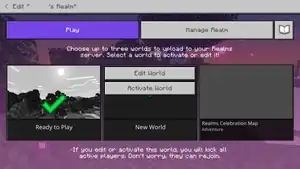
Up to three worlds can be stored on a Realm, and only one can be active. The active world is the world that opens when you press the 'Play' button. The active world is marked with a green check mark. Press a world and press 'Activate World' to set it as the active world. Press 'Edit World' to open the world's world options.
The third slot is by default filled with a world template called Realms Celebration Map. This is an Adventure world used to show players the functionalities of Realms.
A world will be generated as soon as a player joins the Realm.
Edit World
All world options can be changed from this screen. However, this screen uses the old UI, making it very different from the regular "Edit World" screen. There are four tabs.
Game Settings
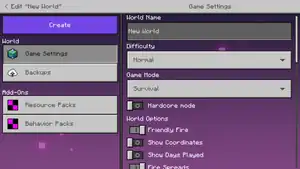
Most options that can be changed from the regular "Edit World" screen or "Create New World" screen can also be changed here. The following option can only be changed before generating the world:
- Hardcore mode
The following options that can be changed in the regular "Edit World" screen or "Create New World" screen can not be changed here:
- World thumbnail
- World seed
- Flat world
- Bonus chest
- Simulation distance
- Education Edition
- All multiplayer settings
- All experiments
- All settings in the 'File management' section
By creating a world from the "Create New World" screen and then uploading it to the Realm, you can still change and view these options.
At the bottom of the screen, there are a few buttons:
- Download World. Instantly downloads the world. It will show up as '[REALM NAME] - Copy' in the Worlds list.
- Replace world. Opens a list of worlds stored on your device. Select one to replace all world data with the data of that world.
- Reset world. Deletes all world data and creates a new world as soon as you play it.
Backups

This tab shows a list of backups for the world. Minecraft Realms automatically creates a few backups. Each backup shows the time it was made and its size. Press on a backup to replace all world data with the data from the backup. Press the download button on the right to download the backup to your device. This will show up as '[REALM NAME] [BACKUP DATE & TIME: DD-MM-YYYY HH:MM:SS] - Copy' in the Worlds list.
Resource Packs
This tab has the same options and functionalities as the Resource packs tab in the "Edit World" and "Create New World" screen. Because it uses the old UI, the usage is somewhat different. You can activate a resource pack by pressing it and then pressing the 'Activate' button.
Behavior Packs
This tab works the same as the "Resource Packs" tab, but for behavior packs.
Manage Realm
From this screen, you can change settings that apply to the whole Realm and are not world-dependent. There are four tabs.
Game Settings
| Option | Description | Default |
|---|---|---|
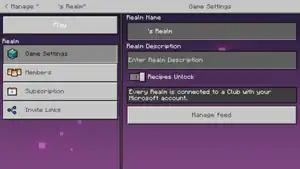
| Realm Name | The Realm's name, which appears in the Realms list and in Realms invites. | [GAMERTAG]'s Realm |
| Realm Description | The Realm's description, which appears in the main menu of the Realm. | |
| Recipes Unlock | Whether crafting recipes have to be unlocked by collecting certain materials. This setting applies to all worlds on the Realm. | ON |
| Manage Feed | This opens a menu where you can see all Realms Stories from which players have send you a notification. You can ignore a notification, or delete it. |
Members
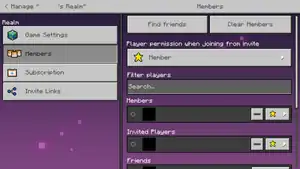
This tab shows all members of the Realm, as well as players you can send invites to. There are a few buttons.
| Option | Description | Default |
|---|---|---|
| Find friends | Opens the "Search for players" screen, where you can add new friends. | |
| Clear Members | Removes all members from the Realm and deletes all pending invites. | |
| Player permission when joining from invite | The player permission when a player joins the Realm for the first time. This can be changed afterward in the pause menu or in the list below. Can be set to Visitor, Member, and Operator. For more information, see Player Permissions below. | Member |
| Filter players | A search box for the player list below. |
Below, there are four lists of players: Members, Invited Players, Friends, and Blocked. You can change the player permission for members and invited players. You can also remove a player from the Realm with the button next to it. In the Friends list, you can send each player an invite which will appear in their Inbox. Blocked players are not able to join the Realm with invite links. You can unblock players with the button next to them, but this won't add them as a Realm member. Players can be blocked from the "Player Permissions" screen in the pause menu.
Subscription
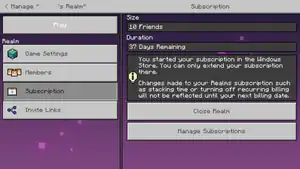
In this tab, you can find more information about the subscription for the Realm. Press the 'Manage Subscription' button at the bottom of the screen to open the "Subscriptions" tab in the settings. Press 'Close Realm' to shut down the Realms server. When a Realms server is closed, no one can enter the Realm, but Realms Stories is still open. Press 'Open Realm' to open the Realm again.
Invite Links
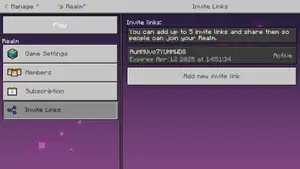
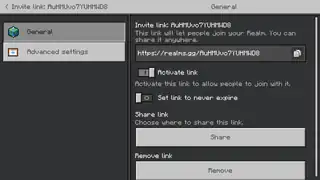
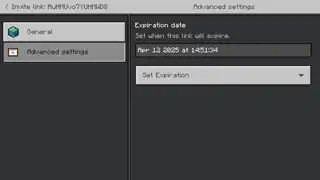
In this tab, you can view active invite links and add new links. Invite links are used when joining a Realm without an invite, from the "Join a Realm" screen. For each link, you can see when it expires. Press 'Add a new link' to open a menu where you can add a new invite link. This menu has two tabs, a "General" tab and an "Advanced Settings" tab.
| Option | Description | Default |
|---|---|---|
| Invite link | Shows the invite link. This can't be changed, but you can copy the link with the button on the right. | https://realms.gg/[INVITE LINK] |
| Activate link | Whether the link is active or not. When the link is not active, entering the link in the Join a Realm screen won't let you join the Realm. | ON |
| Set link to never expire | Disables an expiration time, and lets the link be active forever, or until you remove the link. | OFF |
| Share | Opens the device's share pop up menu, where you can share the link with others. | |
| Remove | Removes the invite link. |
| Option | Description | Default |
|---|---|---|
| Expiration date | Shows the expiration date and time of the link. This can only be changed with the option below. | One week after creation |
| Set Expiration | Extends the expiration date to Never, 30 minutes, 1 hour, 6 hours, 12 hours, 1 day, or 7 days. | 7 days |
-
 The "General" settings tab for invite links.
 -
 The "Advanced settings" tab for invite links.
Advanced
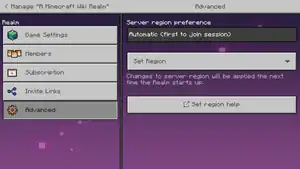
In this tab, you can select in which region the Realms server is located. When the server is located closer to a player, their connection is more stable and faster, allowing for smoother gameplay. The selected server region is shown in a text box at the top of the screen, and can be changed with the dropdown menu below. By default, this is set to Automatic (first to join session). This means that the region with the lowest ping for the first player that joins the Realm will be selected. By selecting Automatic (Realm owner connection), the region with the lowest ping for the owner of the Realm will be selected upon joining the Realm. Furthermore, there are options to choose a specific region for the server. The ping is shown on the right side of each region, and the regions are sorted from the lowest ping to the highest. When changing these settings while someone is playing on the Realm, the changes will be applied the next time the server restarts. This needs every player to disconnect from the world and reconnect a few moments later.
The selected region and the ping is shown while joining the Realm in the loading world screen.
Below, there is a button that opens the Minecraft Help Center, but without opening specific information about server regions.
Beta/Preview Realm
When you own a Realms subscription, you can also create a separate Realm on Minecraft Preview for free. This Realm is connected to the subscription of your main Realm, but the server is completely separate and does not affect your main Realm at all. When the subscription for your main Realm ends, your Preview Realm will be closed as well. You can't manage the subscription settings on Preview, but all other features are still available, including the option to create three different worlds on the Realm.
To create this Realm, you need to press the 'Claim Realm' button in the message that appears on the Realms tab when you own a Realms subscription. This opens a menu where you can select the subscription to connect this Realm to. Press a subscription to open a pop up where you can create the Realm and instantly start playing.
Servers
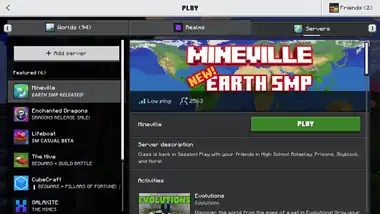
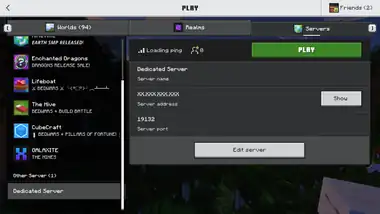
This tab lists all available online servers, as well as lets you add a new server. On the left side of this screen, a list of servers is shown. By pressing one, the information about this server is shown on the left. There are a few featured servers available by default, others need to be added with the button below.
On the right side of the screen, information about the server is shown, as well as the 'Play' button. Press this button to immediately join the server. To load and join servers, you need to be signed in with a Microsoft account. The information contains the amount of active players, the ping, screenshots and a description (some servers can have other information). Other servers also show the server address with the port. The server address is replaced with "X" marks by default for security. To show the address, press the 'Show' button and confirm it in the pop-up. The address can always be hidden afterward with the 'Hide' button.
Add server
To add a server currently not listed here, press the 'Add Server' button at the top-right. This opens a pop-up message, warning you that you should only connect to servers you trust. Press 'Proceed' to open the "Add a new server" screen. Here, you must enter the name, IP address, and port to connect to the server. It does not matter what name you enter, choose a name you like. Enter the server's IP address in the next box, and enter the port in the last box (by default, it is 19132).
Press 'Add and play' to enter the server. Press 'Add server' to add it to the servers list (this will also be done after playing).
Edit server
To play it again, simply press the server to show the information and play button on the right. You can remove the server from the list, or change the name and address by pressing the 'Edit server' button on the right.
If you want to create your own server, see Tutorial:Setting up a Bedrock Edition server.
-
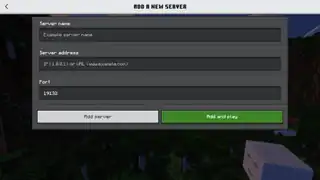 The "Add a new server" screen.
 -
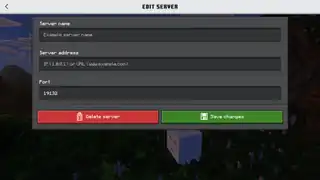 The "Edit server" screen.
Settings
The second button in the main menu opens the "Settings" screen. All settings that are not world-depended can be changed here. Most of these settings can also be changed from the pause menu. There are a few tabs.
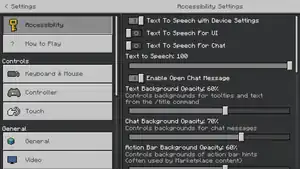
Accessibility
The accessibility options can make the game more playable in certain situations. Changing some of these settings may disable some gameplay features. For the most 'natural' gameplay, leave these settings to default. Press 'Reset to Default' to set all options to their default state.
Accessibility options include options like text to speech, UI styles and some visual effects. For a detailed explanation on all options, see Options § Accessibility.
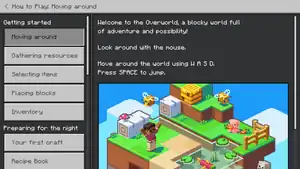
How to Play
This opens the "How to Play" screen, a detailed explanation of the game for beginners. It is separated in several tabs, opened from the left side of the screen. On the right side, a description is shown with pictures and symbols.
Navigate to game mechanics you struggle with and find some tips here. You can also view some tutorials for more detailed information.
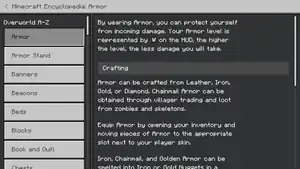
Encyclopedia
Below the information tabs on the left, there is a button that opens the "Encyclopedia". In the encyclopedia, very detailed information can be found about several game features. It works fairly the same as the "How to Play" screen. It can also be opened from some GUIs.
Keyboard & Mouse

With these settings, most controls can be changed when playing with a keyboard and mouse. Press the button for the controls you want to change, then press the button you want to change the control into to change the control. There are also a few settings above affecting the controls. Press 'Reset to Default' to reset all options to their default state.
| Option | Description | Default |
|---|---|---|
| Camera Sensitivity | Adjusts the speed of camera movement. Higher sensitivity values means faster camera movement. | 50 |
| Spyglass Damping | Adjusts the movement of the camera when using a spyglass. Higher damping values means slower movement. | 50 |
| Invert Y-Axis | Invert the y-axis of camera movement (moving mouse). Moving the mouse upward moves the players head downards. | OFF |
| Auto Jump | The player jumps automatically when walking into a one-high wall. | OFF |
| Full Keyboard Gameplay | Allows the use of more buttons for the controls (like the arrows for moving). For specific information, see Controls. | OFF |
Below these options, you can change the controls of most actions. Select the button of an action to pick an imput for that action. The first button pressed after selecting the control will be selected next. You can press the button on the right to reset it to its default state. For a full list, see Controls § Keyboard & Mouse.

Controller
The settings for the controls for a controller are in most cases the same as for keyboard and mouse. For all the controls and default settings, see Controls § Controller.
The different options for controller are listed below.
| Option | Description | Default |
|---|---|---|
| Hide Controller Hints | Hide the controller hints in the menus and GUIs. | OFF |
| Hide Controller Cursor | Hide the cursor of the controller in the menus and GUIs. | OFF |
| Clear Hotbar | OFF | |
| A/B Button Swap | Swaps the controls for the A and B button on the controller. | OFF |
| X/Y Button Swap | Swaps the controls for the X and Y button on the controller. | OFF |
| Controller Cursor Sensitivity | Change the sensitivity of the controller cursor while turning. | 100% |
Below these options, you can change the controls of most actions the same way as the layout for keyboard & mouse controls.
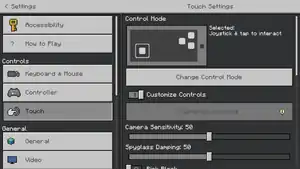
Touch
These are the settings for the controls while using a touch screen device. The settings that also appear in Keyboard & Mouse are not shown here.
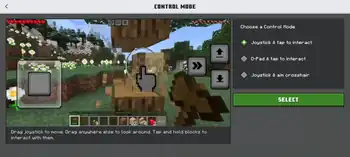
Press the button 'Change Control Mode' to open a screen where you can change the mode of the controls. There are three options on the right side of the screen, the first one is the default option.
- Joystick & tap to interact. Drag joystick to move. Drag anywhere else to look around. Tap and hold blocks to interact with them.
- D-pad & tap to interact. Tap arrows to move. Drag anywhere else to look around. Tap and hold blocks to interact with them.
- Joystick & aim crosshair. Drag joystick to move. Drag anywhere else to look around. Aim crosshair and use buttons to interact with blocks.
On the left side of this screen, a short video is shown where all buttons are visibly used in a Minecraft world.
| Option | Description | Default |
|---|---|---|
| Customize Controls | Unlocks a button which redirects you to a screen where you can change the position, opacity and size of the buttons in the screen, which is only available from the pause menu. | OFF |
| Pick Block (Creative only) | Pick a block by tapping on it in Creative mode. | OFF |
| Left hand mode | Swaps the right and left side of the controls. | OFF |
| Sprint using the joystick | Hold the joystick forward to sprint. | OFF |
| Show Camera Perspective Button | Shows a button on the top of the screen to change the player's perspective | OFF |
| Joystick Visibility Option | Change whether the joystick is visible or not between the following options: 'Visible Joystick', 'Hidden Joystick', and 'Hidden Joystick When Unused'. | Visible Joystick |
| Joystick Opacity | Change the opacity of the joystick. | 50% |
| Sneak | Change the control for sneaking between 'Tap button once to sneak' and 'Hold down button to sneak'. | Tap button once to sneak |
| Mobile menu size | Changes the zoom of the menus. | 50% |
| Vibrate When Breaking Blocks | Lets the device vibrate while breaking a block. | ON |
| Vibrate When Splitting Items | Lets the device vibrate when splitting items. | ON |
| Delayed Block Breaking (Creative Only) | Breaking a block requires a longer press in Creative mode. | ON |
| Touch Only Affects Hotbar | Choose whether to use touch for the hotbar only. | OFF |
General
In the "General" settings tab, a few general settings can be changed and there are some links for more information.
| Option | Description | Default |
|---|---|---|
| Allow mobile data for online play | Toggle to enable multiplayer connections when connected to a mobile network instead of Wi-Fi. Only available for mobile devices. | OFF |
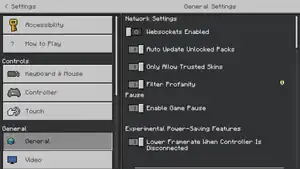
| Websockets Enabled | Allows the player to connect to WebSocket servers, primarily used on Minecraft Education. | OFF |
| Require Encrypted Websockets | Only allows WebSocket connections with encryption. Only available when "Websockets Enabled" is turned on. | ON |
| Auto Update Unlocked Packs | The game automatically updates worlds and resource packs bought from the Marketplace. It does not directly influence your own worlds created from it.
For mobile devices only, this is a dropdown menu with 3 options:
|
ON with Wi-Fi Only on mobile devices, OFF on other platforms. |
| Tutorial | Shows tutorial hints the first three times you are playing Minecraft, informing you about how to play the game. This option is only available for certain players. | ON |
| Restart Tutorial | Resets all tutorial tip counters and shows all tutorials again when playing. This option is only available for certain players. | |
| Only Allow Trusted Skins | Custom player skins will not be shown. | ON |
| Filter Profanity | Turns on profanity filtering. When on, a text filter is applied to what you see. When off, you can see most text unfiltered. | ON |
| Lower Framerate When Controller Is Disconnected | When playing with a controller, the game lowers the framerate if there is no connected controller (practically when the player is afk). | ON |
Below, there are a few buttons that open a link or take you to another screen.
| Button | Description |
|---|---|
| Credits | Immediately starts the End Credits scene, skipping the End Poem. Press a button to let the 'Skip' button appear in the bottom-right of the screen. Press this button to go back to the settings. |
| Attribution | Opens this link, where you can find some links and attributions. |
| Help Center | Opens the Minecraft Help Center, where you can find information on several aspects of the game. |
| Licensed Content | Opens this link, where all licensed content can be found. |
| Font License | Opens a pop-up screen where the complete Noto Sans Font License is shown. |
Below, there is some technical information about the game, containing the version, build, branch, network and some other details.
Video
In this screen, you can change the options affecting the screen and video, like brightness, fullscreen, FOV, render distance, graphics, and Ray Tracing. Press 'Reset to Default' to reset all options to their default state.
Some settings that might need some explanation are described below. For a description of every option, see Options § Video.
| Option | Description | Default |
|---|---|---|
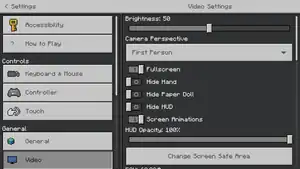
| Camera Perspective | Toggle first/third person view. This can also be changed by pressing F5. | First Person |
| Hide Paper Doll | Hide a paper doll in the top-left of the screen. When off, this paper doll shows up while flying, swimming or sprinting. | OFF |
| FOV | Changes the field of fiew. It might become hard to play the game when set to other values. Note that the slide switch can not be set back to 60.00 but 60.40 (it is not very accurate). | 60.00° |
| Show Autosave Icon | Shows an icon of an arrow pointing into a chest in the bottom-right of the screen while autosaving. | OFF |
| Outline Selection | Toggles the small black outline selection of a block. | ON |
| View Bobbing | Toggles the walking animation. | ON |
| UI Profile | Change the UI style between Classic and Pocket (only for the old UI). | Classic |
| Render Distance | Set the render distance. This is the maximum distance you can see in your world. Can be set from 5-96 chunks, depending on your device. Higher render distances may cause lower framerates. A separate slider exists when the graphics mode is set to Vibrant Visuals or Ray Traced. | Varies |
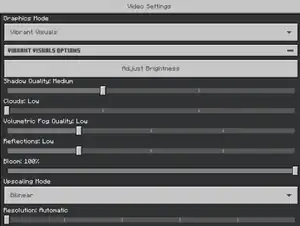
| Graphics Mode | Opens a dropdown menu with 3 graphic modes: Simple, Fancy, Vibrant Visuals, and Ray Traced. Vibrant Visuals is only available for certain devices with specific requirements. A compatible resource pack is needed to enable ray tracing.
When Vibrant Visuals is selected as graphics mode, another setting is shown below with the options to change the quality of Vibrant Visuals to "Favor Performance", "Favor Visuals" and "Custom". Favor Performance is recommended on lower-end devices which might experience performance issues from Vibrant Visuals. Favor Visuals is recommended for higher-end devices without performance issues, and you can select "Custom" to change the quality of individual settings related to Vibrant Visuals below. |
Vibrant Visuals |
Graphics options
Graphics settings related to the graphics mode are located behind a collapsible header below the graphics mode option. For Fancy and Simple graphics, these include:
- Framerate Limit
- Lower the game's maximum framerate to improve battery life and device health. Actual framerate may fall below the set limit. The limit can be set to 30, 35, 40, 45, 50, 55, 60, and Unlimited FPS.
- Anti-Aliasing
- Toggles the amount of multisample anti aliasing, which smooths the image and removes jagged edges. Can be set to 1, 2, 4, 8, and 16.
- Beatiful Skies
- Smooth Lighting
For Ray Traced, these include:
- Framerate Limit
- Anti-Aliasing
- Upscaling
- Boosts frame rates on GeForce RTX graphics cards with NVIDIA DLSS 2.0.
When Vibrant Visuals is selected as the graphics mode, more different options appear.
The render distance slider is replaced by a Deferred Render Distance slider, which is independent of the normal render distance and limited at a lower maximum. The slider can be set between 8 and 24 chunks, with steps of 2.
The following options are hidden behind the collapsible Vibrant Visuals options.
| Option | Description | Default |
|---|---|---|
| Adjust Brightness | This button opens a menu where you can adjust the brightness of the screen. This menu shows three creeper faces with different lighting. For the best Vibrant Visuals experience, the brightness should be set so that the left creeper face is not visible at all, the middle creeper face just barely, and the right creeper face should be clearly visible. The brightness can be adjusted with the slider below, and the setting can be saved by pressing 'Continue'. | |
| Shadow Quality | The quality of shadows created by entities and blocks. Can be set to "Low", "Medium", "High", and "Ultra". | Varies depending on the device. |
| Clouds | The quality of clouds. Can be set to "Low", "Medium", "High", and "Ultra". | |
| Volumetric Fog Quality | The quality of volumetric fog. Can be set to "Off", "Low", "Medium", "High", and "Ultra". | |
| Reflections | The quality of reflections in water or on certain blocks. Can be set to "Off", "Low", "Medium", "High", and "Ultra". | |
| Bloom | Adjusts the strength of light bloom. Slider can be set between 0-100%, with steps of 1%. | 100% |
| Upscaling Mode | Changes the upscaling mode. Can be set to "Bilinear" and "TAAU". | Bilinear |
| Resolution | Adjusts the resolution of upscaling for Vibrant Visuals. Can be set to "Automatic", 33%, 50%, 66%, 75%, and "Native". | Automatic |
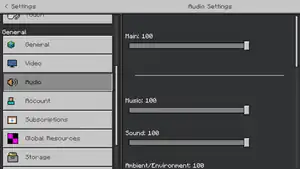
Audio
In this screen, specific sounds of the game can be adjusted in volume. Below, all adjustable sounds are listed, and which in-game sounds are in that category.
- Main. This contains all Minecraft sounds.
- Music. This contains all background music, except music from jukeboxes.
- Sound. This contains all gameplay sounds.
- Ambient/Environment. This contains ambient sounds, flowing water and fireworks.
- Blocks. This contains all sounds produced by blocks.
- Hostile Creatures. This contains all sounds produced by hostile and neutral mobs.
- Friendly Creatures. This contains all sounds produced by passive mobs.
- Players. This contains all sounds produced by players.
- Jukebox/Note Blocks. This includes sounds produced by a jukebox playing a music disc or a note block playing a tone.
- Weather. This includes all weather sounds like rain and thunder.
- Text to Speech. This includes the sound of the voice from the Text to Speech. Enable Text to Speech in the Accessibility settings.
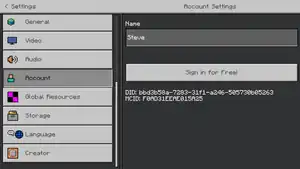
Account
These settings are related to your account settings. The gamertag of the player is shown at the top of the screen, two player ID's at the bottom of the screen. If not signed in, different options are available.
| Option | Description | Default |
|---|---|---|
| Username | Change the in-game username of the player. Only available when not signed in. Default state is a name of one of the default characters. Change it to Dinnerbone or Grumm to turn the player's model upside-down. | |
| Sign in for Free! | Opens the welcome message where there is a button to sign in. Only available when not signed in. | |
| Change Gamertag | Opens the account options in the Xbox app. | |
| Manage Account | Opens the account options in the Xbox app. | |
| Privacy & online safety | Opens the privacy and online safety page on the Xbox Live website. | |
| Manage Realms membership invites | Opens a Realms Membership Invites screen. Here, you can see and manage your Realms invites which are also shown in the Inbox. There is a button above to only show invites from your friends. | |
| Sign out of your Microsoft Account | Signs you out of your Microsoft account. Only available for non-Windows devices. | |
| Use Remote Connect for Microsoft account Sign In (requires restart) | Enables the option to sign in using a Microsoft invite link whenever the player is signed out. Only available for non-Windows devices. | OFF |
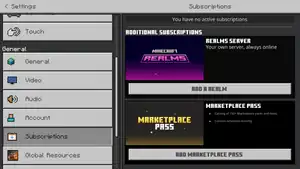
Subscriptions
Shows the available and active in-game subscriptions. Currently, there are three subscriptions:
- Realms server. Press 'Add a Realm' to open the Realms purchase screen.
- Marketplace Pass. Press 'Add Marketplace Pass' to open the Marketplace Pass purchase screen in the Marketplace.
Active subscriptions offer the options to cancel the subscription, and to view more information about the subscription in the Marketplace.
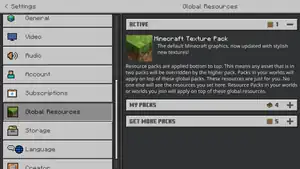
Global Resources
Activate and deactivate global resource packs. These resource packs are always enabled for every world. You can see activated and available packs here, or you can press 'View More Packs' to buy them from the Marketplace.
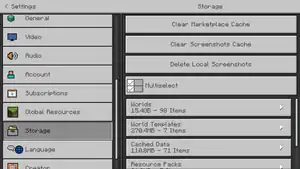
Storage
This tab lets you view all worlds, packs, and some other data. They can easily be deleted from this screen, so be careful while navigating through it.
| Option | Description | Default |
|---|---|---|
| File Storage Location | Choose where the game files are stored on the device, inside the application folder or external. Only available for Android devices. | Application |
| Clear Marketplace Cache | Instantly deletes the Marketplace cache | |
| Clear Download Cache | Instandly clears cache created from downloading Marketplace packs, Realms worlds, or featured server resource packs. | |
| Clear Screenshots Cache | Instantly clears the screenshots cache (includes thumbnails). | |
| Delete Local Screenshots | Delete all screenshots stored inside Minecraft on this device. | |
| Multiselect | Select multiple data from the list below. Press the delete button below to delete all selected data. | |
| Worlds | All the worlds stored on this device, from large size to small size. Press one to unlock a delete button below. | |
| World Templates | All world templates stored on this device (worlds bought from the Marketplace). | |
| Cached Data | Some resource packs and assets related to servers you visited. | |
| Resource Packs | All resource packs stored on this device. | |
| Behavior Packs | All behavior packs stored on this device. |
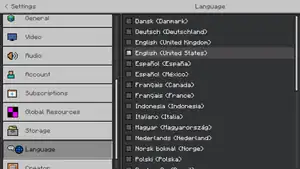
Language
From this screen, the language used in all Minecraft UIs can be changed. Not all languages support the Mojangles font, and some translations may be incorrect. By default, the language selected in the device's settings is used.
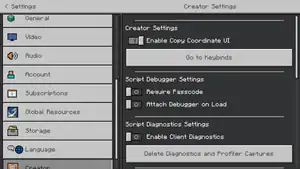
Creator
Settings useful for Add-On creators can be changed here. These often do not impact the normal gameplay. For a more detailed description of every option, see Options § Creator
| Option | Description | Default |
|---|---|---|
| Enable Copy Coordinate UI | This enables a small UI at the top of the chat screen, where you can copy your current or facing coordinates, or paste them into the chat. | OFF |
| Go to Keybinds | Redirects you to the "Keyboard & Mouse" settings tab, even if you use other controls. | |
| Enable Content Log File | Enables the Content Log File. | OFF |
| Enable Content Log GUI | Unlocks the Content Log History button, where you can view old content logs. | OFF |
| Content Log History | Opens the Content Log History GUI, where you can view, copy and delete old content logs. | |
| Delete Old Logs | Deletes old content logs. The log for the current session will not be deleted. |
Realms
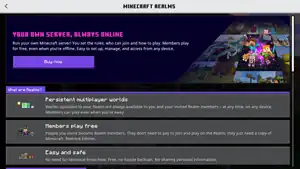
The third button on the main menu is the Realms button. This purple button only appears when signed in. Pressing it takes you to the "Minecraft Realms" screen.
Purchasing Realms
If you have not subscribed to Realms yet, you can find some information about Realms here and you can purchase it. At the bottom of the screen, there are a few frequently asked questions answered.
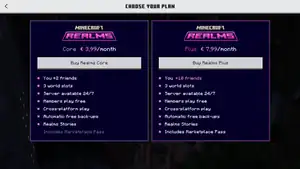
Press the 'Try free' or 'Buy now' button above to select a plan. There are two subscriptions to choose from: Realms Core and Realms Plus. The main differences are:
- Core includes servers for up to 2 players, Plus includes servers for up to 10 players.
- There is a 30-day free trial for Realms Plus.
- Realms Plus includes the Marketplace Pass.
- Realms Plus costs twice as much money as Realms Core.
Press 'Buy Realms Core' to open the purchase screen of a 2 player Realms server. Press 'Free trial' or 'Buy Realms Plus' to open the Realms Plus screen in the Marketplace. Here, you can buy Realms Plus (or start the free trial). You can also find some more information about the subscription here. See Realms Plus for more information about subscribing to Realms Plus.
Buy Realms Core
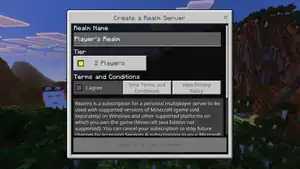
This screen lets you choose a name for the 2 player Realm, and it shows the Terms and Conditions. To make a server, you have to press the 'I agree' button. Two buttons next to it redirect you to the terms and conditions and the Microsoft privacy policy. When agreed, you can press the button 'Create for [money] per month'. The amount of money differs per country. Press this button to open a Microsoft purchase screen and start the subscription.
After subscribing to Realms Plus, the Realms button disappears from the main menu and the Realm can be accessed from the Play screen.
Marketplace
The fourth button on the main menu is the Marketplace button. This button has an animation on it which changes if you hover over it. Press it to open the Marketplace.
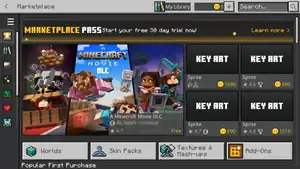
The Marketplace menu contains some tabs on the left, a small bar on top of the screen and many purchasable packs in the middle. From the top of the screen, you can view your library, view and buy Minecoins and start searching for packs. From the left side of the screen, you can view all available tabs. Press the three lines button above to view what each tab is called.
Packs in the Marketplace contain worlds, texture packs, add-ons and mash-ups to add more gameplay. You can buy them for Minecoins and some packs are free.

Purchasing a pack
Click on a pack you like to open the purchase screen of that pack. From this screen, you can view some more information, more images and sometimes videos, share it, add it to or remove it from your wishlist, buy it for Minecoins or buy Minecoins and instantly buy it. You can press one of the tags or genres to open the search screen which shows all packs with that tag or genre. Press 'Download' to download the pack. When the download has completed, you can play it! After buying it, you can also rate it or leave feedback.
Marketplace
From this tab, you can view most popular or featured packs. There are very much packs visible from here, press an arrow button next to a list to view more, or press 'View More' to open a search screen that will show all of the packs available in this category. There are also four buttons that redirect you to screens of that category of packs available in the Marketplace.
Worlds
This will show all available worlds and packs containing worlds. Press one of the four buttons to filter it into specific world types.
Skin Packs
This will show all skin packs. These packs add skins to your Dressing Room. Filter it into skins by Minecraft or all skins with the buttons below.
Textures & Mash-ups
This will show all texture packs and mash-up packs. These packs change the look of your world. Filter it with one of the four buttons.
Sale!
This will show all discounted packs. Press one of the four buttons to open the 'Search' screen.
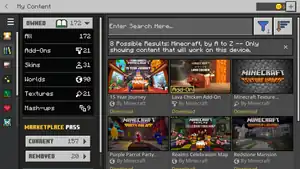
My Content
From this tab, you can view all packs you have ever bought, packs included in the Marketplace Pass and subscriptions. This screen has the same sort options as the search screen, but the only filter option is the pack creator. On the left side of the screen, there are a few tabs and a list with the amount of packs you own per category. The 'Owned' list shows all packs you have ever bought, including Marketplace Pass packs if you are subscribed. The Marketplace Pass 'Current' list shows all Marketplace Pass packs that are currently included. The 'Removed' list shows all packs that have been included in the Marketplace Pass, but are now separate items. The 'Subscriptions' tab shows the same information as the subscriptions tab in the Settings. Press a pack to open the purchase screen and start playing.
Add-Ons
From this tab, you can view all add-ons. In most cases, these are resource packs or behavior packs. They influence your worlds (they do not include worlds).
Marketplace Pass
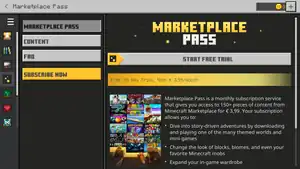
This is the purchase screen of the Marketplace Pass. It works almost exactly the same as the purchasing of Realms Plus below. Subscribing to the Marketplace Pass grants you free access to over 150 packs available from the Marketplace, and some Character Creator items. Just like with Realms Plus, there is a 30 day free trial of the Marketplace Pass.
New Releases
This tab shows the newest packs available in the Marketplace. Press one of the four buttons to filter the packs.
My Wishlist
All packs added to your wishlist (press the heart in a purchase screen to add it) are shown here.
Pop Culture
In this tab, all packs available from official collabs are visible, like Avatar and Moana 2.
Top Sellers
In this tab, the packs with the most downloads are shown.
Popular
In this tab, the packs with the highest ratings are shown.
Realms Plus
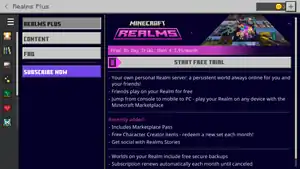
The Realms Plus purchase screen. This screen has four tabs.
Realms Plus
This tab includes some basic information about Realms Plus, and a section with recently added features to the subscription. Press the 'Start free trial' button to open the Subscribe Now tab.
Content
This tab lists content included in the Marketplace Pass, which is included in a Realms Plus subscription. These packs all become available after subscribing to Realms Plus. The 'View all packs' button at the bottom of the screen takes you to a list of all Marketplace packs included in the Marketplace Pass. The 'View Character Creator items' button below takers you to the Character Creator, with a list of items included in the Marketplace Pass.
FAQ
This tab lists a few frequently asked questions with a short answer and an image. This tab includes more frequently asked questions than the main Realms screen.
Subscribe Now
This tab includes a more detailed description of the Realms Plus subscription, as well as the option to subscribe and create a server. You can enter the name of the Realm in the text box below the text. Below, there are two buttons that open the terms and conditions and the Microsoft privacy policy. Check off the 'I agree' checkbox to unlock the button below, which will open a Microsoft purchase screen where you can start the subscription.
Below this button, some more detailed information about the subscription is shown.
Buy Minecoins
From this screen, you can easily buy Minecoins to purchase packs. Press one of the five Minecoin packs to buy them, or press one of the two bundles below to view their details. Bundles contain packs available in the Marketplace combined with Minecoins.
Search
From this screen, you can easily search through all available packs. Enter the name of a pack in the search box above, or use the filter button on the right side to look for specific types of packs. You can filter for pack types, the price in Minecoins, the ratings, most creators, and whether they are available in the Marketplace Pass. Press Clear Filters to clear them and select new ones. You can also sort the packs in relevance, the date they have been added, the ratings, the name or the price.
Dressing Room
Below the miniature player on the right side of the screen, there is a button 'Dressing Room'. Press this to open the dressing room, where you can select, buy, and create skins and emotes. There are five tabs in the dressing room, switch between them on the left side of the screen and view their names by pressing the three lines above. Press 'Go to Marketplace' to go to the Marketplace and buy skin packs or emote packs. However, skins and emotes can also be bought from this screen. You can see your Minecoins at the top of the screen, press it to buy more in the Marketplace.
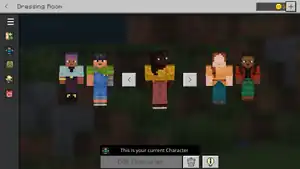
My Characters
In this tab, you can select your current character. The active character is the character shown in the middle, you can activate other characters by pressing one of the arrow buttons next to it, or click on another character. Click on the garbage button to delete the character, click on the light bulb button next to it to view information about characters and skins. Press 'Edit Character' to start editing this character in the Character Creator. Select one of the empty characters at the ends of your characters to create a new one.
At the bottom of this screen, some featured items are shown. Press one to view it on your character and you can buy it for Minecoins.
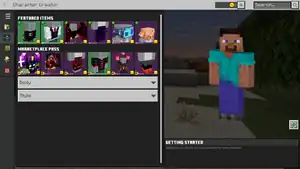
Character Creator
From this screen, you can start editing your characters. The character that will be edited is the currently selected character. Select features on the left side of the screen, then select items to view them on your character. Press the fullscreen button next to your character to view it in fullscreen. Press Equip to equip the item on your character. Below the list of owned items, there is a list of items the player does not own yet. Some are free to download, some can be bought for Minecoins and some can be unlocked by completing an achievement. Press the 'View Achievement' button to view the required achievement.
By default, all classic player character items are unlocked, so the player can make one of the classic characters.
Classic Skins
From this screen, you can select complete skins. Press 'Get More Skins' to buy skins from the Marketplace. Some other Marketplace packs may also contain skins.
The first skin you can select is the Custom Skin. This lets you import a custom skin file from your device. It must be a .png file with a resolution of 64x32, 64x64 or 128x128 pixels. Press 'Choose New Skin' to import a new skin. Imported skins will be shown next to this Custom Skin, but they will not synchronise between devices (they are stored locally). See Skin for more information about creating a custom skin file.
Below, all skins obtained from achievements or Marketplace packs are shown. They are sorted per pack, press one to view it, press 'Equip' to equip the skin. The selected skin will be replaced with this skin, so watch out you do not delete a skin you created with the Character Creator. You can also open the pack in the Marketplace.
Below, some skin packs you can get for the Marketplace and the Marketplace Pass are shown. They can be bought for Minecoins or real money, but you can only buy the whole pack.
Emotes
This tab allows you to buy, download, and equip emotes. At the top of the screen, you can view your owned emotes. Press one to show the emote on your current character. Press 'Equip' to equip it and select one of the four emote slots in the Emote GUI. You can open the GUI in-game by pressing B (by default). Press one of the emotes (or the assigned button for it) to execute it.
Press 'Clear All' to unequip all emotes.
Below, all emotes you do not own yet are shown. Some emotes can be bought for Minecoins, some can be downloaded for free, and some emotes are unlocked by completing a specific achievement. Some emotes are part of a pack and can not be purchased separately.
Capes
Capes are character items the player wears on their back, independent of their skin or character. Just like with other character items, select a cape on the left to view it on your character and press 'Equip' to equip it.
Capes are exclusive items that can not be bought from the Marketplace or obtained from achievements (the Pancape is free for everyone). Capes can be obtained from various sources, most commonly by participating in official events.
Sign In
The Sign In button only appears in the Main Menu when the player is not signed in. Pressing it will automatically sign you in (if already signed in on this device).
If the player has never signed in in-game before, this opens a sign in screen where there is a button to sign in. This automatically signs you in, or opens a pop-up screen where you can sign in with your Microsoft account.
The sign in pop up can also be opened from other menu screens when not signed in, including the Achievements screen, the Friends sidebar, and the Servers tab in the Play screen.
-
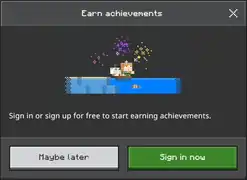 The "Sign In - Earn achievements" pop ups.
 -
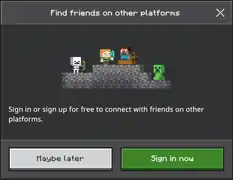 The "Sign In - Find friends on other platforms" pop ups.
 -
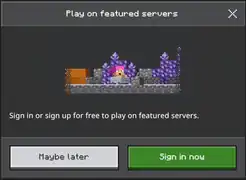 The "Sign In - Play on featured servers" pop ups.
 -
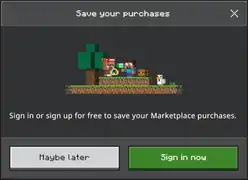 The "Sign In - Save your purchases" pop ups.
Profile
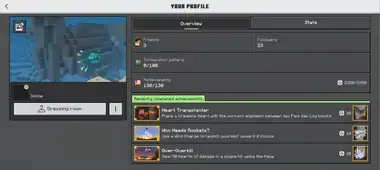
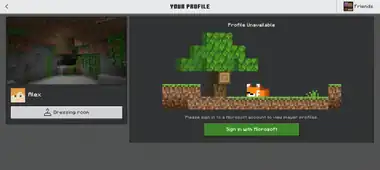
On the left side of the main menu, a button with your profile icon called 'Profile' appears. From this screen, you can view several statistics, achievements, and screenshots.
On the left side of this screen, you can see your profile image with your own gamertag and profile icon, with an online status, below. On the right side of the screen, an overview is shown, where you can open the achievements, friends, followers, and screenshots screens. Some suggested and recently completed achievements are shown below.
| Option | Description |
|---|---|
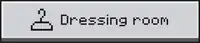 |
Opens the Dressing Room. |
 |
Opens an "Account options" menu, with three options:
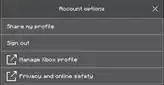
|
 |
Opens the "Select Screenshot" screen, where you can select a different featured screenshot than the image currently shown on your profile. |
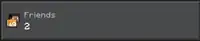 |
Opens the "Friends" screen. This button is only available on certain devices, other devices can access the friends drawer in the profile screen. |
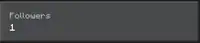 |
Opens the "Followers" screen. |
 |
Opens the "Screenshot Gallery". |
 |
Opens the "Achievements" screen. |
 |
Opens the "Stats" tab. |
If you are not signed in, this screen only shows the 'Dressing room' button and a button to sign in.
Friends
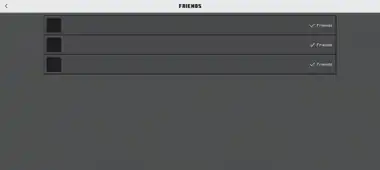
This screen shows a list of friends, and players you've added as a friend. If a player is 'Added' (this can be seen on the right side of a player), you are following the player but they have not added you as a friend. If a player is a friend, they can also see your activity and join your worlds. Press the button of a player to view their profile. See Profiles from other players below for more information.
This screen is only available on certain devices.
Followers
In this screen, you can see all players that follow you. This means that they have added you as a friend, but you have not (yet) added them. Press the button of a player to view their profile. See Profiles from other players below for more information.
Next to each player, there is a button that adds it as a friend.
Screenshot gallery
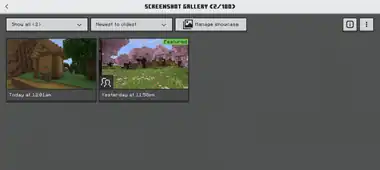
In this screen, you can view all of your in-game screenshots. You can take up to 100 screenshots by pressing F2 (by default) or the camera button in the pause menu, in-game. These screenshots are stored in the Screenshots file in ![]()
com.mojang.
| Option | Description |
|---|---|
Opens a menu where you can filter which screenshots are shown. There are four options:
| |
Opens a menu where you can sort the screenshots, either from newest to oldest or oldest to newest.
 | |
|
|
Opens the "Manage showcase gallery" screen. In this screen, you can see four showcased screenshots and your featured screenshot (the big image on the left). Screenshots in the showcase gallery are visible for other players. Press on a screenshot to remove it from the showcase gallery. Press an empty frame to select a new screenshot. This opens the "Select Screenshot" screen where you can select a new showcased screenshot, which works the same as the world thumbnail selection screen. |
 |
Shows a short explanation on how screenshots work.
 |
|
Opens a "Manage gallery" menu, with two options:
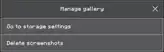
|
Below these buttons, a list containing all screenshots is shown. Up to four screenshots are shown per row, each showing the date and time it is taken. Up to 48 screenshots are shown per page, you can navigate between pages with the buttons at the bottom of the list. Press a screenshot to open the "Screenshot Details" screen, where you can view the screenshots with some details. This screen has five buttons:
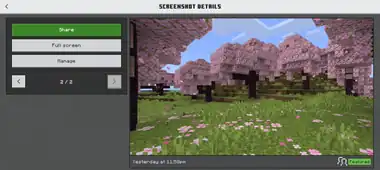
| Option | Description |
|---|---|
Opens a menu where you can either share the screenshot external (using a pop-up screen from your device), or post it on Realms Stories.
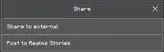 When you select 'Post to Realms Stories', a screen will be opened where you can select the Realm you want to post it on. Next, you can post it on the Story Feed tab. | |
| Opens the screenshot in fullscreen. Note that there is a 'back' button inside the screenshot. | |
Opens a menu where you can open the storage settings, delete the screenshot, or set it as a world thumbnail.
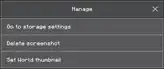 Pressing the latter opens a list of worlds, sorted by last played/edited. Press a world to immediately set the world thumbnail. | |
 |
Opens the previous screenshot, following the list in the screenshot gallery. |
 |
Opens the next screenshot, following the list in the screenshot gallery. |
Achievements
This button opens the "Achievements" screen. This allows you to view all of the in-game achievements. Achievements are in-game goals that award you achievement progress, gamerscore, and sometimes unique rewards (character items or emotes). Achievements can be obtained by using specific in-game features to do an activity.
On the left side of the screen, there is a percentage showing how much achievements you have completed, with a number of achievements below. Below, you can see how many achievements are currently in progress, how many rewards you have got, the gamerscore you have earned and how much time you have played. On the right side of the screen, you can view all achievements. You can also select to show only the locked, or completed achievements. Each achievement has a name, description, picture, gamerscore, and sometimes a reward. Achievements in progress have a progress bar showing how much of the achievement you have completed.
Select an achievement to show its details. This shows the date you have completed the achievement (if completed), the exact progress of the achievement (if in progress), and the reward on the right side (if available). Press 'View reward' to view it in the Marketplace.
-
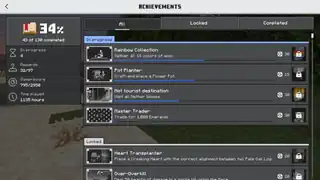 The "All" tab.
 -
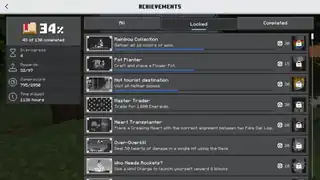 The "Locked" tab.
 -
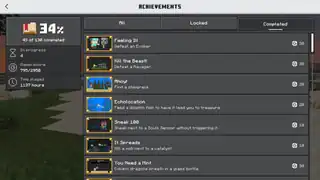 The "Completed" tab.
Stats
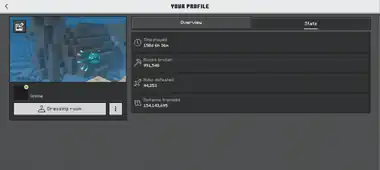
In Bedrock Edition, there are four statistics the player can view, in the profile screen. These include the total amount of time played (in a world or server), the total amount of blocks you broke, all the mobs you have ever killed, and the total distance traveled.
Featured screenshot
The thumbnail button in the featured screenshot in your profile takes you to the Select Screenshot screen, where you can select a different screenshot for your profile image. This screen works the same as the "Select Screenshot" screen accessible from the world thumbnail selection or the showcase gallery, with one more option, 'Reset to default'. This resets the featured screenshot to a random default screenshot.
Friends
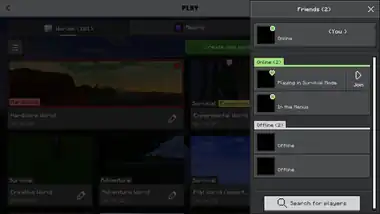
In the main menu, the "Play" screen, the "Edit World" and "Create New World" screen, the "Profile" screen, and the pause menu, there is a button at the top-right of the screen which opens the "Friends" drawer. This menu allows you to view your Xbox friends and their profiles, search for new friends, and join multiplayer games.
At the top of the list, your own profile button is shown with your Xbox icon and gamertag. Press it to open your own profile screen. Below, there are two lists of friends. The first list shows friends that are online in a game connected to their Xbox account, or in the Xbox app or website. When a friend is playing Bedrock Edition, it is also shown whether they are in the menus or which type of world they are currently playing. Press a player's profile button to open their profile screen. If they are playing in a multiplayer world opened for friends or friends of friends, you can join that world with the 'Join' button next to their profile button.
Below, a list of offline friends is shown. Note that this list also includes players that can't share their online status due to privacy settings, or players that manually set their online status to offline in the Xbox app.
At the bottom of the list, there is a button that opens a menu where you can search for new friends on the Xbox network.
Up to 15 friends are shown in the friends list. If you have more then 15 friends, you can navigate between pages with the buttons at the bottom.
For certain players, the "Friends" drawer is not accessible from the main menu.
Profiles from other players
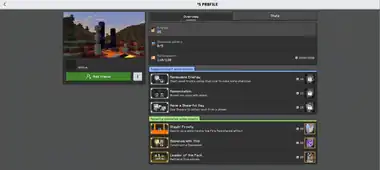
By pressing a player's button, you can see their profile screen. This screen looks roughly the same as your own profile screen, however, there are some different options. For some players, you do not have access to view (parts of) their profile. This is affected by their privacy settings. If you do not have access to a player's profile, a button that opens the privacy and online safety page on the Xbox website shows up instead.
Like in your own profile screen, the profile image with the gamertag and icon below are shown on the left side of the screen, with the player's real name below (if available). Some buttons and suggested and recently completed achievements are shown on the right, but you can't open the achievement details screen.
| Option | Description |
|---|---|
| Adds the player as a friend. Until they have added you as a friend, you are following that player. This button is replaced with a gray 'Friends' text box if you are already friends. | |
| Joins the world the player is currently playing, if it is opened for multiplayer. Depending on the multiplayer settings for that world, you can only join it when you are friends or friends of friends with the player. The button replaces the 'Add friend' button or 'Friends' text box, below the featured screenshot. | |
|
Opens an "Account options" menu, with a few options:
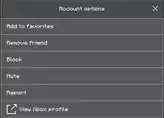
|
| Opens the a screen where you can view the friends of the player. | |
| Opens the player's showcase gallery. | |
| This grayed out button shows the amount of completed achievements, and the players gamerscore. | |
| Opens the player's "Stats" tab. |
Report Bad Behavior
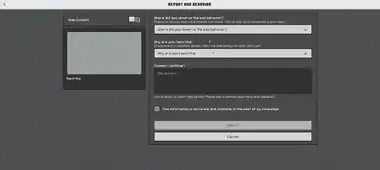
In the "Report Bad Behavior" screen, you can report the player to Mojang Studios for specific reasons. On the left side of the screen, the player's name is shown, which can be hidden with a switch above it.
On the right side of the screen, there are five sections where you can provide information about the report, and send the report.
| Option | In-game description |
|---|---|
Please let us know where the incident took place. This will help us in researching your case.
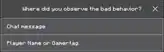
| |
If someone is in immediate danger, call local emergency services. Don't wait.
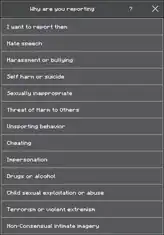
| |
| You are about to report this person. Please add a comment describing what happened. | |
 
|
This information is accurate and complete to the best of my knowledge |
|
Submits the report.
This button is grayed out unless the checkbox above has been checked off. |
| Returns to the player's profile screen. |
Player's Friends
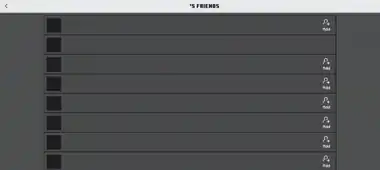
The "PlayerPlayer's Friends" screen works the same as the "Followers" screen. All friends of the player are shown here, and you can view their profiles, or add them as a friend with the button next to every player.
Showcase Gallery
In the showcase gallery, you can see up to five images the player selected as showcased. You can view the details of a screenshot by pressing one. The "Screenshot Details" screen works the same as the "Screenshot Details" screen on your own profile, without the 'Share' and 'Manage' buttons. However, there is one additional button, 'Report'. This opens the "Report Bad Behavior" screen, but specifically for reporting the screenshot. This screen works the same as the previous "Report Bad Behavior" screen, but without the options to select where you observed the bad behavior, and why you are reporting it. You can still provide additional information in the comment section.
Stats
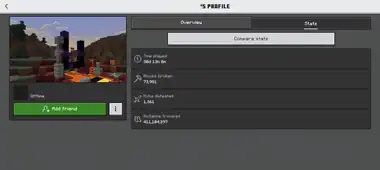
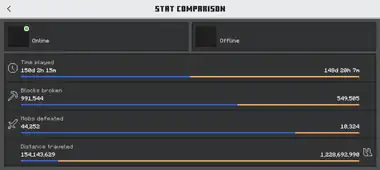
In the player's stats tab, you can view the same stats as in your own profile screen. There is one more button, 'Compare stats', which opens the "Stat Comparison" screen. In this screen, your own stats and the player's stats are shown, with a bar below each stat showing the difference in progress for each player. The blue bar represents your own progress, and the orange bar represents the player's progress.
Search for players
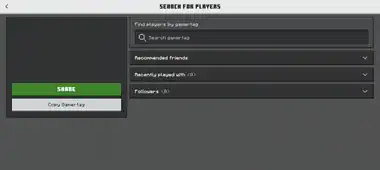
From this screen, you can search and add players as friends, and share your gamertag. The gamertag is the name everyone can see in-game. On the right side of the screen, you can enter someone's gametag and the search results will be shown below. If the player you search is not listed here, press 'Load more results' to load more (this can only be done two times). Press 'Back to top' to immediately move to the top.
When not entering a gamertag in the search box, three collapsable lists of players are visible below. These are recommended friends, players you recently played with (usually friends of friends in multiplayer worlds), and followers (players who added you as a friend). Press on the button of a player to view its profile. You can add the player as a friend (it is considered 'added' until it has confirmed your invite) its profile screen.
On the left side of the screen, your own gamertag with a QR-code containing the gamertag and two buttons, 'Share' and 'Copy gamertag' are visible. This is used when other players need to add you as a friend (confirm invite). Press 'Share' to share the gamertag with other devices or on social media and press 'Copy gamertag' to copy it to the clipboard.
Getting started on Multiplayer
When you want to play Minecraft with others, you need to add them as friends before you can join a world. To add someone as a friend, both need to be connected with the internet, and both need to be signed in with a Microsoft account. Next, both of you must press 'Search for players' and search each other (enter their gamertag in the search box). Check that you find the right one by looking at its profile picture. Both of you must add the other as friends to become in-game friends.
To start playing, one of you must create a Multiplayer world. A new world is Multiplayer by default, so just create and enter it. The other player must look in the "Friends" sidebar. If everything went well, you can join the world from here. You can also open the player's profile and join from there. If it did not work, (both of) you might need to restart the game. Control that you are friends in the "Friends" menu and in your profiles.
Inbox
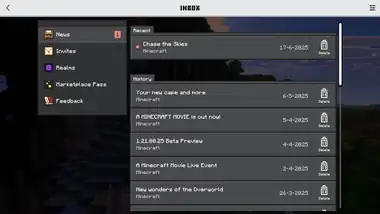
Next to the 'Profile' button, there is a button which takes you to the Inbox. Here, you can view all in-game messages and invites. There are five tabs of messages, and there is a button in the top-right of the screen which opens the Inbox settings. The amount of unread messages is shown next to each tab.
Inbox settings
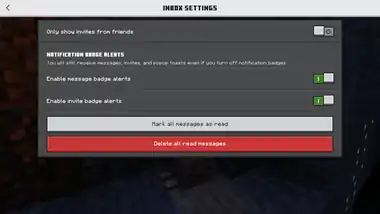
There are a few settings related to messages in the Inbox.
| Option | Description | Default |
|---|---|---|
| Only show invites from friends | Under the 'Invites' tab, only invites from friends are shown (not from friends of friends). | |
| Enable message batch alerts | Enables a notification when getting a message. | |
| Enable invite badge alerts | Enables a notification when getting an invite. | |
| The 'unread' red dot of all messages disappears, all messages are now marked as read. | ||
Deletes all the messages marked as read. A warning message pops up before deleting.
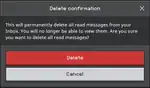 |
News
All the 'news' messages are shown here. Most of these messages also pop up when entering the game, one time per message. Select a message to view the details. This shows a picture, the sender, the whole message, the date of sending, and sometimes a button or a link. Press the '![]() ' button next to the message to delete it.
' button next to the message to delete it.
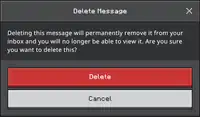
Invites
All Realms invites are shown here. On the right side of an invite, there are buttons to accept or decline the invite. Press 'Accept' to join the Realm. This button is then replaced with a 'Join' button, which opens the Realms tab in the Play screen. Press 'Decline' to decline the invite and remove the option to join the Realm. After accepting or declining the invite, the message can be deleted.
You can open a Realm invite to view more details about it. In the invite details screen, you can accept or reject the invite too, but you can also open the profile from the player who sent you the invite.
Realms
All messages related to Minecraft Realms are shown here. These include messages about your server or subscriptions.
Marketplace Pass
Messages from the Marketplace Pass are shown here. These include messages from new packs available in the Marketplace Pass, or about your subscription. If not subscribed, you can press a button to open the purchase screen in the Marketplace.
Feedback
Messages related to feedback you made are shown here. There are also two buttons that open links to the feedback page, and the community posts page.
Pause Menu
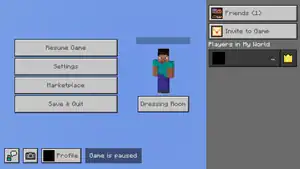
The pause menu is a menu screen that is opened in-game by pressing Esc. This also opens when minimizing the game and then opening Minecraft again. While in the pause menu, the game is only paused when playing singleplayer. In multiplayer, you can still be killed, and the world is still loading. A message in the pause menu shows whether the game is paused or not. Go to a safe place when opening the pause menu for longer.
Most options that are available in the main menu are also available in the pause menu (except the "Play" screen and "Inbox" screen). This means that almost every menu and option is available while still in the game. It might be not a very good idea to buy and download new Marketplace packs from here, but it is still possible.
The settings menu is somewhat different when entered from the pause menu, with some options disabled and few new options.
There are a few other options available in the pause menu.
| Option | Description |
|---|---|
| Closes the pause menu and resumes the game for the player. | |
| Opens the Realms Stories menu. On the top-right of this button, the amount of unseen story posts are shown in a red dot. Only available when playing on a Realm. | |
| Opens a different version of the "Settings" screen, with some new options and some disabled options. | |
| Opens the Marketplace. | |
| Opens the loading screen while saving the game. The "Play" screen will be opened next, which tab depends on which tab the world was opened from. | |
| Opens the Dressing Room. | |
| Opens the feedback page. | |
| Takes a screenshot of the game (not the pause menu), and stores it in-game. | |
| Opens the "Friends" drawer, where you can see the profiles of your friends, and search for new friends. This button is only available for certain players. | |
| Opens a list of friends, where you can sent invites. |
Settings
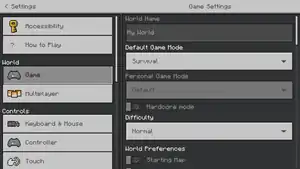
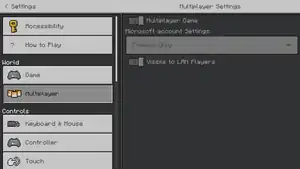
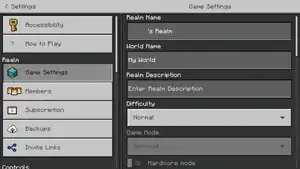
The settings button opens the in-game settings screen. Most options available in the edit world screen and the main settings screen are available here. It currently uses the old UI, so some options may look different. There is one new option.
- For the game mode, there is a difference between the default game mode and the personal game mode. The default game mode is the game mode selected for the world, every new player starts in this mode. The personal game mode is the game mode of the player. This can be set to Default (the personal game mode is the same as the default game mode), Survival, Creative, Adventure and Spectator.
There is also one new option in the "General" tab which is not available in the main settings screen.
- Enable Game Pause (ON)
- Toggles whether the game is paused while in the pause menu, only in singleplayer.
In worlds in Minecraft Preview with the "Render Dragon Features for Creators" experiment enabled, the quality of point lighting can be adjusted in the Vibrant Visuals options in the video settings. The default value of these options varies depending on the device.
- Point Light Shadow Quality
- Changes the quality of shadows created by point light effects. Can be set to "Off", "Low", "Medium", "High", and "Ultra".
- Point Light Loding Quality
- Changes the quality of point light effects. Can be set to "Off", "Low", "Medium", "High", and "Ultra".
The following options from the "Settings" screen and the" Edit World" screen accessible from the main menu can not be changed:
- Hardcore mode
- Simulation Distance
- Experiments
- All Multiplayer settings
- Lower Framerate When Controller Is Disconnected
- Fancy Bubbles
- All Account settings (account data can still be viewed, all buttons are inaccessible)
- Enabling and disabling global resources
- Script Debugger Settings
- Script Diagnostics Settings
- Script Watchdog Settings
- Device Info Settings
- Enabling and disabling resource packs and behavior packs
- The "Storage" and "Language" settings tabs.
When playing on a Realm as the Realm owner, you can also change all world settings exclusive to Realms from the pause menu, as well as Realm-wide settings. See Edit Realm for more information.
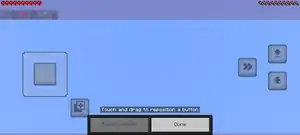
Customize Controls
When playing on touch devices in a world, you can press the 'Customize Controls' button in the "Touch" settings tab to customize the postion, scale, and opacity of buttons on the HUD. The button only shows when the 'Customize Controls' option above is toggled on.
Tap a button to select it for customization. You can drag the button anywhere on the screen, except the red bar above, which is used for other HUD elements. Multiple buttons can never overlap each other. With the two buttons above, you can change the opacity and size of that button. This is a slider which indicates the percentage of the scale or opacity of a button. Press the returning arrow on the right to reset it to the default state. Press the checkbox below to apply this setting to all buttons.
Tap anywhere else on the screen to deselect a button. Press 'Reset Default' to reset all settings to their default state. Press 'Done' to save your changes and return to the settings screen.
List of players
On the right side of the pause menu, there is a list of players active in this world (with the world name above). Press on a player's button to view their profile.
Player Permissions
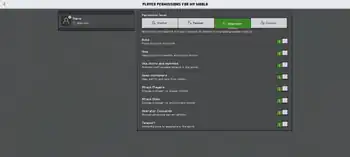
Next to each player, there is a button which opens their player permissions. Player permissions dictate what the player can and cannot do in a multiplayer game. For example, actions such as building, mining, attacking mobs or players can be disabled or restricted by each of their own permissions. They can be configured individually or by preset roles on a separate screen accessible in the pause menu.
There are four roles which can set specific permissions for players:
- Operator, which enables all permissions, including operator commands, world settings, teleportation, and all of member permissions.
- Member, which enables mining, building, world and entities interactions.
- Visitor, which only lets players view or observe the world only, with none of the permissions enabled.
- Custom, which enables specific permissions set by operators. Following permissions can be applied for custom role:
| Option | Description | Default |
|---|---|---|
| Build | Allows the player to place blocks and entities in the world. | |
| Mine | Allows the player to break blocks in the world. | |
| Use doors and switches | Allows the player to use doors, levers, and buttons. | |
| Open containers | Allows the player to open the GUI of containers (chests, hoppers, crafters, etc). | |
| Attack Players | Allows the player to deal damage to players. | |
| Attack Mobs | Allows the player to deal damage to mobs. | |
| Operator Commands | Allows the player to execute operator commands. Also sets the player's permission level depending on the environment, see below. | |
| Teleport | Allows the player to use the /tp command.
|
The owner of the world can change any player permissions, regardless of its own permissions. Other players can't change any player permissions unless if they are operators, but they can still view them for themselves and other joined players.
Player permissions differ from permission level, the latter enables and restricts specific commands, requiring different level for each command. Additionally, the "Operator Commands" permission if enabled sets the player's permission level to 3 in singleplayer or LAN world. In Bedrock Dedicated Server, it sets the permission level to 1.
Below all player permissions, there is a button to kick the player from the world. This is only available for the owner of the world. Kicked players can always join the game again if they aren't blocked by the owner.
Realms Player Permissions
When playing on a Realm, the old player permissions screen is shown instead of the Ore UI version, but it works roughly the same. As an operator, you can set the player permissions from any player (except the Realm's owner) to Visitor, Member, or Operator. All specific permissions are the same as on regular worlds, but you can't select the Custom permission nor enable or disable any specific permissions. At the bottom of the screen, there is a 'Kick Player' button that instantly kicks the player from the world, but they will still be able to rejoin. The 'Ban Player' button below kicks the player as well, but this also removes the player from the Realm, and blocks the player from joining the Realm ever again. However, players can be unblocked from the "Members" tab in the "Manage Realm" screen. The 'Ban Player' button is only available for the Realm's owner.
Invite to Game
Press the 'Invite to Game' button to open a menu where you can start inviting friends to your world. There is a list of online friends and offline friends. Offline friends will probably not react, but they will get a notification even if they are offline, so it is not pointless. Select all friends you want to invite and press 'Send ... Invites' to send them an invite. All players will get a notification from Xbox.
Press 'Add Friend' to open the "Search for players" screen and add a new friend.
When playing on a Realm as the Realm owner, only members of the Realm are shown. The 'Add Friend' button is replaced with an 'Add Realm Members' button. Press this button to open the "Members" tab in the "Manage Realm" screen. You can still open the "Search for Players" screen from here. Although this is used to invite new players to the Realm, you can also open other settings tabs and manage most Realm settings that could otherwise be done when not playing on the Realm. However, some options are disabled.
Chat
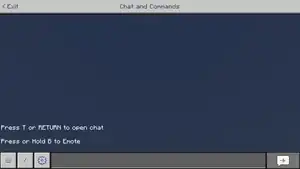
The chat is a menu screen that can be opened in-game by pressing T or ↵ Enter for keyboards, ![]() for touchscreens, or
for touchscreens, or ![]() for controllers by default. It can also be opened by sleeping in a bed in multiplayer. By pressing /, the chat menu opens with the text box selected and "/" already filled in, allowing to type in a command next. In this screen, you can view and type in chat messages, execute commands, or access the chat settings. There are a few buttons:
for controllers by default. It can also be opened by sleeping in a bed in multiplayer. By pressing /, the chat menu opens with the text box selected and "/" already filled in, allowing to type in a command next. In this screen, you can view and type in chat messages, execute commands, or access the chat settings. There are a few buttons:
| Option | Description |
|---|---|
| Exit | Closes the chat menu. |
| Opens an on-screen keyboard (touch and controller), or selects the text box to start typing (keyboard). | |
Back |
Hides the keyboard and deselects the text box. |
| Opens the quick commands interface. Only available when cheats are enabled for this world. | |
| Opens the chat settings. | |
| Text box | A text box where you can enter chat messages or commands. |
| Enters the chat messages, or executes the command. | |
| Opens a dropdown menu where you can select which coordinates are shown next to this button. Only available when the Copy Coordinate UI option is enabled. | |
| Copies your current coordinates. Only available when the Copy Coordinate UI option is enabled. | |
| Pastes copied text into the text box. |
Messages
In the middle of the chat screen, all game and chat messages are shown, from oldest to newest. You can scroll through this section using the scroll bar on the right side of the screen.
For each chat message, the player who sent it is shown first, following by the message. Messages sent by the game do not show a sender.
In the text box below, you can write chat messages and send them by pressing ↵ Enter or the send button. These messages will appear in the top-right of the HUD, and they disappear after a short while. They can be found in the chat menu afterward.
You can notify players by pressing @ followed by the name of the player. Press Tab ↹ to quickly select a player from the player list. Enter @here to notify all players.
Commands
Press / to enter a command. A list of commands shows in the chat screen, filtered by any letters you type in. Press Tab ↹ to select the next command and automatically enter it in the text box. Press ⇧ Shift + Tab ↹ to select the previous command. You can't scroll through this list of commands, the only way to view all commands is by repeatedly pressing Tab ↹ or using the /? or /help command.
Press SPACE after selecting or typing a command to start typing arguments. These arguments are also shown in the chat menu, and you can navigate through them the same way as commands. Blocks and items also show an icon, and string values are not shown here. At the bottom of the chat menu, the format of the command is shown, showing all different options and inputs for the command.
After typing in a command, you can press ↵ Enter or the send button to execute the command. Depending on the input, you will get a message showing the output of the command.
When at least one command has been executed before in the same session, you can press ↑ to automatically fill in the previous command. You can repeatedly press ↑ or ↓ to select a command that has been used before.
Quick commands
Press the second button on the bottom-left to open a quick commands menu. From this menu, you can quickly execute four different commands. Press a button to fill in the command and press ↵ Enter to execute it, or press a button to fill in an argument. The following commands and arguments are available:
- Set World Spawn
- Has no buttons for arguments. Press ↵ Enter to instantly set the world spawn at your current position.
- Teleport
- Shows a list of players as arguments. You select the player you are teleporting first, and then the player you are teleporting towards.
- Time
- Sunrise, Day, Noon, Sunset, Night, and Midnight.
- Weather
- Clear, Rain, and Thunderstorm.
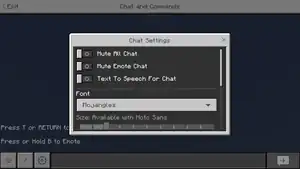
Chat settings
Press the settings button on the bottom-left to open the chat settings menu. Settings related to the chat and chat messages are shown here.
| Option | Description | Default |
|---|---|---|
| Mute All Chat | Whether to show chat messages on the HUD. | OFF |
| Mute Emote Chat | Whether to show emote messages on the HUD (when a player executes an emote, a message will be send). | |
| Text To Speech For Chat | Enables text to speech for chat messages. This can also be toggled from the main accessibility settings tab. | |
| Font | The font of all chat messages. This can be Mojangles or Noto Sans. | Mojangles |
| Size | The size of the text. Only available when the Noto Sans font is selected. Slider can be set between 10 and 20, with steps of 1. | 12 |
| Line Spacing | The space between lines in the chat menu. Slider can be set between x1.0 and x10.0, with steps of 0.1. | x1.0 |
| Chat Color | The color of chat messages. Available colors are: white, green, aqua, red, light purple, yellow, and gold. | White |
| My Mentions Color | The color of mentions of your gamertag. Available colors are the same as for chat color. | Yellow |
| Reset to Default | Resets all settings to their default state. |

Copy Coordinate
When the option Copy Coordinate UI in the Creator settings tab is enabled, your current coordinates are shown at the top of the screen, in two decimals. With the button on the left side, you can select whether to show your current coordinates, or the coordinates of the block you are facing. When you look at the air and are not facing any blocks (even in the distance), 'Invalid Coordinates' shows instead. Press the copy button on the right side to copy your current coordinates.
Press the button next to the copy coordinate UI to paste copied text in the text box. You can press the copy coordinates and paste button to quickly enter your current coordinates in the chat.
External links
- Minecraft Attributions
- Minecraft Help Center
- Licenced Content
- Feedback page
- Community posts page
- Privacy and Online Safety page