228

I'm a new Linux user. I've reinstalled my Wubi from scratch at least ten times the last few weeks because while getting the system up and running (drivers, resolution, etc.) I've broken something (X, grub, unknowns) and I can't get it back to work. Especially for a newbie like me, it's easier (and much faster) to just reinstall the whole shebang than try to troubleshoot several layers of failed "fixing" attempts.

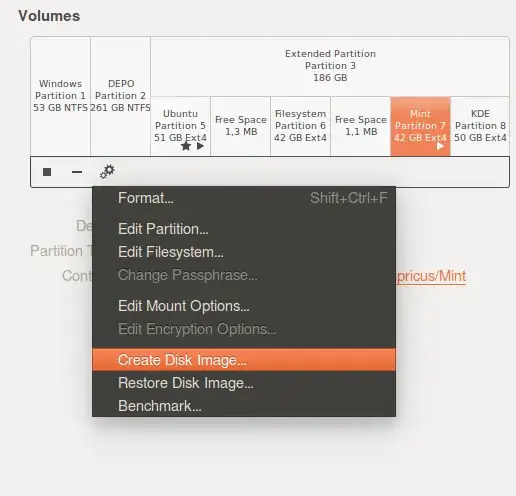
Coming from Windows, I expect that there is some "disk image" utility that I can run to make a snapshot of my Linux install (and of the boot partition!!) before I meddle with stuff. Then, after I've foobar'ed my machine, I would somehow restore my machine back to that working snapshot.

What's the Linux equivalent of Windows disk imagers like Acronis True Image or Norton Ghost?


Note: I found a similar question: Easy backup/restore of installed system?

Kulfy
  • 18,154

12 Answers12

151

With dd

dd is the low level utility that you can use to accomplish this task. It's essentially a low level byte-for-byte copy utility. If you want the "UNIX" way of accomplishing this, then read on.

All references to the file system and hard disks are located locally on the virtual /dev/ filesystem. There are a multitude of "nodes" in /dev/ that are interfaces to almost all the devices on your computer. For example, /dev/hda or /dev/sda would refer to the first hard drive in your system (hda vs sda depends on the hard drive), and /dev/hda1 would refer to the first partition on your hard drive.

The most straight forward way to make a raw image of your partitions is to use dd to dump the entire partition to a single file (remember the OS access the partitions /dev/sda1 through a file interface). Make sure you are on a larger partition or on a secondary drive and perform the following command:

dd if=/dev/hda1 of=./part1.image to backup (repeat for different partitions) dd if=./part1.image of=/dev/hda1 to restore. When you backup /dev/hda1 this partition should be unmounted (or mounted read-only) to avoid potencial corruption.

You can use the exact same command to back up the entire hard disk (replace hda1 with hda). You can then use any compression program (gunzip, zip, bzip) to compress the file for storage. You can use this same technique to make rote copies of entire partitions to make clones of your computer.

There is one limitation though, when restoring the backup: The partition needs to be the same size (or bigger) as the partition you took the image from, so this limits your options in case of a restore. However, you can always expand the partition after you've restored the backup using gparted or parted. The picture gets even muddier when you are trying to restore entire disk copies. However, if you are restoring the backup to the same exact hard drive, you don't need to worry about this at all.

However, if you want a "friendlier" utility à la Norton Ghost then this suggestion might not be for you.

crasic
  • 3,882
119

It's Clonezilla Live: http://clonezilla.org/

The tutorial for Clonezilla can be found here.

Mochan
  • 1,708
52

We have a GUI available in Ubuntu, called 'Disks' (gnome-disks) and comes default in later Ubuntu.

Or

sudo apt-get install gnome-disk-utility

Launch/search as "Disks", or run as gnome-disks.

Also needed are:

  • Gparted

  • A live Ubuntu (or derivatives) live-session usb-stick.


Prepare the partition:

Obviously, a partition cannot be copied while in use: it needs to be unmounted so it doesn't suffer changes during copying (that is self-evident). Therefore, in order to back up your system partition you have to boot in a usb live system - or, as seen in the above image, in a separate (multi-boot) system. The system partition is the one marked with a star. If you try to copy the system partition you get an error soon enough:

enter image description here

Also, one has to take notice that the back-up and the restoration of bootable partitions are both risky procedures and that a back-up of valuable/sensitive data should be first done in a different way (by copying the data instead of the entire partition, etc). - From my experience, this works with Ubuntu system partitions but not with Windows ones.

Optionally, in order to minimize the space taken by the saved image, a partition can be first shrunk (from end, that is from right) so that it would not include the empty space. Here is a post on that: create partition backup image no larger than its files.

Save the partition:

enter image description here

Restore the partition:

Following this answer: How to correctly restore system partition (iso image) with 'Disks'. See the question there. The main idea is that the image (iso) has to be restored onto an existing empty partition that is:

  • formatted

  • un-mounted

  • larger than the saved image

Prepare the restored partition for use:

See the comments under the above linked answer on the fact that Gparted reports the difference of space between the destination partition and the restored one as un-allocated space. That can be fixed with Gparted: select partition and apply "Check" action.

If the restored partition is a system partition that you want to use as the main one:

20

The following are steps from the Ubuntu Wiki

Backup with dd
The following example will create a drive image of /dev/sda, the image will be backed up to an external drive, and compressed. For example, one may use bzip2 for maximum compression:

sudo dd if=/dev/sda status=progress | bzip2 > /media/usb/image.bz2

Restoring a drive image
To restore a drive image, one will want to boot into a live environment. Restoration is quite simple, and really just involves reversing the if and of values. This will tell dd to overwrite the drive with the data that is stored in the file. Ensure the image file isn't stored on the drive you're restoring to. If you do this, eventually during the operation dd will overwrite the image file, corrupting it and your drive.

To restore the drive above with dd:

bzcat /media/usb/image.bz2 | sudo dd of=/dev/sda status=progress

When restoring the whole drive, the system will not automatically create the devices (/dev/sda1, /dev/sda2, etc.). Reboot to ensure automatic detection.

If you restored Ubuntu to a new drive, and the UUIDs (see UsingUUID for more) changed, then you must change the bootloader and the mount points. One will want to edit the following via a terminal:

sudo nano /boot/grub/menu.lst
sudo nano /etc/fstab 

To know what the new UUIDs for your drives are, use the following command:

sudo blkid 

From this list, you can cross-reference the information with that of fdisk to know which drive is which. Then simply update the UUIDs in both GRUB and fstab files.

Sinipelto
  • 137
  • 8
jtlindsey
  • 2,100
17

The "dump" and "restore" backup utilities in the Ubuntu repositories provide you with the ability to backup and recover an entire system's "system state".

The "dump" and "restore" utilities can be installed from the repositories using:

sudo apt-get install dump

Below are links to the Man pages:
Dump
Restore

In your case, you could backup the system to a portable drive:

dump -0uan -f my_file /

For recovery you would need to:

  1. Boot from your Ubuntu live CD/DVD/USB.

  2. Install the dump utility.

  3. Mount your hard drive.

  4. Restore (i.e. restore -r -f my_file /my_mount).

Note: If you are restoring to a new disk you will need to install your bootloader (GRUB).

More information can be found at Move linux to another hard drive (dump, restore, backup)

karel
  • 122,292
  • 133
  • 301
  • 332
Sparky
  • 484
6

I would recommend RemasterSys for this Task.enter image description here

It creates iso for your installtion, Backup user Date with Deja Dup.

BigSack
  • 2,713
4

You can do exactly what you need using CloneZilla

Mitch
  • 109,787
4

If you're using Wubi, why don't you just boot into Windows and copy the root.disk file?

Then restoring is as easy as renaming root.disk to something else, and renaming the copy to root.disk.

Eliah Kagan
  • 119,640
Roy
  • 41
4

There also Ghost for Linux, but Clonezilla is the better option - it's more up to date. The latest version of Ghost for Linux is listed May 2009, while Clonezilla's latest version was posted in November 2010. One minor limitation of Clonezilla compared to Ghost is that you can't resize the partition on restore, while Norton Ghost can.

You probably won't need it, but Clonezilla also supports multicasting.

Scaine
  • 11,229
3

Using "Dump" and "Restore" is one solution, as indicated by virtual.stack.

However you might be interested in using Clonezilla if you have an external USB hard disk drive or a NAS. You just have to download an ISO image by clicking here (you can access the global download page here), burn it with "Brasero". Boot from Clonezilla Live CD and perform a backup (disk or partition to image) of your main hard disk drive (with your healthy Ubuntu). Please note that you can't backup the partition you have mounted as backup destination (quite logical). If your system is broken, you just have to boot again with Clonezilla Live CD and perform a restore of your system. Don't forget that Clonezilla makes snapshots, so if you have your data ("/home", "/etc", ...) on the same disk/partition as Ubuntu system, you'll get back the one from the backup and loose what has been done since that backup was performed...

You can find a tutorial for Clonezilla Live here : How to Use Clonezilla - Tutorial

You can also use "Back In Time (backintime-gnome)" (available from Ubuntu Software Center) or else (Déjà Dup, ...) alongside to get a backup of your data. You just have to include ("/home", "/etc", "/var", "/usr/local", ...) in the backup profile. Like that you can get back your healthy system with Clonezilla and then your latest data with "Back In Time" or else.

Golboth
  • 1,422
2

You can use Clonezilla

  • Download Clonezilla live CD
  • Burn the iso file to a CD
  • Once you finish your initial machine reboot and start your Clonezilla Live CD and make a clone from your initial harddisk to others.

Check these screenshots here and be free to ask in details for any ambiguous menu


You can also use Ghost for Linux G4l.

download iso from here then burn to Cd and use it Live CD.


Maythux
  • 87,123
2

UPDATE November 2015

The new Remastersys is Pinguy Builder and there is also an app called Systemback which I prefer personally. Here is how you can install it:

sudo add-apt-repository ppa:nemh/systemback
sudo apt-get update
sudo apt-get install systemback

UPDATE 05.01.2015

The link I provide in this and other instructions in step 2 does not work anymore. However, I had downloaded the Remastersys files before the website shut down and they can be installed perfectly through Ubuntu Software Center. !! I am not sure if the files are available in Ubuntu Software Center, but if you have them on your computer, they can be installed through it.

You need a program that can produce an iso file, and this is Remastersys.

This set of instructions helped me install and run successfully remastersys on Ubuntu 14.04.1 32bit and also successfully create and use a bootable flash drive with the custom iso I made.

Note: a flash drive works unless you manually made an upgrade of the kernel for some reason before making an image of the system.

  1. Press Ctrl-Alt-T and run

     sudo apt-get install plymouth-x11  
    
  2. Go to this link and download remastersys version for 32bit or 64bit system

    http://www.remastersys.com/ubuntu/pool/main/r/remastersys-gui/

    IMPORTANT: I downloaded version 3.0.4-1 i386 and it WORKS I checked 3.0.2- version and it doesn't work.

  3. Open Programs and Updates (search in Dash or in the System's parametres)

  4. In Programs and Updates, go to Other tab and press Add...

  5. Copy/paste this

       deb http://www.remastersys.com/ubuntu precise main 
    

and press OK

  1. Now look for two lines with "www.remastersys.com/" in the list you can find on the Other tab and make sure you check both boxes. Enter a password if you are asked to.

  2. Press Ctrl-Alt-T and run

     sudo apt-get install remastersys-gui 
    
  3. To open remastersys-gui, you always need root priveleges. So do it in the terminal (Ctrl-Alt-T)

     sudo -i remastersys-gui 
    
Anwar
  • 77,855