Update: this solution messes up snaps due to a limitation in Timeshift. I've added a workaround to the steps for now, until this is fixed.
This is meant as complementary to Organic Marble's answer.
So you've decided to use Timeshift to make a full backup of your system. Excellent! It's good software. But there are some things that you need to be aware of.
But before I get into it, this needs to be said up front: Make sure you try restoring a backup before your drive fails. Restoring to a new drive is not as straightforward as you think.
Things to keep in mind as you set up Timeshift
1. If you want to back up user home directories, you have to enable that manually
To do this:
- In Timeshift's settings, go to the "Users" tab and select "Include All Files".
- In the "Filters" tab, click the "+" for each of the default filters, as by default they exclude /home files.
Only do this if you want Timeshift to back up your personal files as well as your system. This isn't the intended use-case for Timeshift, but since this question is about recovering everything to a new drive, I thought I should include this. And it works very well.
2. After you've set up Timeshift, save your disk structure somewhere
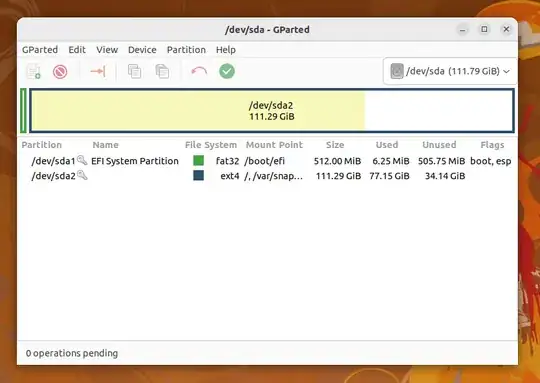
The disk structure is important to the restore process. Timeshift doesn't handle creating partitions or anything; you have to add those partitions yourself, and then tell Timeshift to use them. So pull up your system drive in GParted and email a screenshot to yourself or store it somewhere you'll be able to get to it if your drive fails.
Here's an example from my system. As you can see, my installation is split across two partitions:
How to restore to a new drive
1. Create a bootable Ubuntu USB stick and load into the desktop
This is covered elsewhere. There's a tutorial here.
We're going to use this to restore the snapshot to the new drive. Boot into the USB, and select the "Try" options until you're into the desktop.
2. Install needed tools
GParted
Already installed!
Timeshift
sudo apt-get update
sudo apt-get install timeshift
Boot-Repair
sudo add-apt-repository ppa:yannubuntu/boot-repair && sudo apt update
sudo apt install -y boot-repair && boot-repair
3. Prepare the target drive
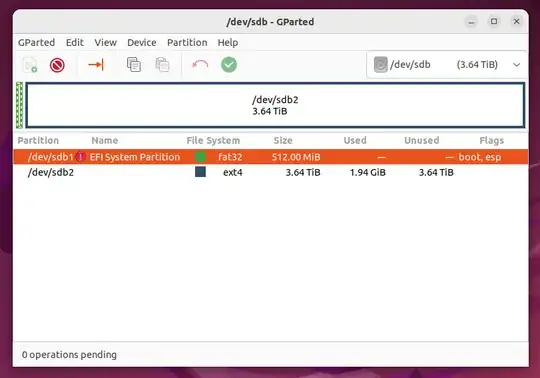
You want your target drive to match the structure that your system drive had. So use your reference to create the needed partitions in GParted, in the correct format, with the correct flags:
4. Use Timeshift to restore to the target drive
First, open Timeshift, and when prompted to "Select Snapshot Location", select the device that you were backing up your system to (i.e. the one that you want to restore from):

Your Timeshift snapshots should pop up. Select the one you want to restore onto your target drive, and select "Restore". You will get a popup that looks like this:
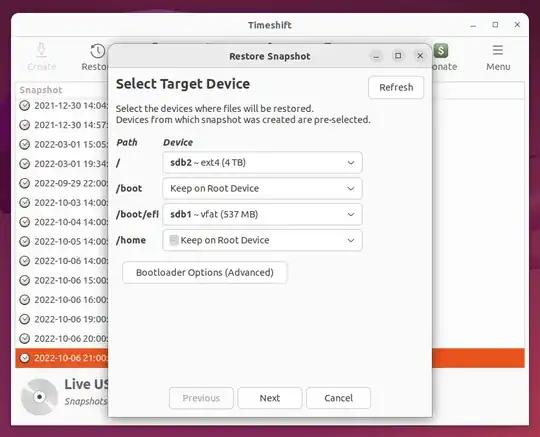
Important: I had to manually set the /boot/efi to use the first partition of the target drive. Timeshift doesn't do this for you manually. Your system might not have the same structure as mine, so you may have to do something different here. That's why it is so important that you test your backup and make sure it can be restored, because you may need to reference your currently working system to see how it's structured.
After this, continue with the restore process. When it's done, we have one thing left to do!
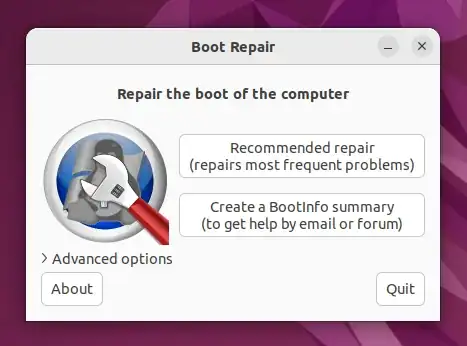
5. Use Boot-Repair to make the drive bootable
This may not be necessary for you, but it absolutely was for me. Launch Boot-Repair and select "Recommended Repair". You may want to look at the advanced options to make sure it's detecting your drive correctly. For me, it did, so the recommended repair worked fine.
6. Boot into the target drive to make sure the backup worked
If you're loading it on the same device that your original system is on, you should change the desktop image or something to make sure you don't boot into the existing system and think your backup worked! Did this happen to me? Maybe.
For me, these steps completely restored my computer. The desktop environment and all of my settings and projects were left intact.
If this didn't work for you, be glad you're trying it now and not finding out after your drive failed that you don't know how to restore your backup! I spent a lot of time struggling with this, and if you have issues I might not be able to help. But hopefully this helps steer you in the right direction!
7. UPDATE: Fix snaps
Due to a current bug in Timeshift, snaps are broken when restoring to a new drive. To fix this:
- Use this method to repair each of the snap cores. Short version: run
snap refresh core --edge then snap refresh core --stable to force refresh the core. I did this for core, core18, core20, and core22, just to be safe.
- Remove then install the rest of the apps. You can see them all with
snap list. The user data as far as I can tell is retained and it also backs it all up on removal anyway, so you can restore if your data is lost (see snap saved after removing an app).
Other notes
Timeshift uses symlinks to back up your system, which can be a bit of a pain if you want to make a remote backup. Backblaze, for example, doesn't support symlinks at all.
I've found that .tar files work well for packaging up the backup into a format that can be uploaded, and I was able to successfully restore from an extracted .tar file.
I haven't settled on .tar yet, but if you decide to do something similar, make sure to test that the backup works after extracting! Some formats strip symlinks by default which will completely break your backup.


