Tutorial:Playing with a controller
Here is a tutorial on how to use a game controller (PlayStation, Xbox, Nintendo Switch, etc.) for playing Minecraft.
Minecraft: Bedrock Edition officially supports game controllers. You can play the game with controllers directly by connecting them to your PC, consoles or mobile device, wired or wireless, and without the need to use third-party tools.
This is not the same case for Minecraft: Java Edition, as the game does not natively support game controllers. In order to use controllers for Minecraft: Java Edition, there are two main workarounds: using Steam as a middleware to provide controller support for the game, or using community mods.
How to use the controller
Minecraft: Bedrock Edition features controller buttons that are simple to use and easy to memorize. It is similar to those in first-person video games, so if you're familiar with that, you should be able to learn these pretty quickly. Here is a brief list of actions you can do in Minecraft:
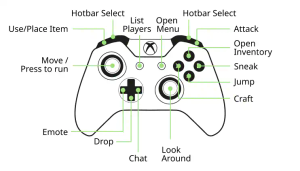
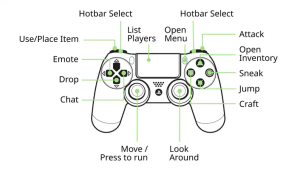
- You can navigate through menus pressing
 buttons.
 - You can move your player character moving
 left thumb, and move the camera moving
  right thumb.
 - You can jump pressing
 or
or  buttons.
 - You can sprint moving left thumb forward two times.
- You can attack entities or destroy blocks pressing
 button.
 - You can interact or place blocks pressting
 button.
 - You can sneak or fly down pressing
 or
or  buttons.
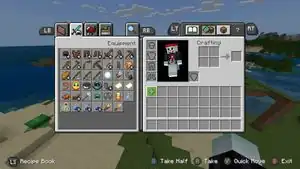
 - You can open up crafting and inventory menu pressing
 or
or  and
and  or
or  buttons.
 - You can cycle your item left and right in the hotbar pressing
 and
and  buttons.
 - You can drop your item pressing
 button.
 - You can toggle your perspective pressing
 button.
 - You can open the chat pressing
 button.
 - You can select emote for your character pressing
 button.
For full list of controller buttons mapping, see Controls § Controller.
Connecting a controller to Windows
PlayStation DualSense and DualShock 4 controllers
You can connect your DualShock 4 or DualSense controllers into your Windows computer. However, Windows UI navigation using these controllers are not supported, this includes Windows on-screen keyboard. To use your Dualsense or DualShock 4 controller, you need to use software to do it. The most popular software is DS4Windows. (Note that you should check social media about their popularity)
Wired
Simply plug in the controller into a USB port on the computer by using micro USB cable for PS4 and USB type C cable for PS5.
Wireless
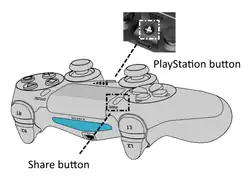
- Press and hold the Share and the PlayStation buttons on the controller until it starts flashing. When the controller starts flashing, the controller is ready to be paired.
- Open "Bluetooth & devices" on the Windows settings.
- Click "Add device" button, and in the menu, click the "Bluetooth" button.
- Wait until "Wireless Controller" appears on the device list, and then connect.
- Your controller is now connected.
Xbox One and Xbox Wireless Controller
Wired
Simply plug in the controller into a USB port on the computer by using micro USB cable for Xbox One controllers and USB type C cable for Xbox Wireless Controllers.
Wireless
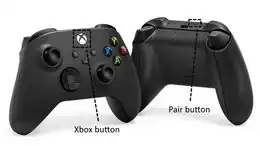
- Turn on the controller by holding the Xbox button.
- Hold the Pair button on the top of the controller in the middle until the controller flashes quickly.
- Open "Bluetooth & devices" on the Windows settings.
- Select "Xbox Wireless Controller" in the menu of available devices.
- Your controller is now connected.
Nintendo Switch Pro Controller
You can connect a Nintendo Switch Pro controller to your Windows computer. However, Windows UI navigation using this controller is not supported, this includes Windows on-screen keyboard. Minecraft can still be played with a Pro Controller without the need of additional software.
Wireless
- Desynchronize the controller from other devices by holding down the "Sync" button for a few seconds until the indicator lights start flashing. The "Sync" button is located next to the USB port at the top of the controller.
- Open "Bluetooth & devices" on the Windows settings.
- Click "Add device" button, and in the menu, click the "Bluetooth" button.
- Wait until "Pro Controller" appears on the device list, and then connect. Make sure the controller is in sync mode by pressing a button on the controller.
- Your controller is now connected.
Java Edition workarounds
Steam
This method is the easiest, as it only requires you to download Steam without using any mods. Here's a simple step by step of setting up a controller to use with Minecraft: Java Edition on your computer:
- Download Steam if you do not have it in your computer.
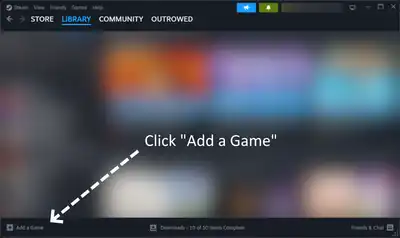
- Open Steam, and then navigate to "Library".
- Add Minecraft Launcher as a non-Steam game by clicking the "Add a Game" button, then click "Add a Non-Steam Game".
- Find and select Minecraft Launcher from the list of programs. If its missing from the list, you may click "Browse..." and find the Minecraft Launcher executable (
MinecraftLauncher.exe) in the program files.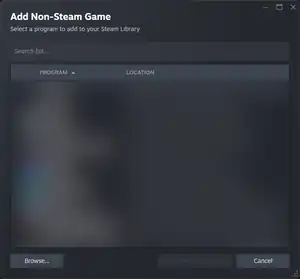
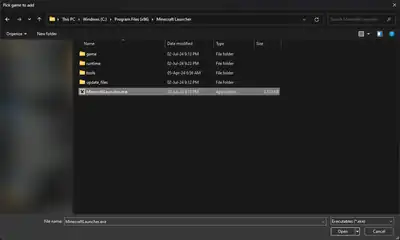
On Windows, the Minecraft Launcher executable sits on C:\Program Files (x86)\Minecraft Launcher. - Right click Minecraft Launcher in the game list, then click the "Properties..." button.
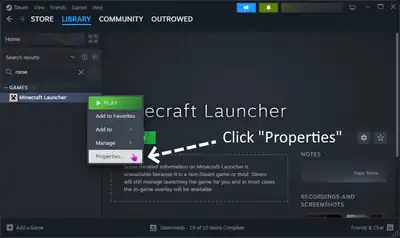
- Navigate to Controller settings, and then click the underlined "Controller Configurator".

- In controller configurator, you may configure your controller layout from a set of premade templates provided by Steam.
Since Minecraft: Java Edition does not support controller natively, it is recommended to choose "Keyboard (WASD) and Mouse" template. You can also browse for other presets made by Steam users.
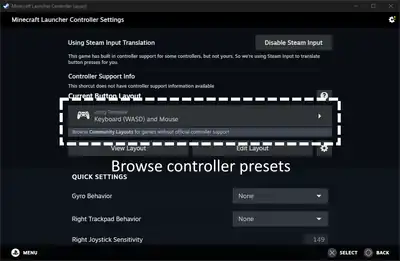
Browse premade templates for the controller layout. 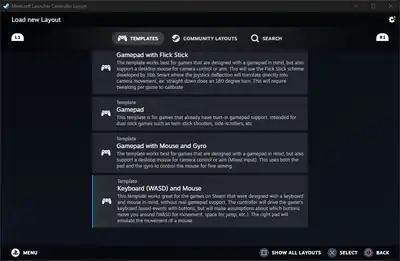
"Keyboard (WASD) and Mouse" is the recommended controller layout for Minecraft, as is designed for games without native controller support. - Start the game through Steam. You can now use your controller to play Minecraft: Java Edition!
Unfortunately, this method only supports the legacy Minecraft Launcher downloaded from the official website, and not from Microsoft Store. However, you can try out the next method using community-made mods.
Supported controllers in Steam are Xbox controller, PlayStation, Nintendo Switch, Steam controller, and Steam Remote Play. Other controllers may be supported, but expect some additional setup and configurations.
Community mods
This method is the most effective and reliable way to play Minecraft: Java Edition with game controllers, as mods can directly add controller support into the game itself. There are many community-made mods exist to enable controller support for Minecraft: Java Edition, such as Controllable, Controlify, and MidnightControls. In order to use these mods, you'd need to install a mod loader such as Forge or Fabric.