72

Since Ubuntu 13.04 storage access to external devices via MTP is supposed to work out of the box via a GVFS-MTP module.

While this question is about the Galaxy Nexus, other Android devices as well as Windows Phones and MTP enabled media players are also supported.

For troubleshooting see this anwser.


I am having quite a bit of problems getting file-transfers working over MTP with the Galaxy Nexus. I am using Kubuntu 11.10 64-bit, and this is what I have done and the results I get:

  1. Added rule for device in /etc/udev/rules.d/51-android.rules. The rule is the following and works for adb:

    SUBSYSTEMS=="usb", ATTRS{idVendor}=="04e8", ATTRS{idProduct}=="6860", MODE="0666", OWNER="leob" #Galaxy Nexus
    
  2. Restarted udev (and computer just to make sure).

Adb works, and all methods for reading from the device via MTP seems to work (I have tried mounting with mtpfs, gmtp and using the mtp-tools package directly). When I try to write to the device however, nothing I have tried works.

As an example, running mtp-newfolder test_dir 0 0 gives the following output:

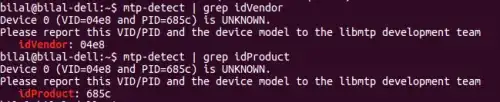
libmtp version: 1.1.0
Device 0 (VID=04e8 and PID=6860) is a Samsung GT-P7510/Galaxy Tab 10.1.
Folder creation failed.
ERROR: Could not close session!

If I run mtp-folders after a failed mtp-newfolder without re-plugging the device, I get the following output:

Attempting to connect device(s)
Device 0 (VID=04e8 and PID=6860) is a Samsung GT-P7510/Galaxy Tab 10.1.
PTP_ERROR_IO: failed to open session, trying again after resetting USB interface
LIBMTP libusb: Attempt to reset device
mtp-folders: Successfully connected
Friendly name: (NULL)
Error 1: Get Storage information failed.
Error 2: PTP Layer error 02fe: get_all_metadata_fast(): could not get proplist of all    objects.
Error 2: (Look this up in ptp.h for an explanation.)
Error 2: PTP Layer error 02fe: get_handles_recursively(): could not get object handles.
Error 2: (Look this up in ptp.h for an explanation.)
LIBMTP_Get_Storage()
: Resource temporarily unavailable
OK.

Accompanied by the following in dmesg:

[ 1000.912082] usb 2-4: reset high speed USB device number 7 using ehci_hcd
[ 1001.045877] usb 2-4: usbfs: process 3166 (mtp-folders) did not claim interface 0 before use

Does anyone have any idea about what to do?

EDIT:

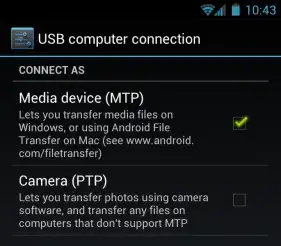
I also tried the PTP mode. Again, reading works fine, but I cannot write anything to the device.

Leo
  • 1,775

7 Answers7

37

Since Ubuntu 13.04, storage access to external devices via MTP works out of the box via a GVFS-MTP module.

Related question: Are there any plans to improve mtp support on future Ubuntu releases?

For troubleshooting, see this answer.


For me, it was a problem of not having the latest libmtp files on my system. So I fixed the problem and made this write-up to help others.

Summary of the link: There was a bug in the libmtp bundled with older Ubuntu releases. This bug was already fixed in the latest source of libmtp.

25

Have you tried Bilal Akhtar's suggestion at omgubuntu?

Connecting your Android phone or tablet to Ubuntu with MTPFS

  1. Setup

    First up, install the necessary tools with sudo apt-get install mtp-tools mtpfs

    Connect your Galaxy Nexus to your computer. On your phone, open up the notification drawer, and click on "USB Connection type". Make sure that MTP is selected.

    image showing Android USB connection settings

    Then, run these commands:

    mtp-detect | grep idVendor
    mtp-detect | grep idProduct
    

    You shall get an output like this: enter image description here

    Now, run these commands:

    gksu gedit /etc/udev/rules.d/51-android.rules
    

    A Gedit window should open up. Type this text in it, all in a single line:

    SUBSYSTEM=="usb", ATTR{idVendor}=="VENDORID", ATTR{idProduct}=="PRODUCTID", MODE="0666"
    

    Replace VENDORID with the idVendor you had noted down earlier. Similarly, replace PRODUCTID with the idProduct you had noted down. In my case, they were 04e8 and 685c respectively, but they might have been different for you.

    Save and close the file. Then, disconnect your phone and run these commands:

    sudo service udev restart
    sudo mkdir /media/GalaxyNexus
    sudo chmod a+rwx /media/GalaxyNexus
    sudo adduser $USER fuse
    

    $USER is a default shell variable and should be the user you want to add (usually yourself). Now, run this command:

    gksu gedit /etc/fuse.conf
    

    In the Gedit window, remove the # at the beginning of the last line (the one that begins with #user_allow_other) like this:

    enter image description here

    You're almost done! Now, restart your computer, and then run these three commands:

    echo "alias android-connect=\"mtpfs -o allow_other /media/GalaxyNexus\"" >> ~/.bashrc
    echo "alias android-disconnect=\"fusermount -u /media/GalaxyNexus\"" >> ~/.bashrc
    source ~/.bashrc
    
  2. Usage

    Connect your phone, make sure your phone is using MTP and run android-connect.

    Voila! You can now browse your Android phone contents using Nautilus. Just fire up the file manager, and then in the side bar click GalaxyNexus to browse your phone contents just like you would do with a USB stick. You can also add, remove and modify files just like a normal file system.

    screenshot of nautilus displaying phone contents

    To safely remove the phone, just run android-disconnect.

  3. Conclusion

    From now onward, you just need to run android-connect to mount your phone and then android-disconnect to safely remove your phone. Everything else should be handled automatically. I tried many ways of getting the mount and unmount to happen automatically on cable connect, but this was the best solution I could come up with.

    These two commands won't require root permissions to run. All users who are members of the fuse user group should be able to run these commands without root access.

    That's it! You've successfully connected your Ice Cream Sandwich phone to your Ubuntu computer. The process may be long for a newbie, but I’m sure someone will come around and make a GUI for all of this so that everything happens smoothly. :)

LiveWireBT
  • 29,597
desgua
  • 33,215
24

Connecting devices via MTP with GVFS

Since Ubuntu 13.04 storage access to MTP capable devices works out of the box through a GVFS backend. Please have a look at Are there any plans to improve mtp support on future Ubuntu releases? for installation instructions prior to 13.04.

This solution should work for all Android devices providing MTP functionality and probably all non-Android devices with MTP functionality like Windows Phones and Portable Media Players.

Don't be confused

There has been some confusion, let's try to clear things up:

  • You don't need to do anything that may void your warranty!

  • You don't need to root your device.

  • You don't need to unlock the bootloader. (You can find instructions for Android here.)

Unlocking just refers to the operating systems lockscreen in this answer.

  • You don't need to configure developer access to your device like ADB, fastboot or something similar through certain udev rules. (You can find instructions for Android in chapter Configuring USB Access here or here.)

  • As far as I know, you also don't need FUSE or configure FUSE-related options.

Troubleshooting issues

  1. I cannot put files onto the device.

    Your device must be unlocked to access the storage of the device with Ubuntu via MTP.

    showing device in nautilus in locked and unlocked state

  2. I'm getting an error message that the device cannot be mounted.

    If you get the below error message, try to replug the device once.

    error message that might pop up when connecting

    If the error message appears again open a new nautilus window from the launcher (preferable by clicking the icon of the device) and probably closing the current nautilus window. Possibly related: How create a udev rules to disable one of Android devices?

  3. Check if there are udev rules for your device

    Open a terminal and type lsusb. Find your device in the output and note down the ID (e.g. 0fce:01b1). The first part is the vendor ID the last part the product ID.

    Open the corresponding mtp udev rules file with nano /lib/udev/rules.d/69-libmtp.rules and seach for your product ID (use Ctrl+W). If you can't find it, you have to create a custom entry in /etc/udev/rules.d/69-libmtp.rules following the pattern below and reboot.

    # SONY Xperia Z2 MTP
    ATTR{idVendor}=="01b1", ATTR{idProduct}=="01b1", SYMLINK+="libmtp-%k", MODE="660", GROUP="audio", ENV{ID_MTP_DEVICE}="1", ENV{ID_MEDIA_PLAYER}="1"
    

    You should consider filing a bug against the libmtp package (more precisely libmtp-common) to have your device included in future versions, if this worked for you.

  4. I still can't connect

    Your device is either not supported by the underlying libmtp or you might experience the same issue I have with my Lumia 620, please follow the workaround (steps to reproduce) I posted in LP#1247572: Nokia Lumia 620 (WP8) fails to mount reliably via gvfs-mtp in nautilus. (The device still doesn't work flawless here, but using mtp-detect helps.)

    You should search the libmtp bug tracker for your device and follow the instructions for new devices on the project page to open a bug report.

  5. The bug tracker lists my device as supported but it still won't work

    In some cases a bug report concerning your device might have already been filed and solved in a more recent libmtp release than what your distribution ships with (e.g.: Motorola Moto G). If that's the case you will either have to wait for the official repositories to get updated or go looking for an updated PPA.

    An updated list of all libmtp versions available through the official Ubuntu software channels and private PPAs may be found here (make sure to expand Other versions of 'libmtp' in untrusted archives). As of 2014/02/13 this PPA by Matthieu Baerts offers the latest libmtp package available for Ubuntu.

    Warning: this PPA contains a variety of different and possibly unstable packages. I would advise against adding it to your system. Instead, you could download the libmtp packages separately and manually install them on your system.

    Please familiarize yourself with PPAs and their risks before moving any further. Please also read the paragraph below on restoring your original packages before proceeding with the following steps:

    1. Head to the package detail page of the PPA and expand the libmtp entry

    2. Download the following packages: libmtp-common, libmtp-runtime, libmtp9, mtp-tools. Make sure to choose the right architecture for your system (this will generally be amd64).

      Here are the package links as of 2014/02/13: libmtp-common, libmtp-runtime, libmtp9, mtp-tools

    3. Proceed to manually install the updated packages with dpkg (change $HOME/Downloads to your download folder and make sure no other deb files are present:

      cd "$HOME/Downloads" sudo dpkg -i *.deb

    4. Once everything has been installed successfully, restart your computer, unlock your Android device, connect it via USB and it should show up in your file manager.

    This has worked fine for me (@Glutanimate) with my Motorola Moto G. Because I was running Ubuntu 12.04 LTS I first had to install an updated version of gnome-gvfs. Please see installation instructions prior to 13.04 at the top for more information.

    To undo the changes if something goes wrong or if the device still isn't recognized you will have to manually install the original packages. Head to the libmtp source overview and find your Ubuntu release. Expand the entry in question and proceed to download the packages, just like you did in step 2 before. Continue with the installation as described in step 3 and reboot your system. Everything should be back to normal now.

Pablo Bianchi
  • 17,371
LiveWireBT
  • 29,597
5

All programs based on libmtp still seem to have issues with the Galaxy Nexus (as of libmtp 1.1.3). Programs based on gphoto2 work for me.

Personally I'm using gphotofs, available in a package of the same name.

Use gphotofs ~/mymountpoint to mount, then fusermount -u ~/mymountpoint to unmount when you're done.

bseibold
  • 1,513
4

Install the following and reboot:

sudo apt update
sudo apt install android-tools-adb gvfs-backends go-mtpfs jmtpfs gmtp  libgoogle-glog0v5 libmtp-common libmtp-dbg libmtp-dev libmtp-runtime libmtp9 gmtp jmtpfs mtp-tools python-pymtp
mchid
  • 44,904
  • 8
  • 102
  • 162
0

As a first step, I would install jmtpfs (sudo apt-get install jmtpfs in terminal - Ctrl+Alt+T ), then create a folder with mkdir foldername and then mount the device with jmtpfs foldername, then go to nautilus (Files).

If your device is not compatible with the libmtp version in ubuntu. You have to download and build a recent libmtp (> 1.1.12), as in: How can I install the latest version of libmtp?

You should be able to see the folders also using mtp-folders in a terminal or with the graphic interface gmtp.

Previous steps could show an error if you run them without sudo:

libusb_open() failed!: Permission denied

To avoid using sudo you should add your device to the /etc/udev/rules.d/51-android.rules file as above (see desgua) and reloading rules or restarting.

Ferroao
  • 959
-1

Just a small workaround, connect your ICS based phone with good old MASS STORAGE http://forum.xda-developers.com/showthread.php?t=1556367

adb install UMS1.0.apk