69

Currently I'm in a new building of my university. In this building my wifi often breaks down and then restores connection again. This is really irritating since it happens a lot.

Now as a coincidence there were some tech guys running around here and where asking everyone if the wifi was doing fine. I told them that my wifi tears down all the time and then reconnects. They figured out that my wifi is switching all the time between the 2.4 GHz channel and 5 GHz channel. They asked me if I could acces the driver settings of my wireless card. Unfortunately I don't know how to do this is in either Linux or Windows. And unfortunately again they only knew the windows solution xD.

So I hope somebody can tell me how I tell my wifi that it should stay on the 5 GHz network and not disconnect and switch to the 2.4 GHz channel?

-edit-

@arhimed, firstly thank you for your help.

I just tried what you said. It is some what different for me. I can't seem to save the settings when I change the setting and choose to use only the 5 GHz band.

"Network connections"->"Select the appropriate wireless network and click edit"->"In the wireless tab"->"Change the mode from infrastructure to ad-hoc"->"Choose 5 GHz band"
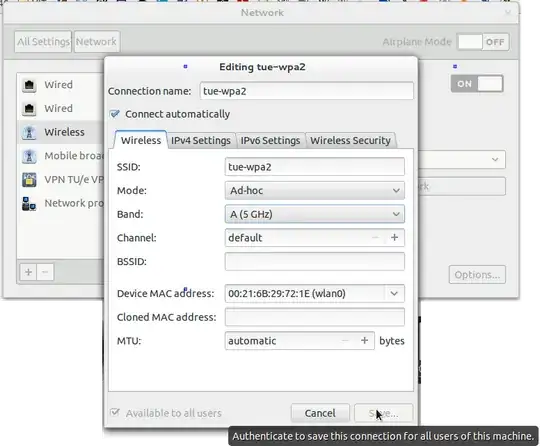
Wireless connection settings panel

However when I want to change the mode from infrastructure to ad-hoc the "save" button tells me that I have to authenticate myself. However I get no pop-up asking me for a password. Using sudo gnome-control-center didn't help either. I could still not save it. Also a error occured then in the terminal:

** (nm-connection-editor:5577): WARNING **: Invalid setting Wireless Security: Security not compatible with Ad-Hoc mode

Hopefully this is some useful info for you to help me further.

BenMorel
  • 173
WG-
  • 1,850

7 Answers7

44

Run:

$ iwlist wlan0 scanning | grep -C3 <name of your network>

You should find 2 entries for the network, for example:

Cell XX - Address: 11:11:11:11:11:11 // This will be different in your machine
ESSID: "name of your network" // This will be different on your machine
Protocol: IEEE 802.11bgn
Mode: Master
Frequency: 2.437 Ghz

--

Cell XX - Address: 22:22:22:22:22:22 // This will be different on your machine
ESSID: "name of your network // This will be different on your machine
Protocol: IEEE 802.11AC
Mode: Master
Frequency: 5.18 Ghz
  • BSSID for the 5Ghz Network, in this example: 22:22:22:22:22:22
  • BSSID for the 2.4 Ghz Network, in this example: 11:11:11:11:11:11

Now what you do is:

  1. click on 'Network Connections'
  2. 'Edit Connections...'
  3. [Select your network connection] (there could be 2 entries, any will do)
  4. Click Edit
  5. Go to 'Wi-Fi' or 'Wireless' Tab
  6. Click the BSSID Dropdown
  7. Select the BSSID Matching the 5 Ghz Network (22:22:22:22:22:22 in this example)
  8. Switch to the 'General Tab'
  9. Make sure to check the checkbox that is labeled: 'Automatically connect to this network when it is available'
  10. Rename the Connection Name (not the SSID) to 'your network name'_AC
  11. Click Save
  12. If there were 2 entries for 'your network name' in your Network Connections list, proceed with next step, otherwise go to the last step.
  13. Click on the other 'your network name' entry
  14. Click Edit
  15. Go to 'Wi-Fi' or 'Wireless' Tab
  16. Click the BSSID Dropdown
  17. Select the BSSID Matching the 2.4 Ghz Network (11:11:11:11:11:11 in this example) OR leave the BSSID empty if there are multiple other secondary access points
  18. Switch to the 'General' Tab
  19. Uncheck the checkbox that is labeled: 'Automatically connect to this network when it is available'
  20. Set the 'Connection name' to [your network name]_N
  21. Click Save...
  22. Disconnect from your network and re-connect

You should now be connected to the 5Ghz network, and you would have to explicitly do the opposite process in order to connect to the 2.4 Ghz Network.

EoghanM
  • 5,135
33

Method 1 — for use at home with a single wireless router

First, connect to your basic wifi network under "Infrastructure". Next, click on BSSID. The BSSID you are connected to at that time should appear when you click on that arrow. This feature prevents your computer from switching networks. 2.4 Ghz and 5 Ghz.


Method 2 — roaming on a network with multiple access points like a college campus or public wifi

NOTE: If you used the method above, you will need to do the opposite before you begin. Make sure the BSSID is not set to anything (is blank) so that you can use multiple access-points and roam across the network.

First, you will need to edit the system-connections file that corresponds to your network. For this example, I will use a network named "coffee-shop".

sudo nano /etc/NetworkManager/system-connections/coffee-shop

Now, under the [wifi] section, edit the band field to the following (if band= is not listed, you can insert it on the line below [wifi]):

band=a

This will set the network to use 5 GHz only. If you want to use 2.4 GHz, use band=bg instead.

When you are done editing, press CTRL+o and then press ENTER to save the file and then press CTRL+x to exit nano.

Finally, restart network-manager to apply the changes:

sudo systemctl restart network-manager

Click here for more information.

NOTE: this setting does not exclude you from using wireless n or wireless c (so don't worry), this feature is only used to select 2.4 or 5 GHz

mchid
  • 44,904
  • 8
  • 102
  • 162
6

Change that "Ad-hoc" option to something else, like "Infrastructure" (or a similar menu option). Infrastructure wireless is your typical "lots of devices connecting to a single router" approach, while ad-hoc wireless is intended for a "mesh" of wireless devices with no centralized router.

Being in ad-hoc mode is likely what's causing your problem (and this is further evidenced by the error message you provided).

3

This may work or may not work. Based on my experience, it is inconsistent. On the network manager settings, you can manually enter the BSSID of the AP. You can found out the BSSID using an android application called 'WIFI analyzer'. You can also use other linux based wifi monitoring tools like Kismet, but the easiest way that I found out is using the android application. If you don't know, 5Ghz AP have higher channel number (more than 13). Now, the inconsistency, depending on distro, the BSSID select box may be populated, or you have to input it manually. Either way, enter the BSSID that you wish to connect, and set the name of the network to something you can remember, like "U-WIFI-5Ghz". Now unfortunately, sometimes the network will appear (and you can connect to that specific AP) and sometimes it do not even if you know the AP is close by.

asdacap
  • 203
1

For those who came here in a desperate search and don't have control over the router. Here's what worked for me on Ubuntu 20.04:

  1. Create a new connection to the network (or just use the existing one).
  2. Use nm-connection-editor to set it to the desired band (A(5GHz) or B/G(2.4GHz) ) instead of Automatic.
  3. Reconnect, network manager will create a new connection with the same ESSID and a slightly different name.
  4. Edit the new connection and set it to the undesired band instead of Automatic.
  5. Edit the first connection again, go to the General tab and set a high enough priority in the automatically connect with priority ___ field.
  6. Reconnect.
  7. ???
  8. Profit!

Don't forget to check you're actually on the required band by sudo iwlist freq.

0

Run the following commands, one line at a time in the terminal (CTRL+ALT+T):

echo "options iwlwifi 11n_disable=1" | sudo tee /etc/modprobe.d/iwlwifi.conf
sudo modprobe -rfv iwldvm
sudo modprobe -rfv iwlwifi
sudo modprobe -v iwlwifi

What does this do? The 11n_disable option disables 802.11n features. Adding it to

/etc/modprobe.d/iwlwifi.conf

makes the change persist after reboots (because it will be part of the module config). The modprobe -rfv commands are removing the kernel modules iwldvm and iwlwifi, and finally the last line modprobe -v is adding iwlwifi back in.

To know what those kernel modules are/do, you can run modinfo | grep description, which will tell you the following:

iwlwifi is an Intel(R) Wireless WiFi driver for Linux (generic Intel drivers)

iwldvm is Intel(R) Wireless WiFi Link AGN driver for Linux (more specific drivers)

Other suggestions

Now, check the settings in the router. WPA2-AES is preferred; not any WPA and WPA2 mixed mode and certainly not TKIP. Second, if your router is capable of N speeds, You may have better luck with a channel width of 20 MHz in the 2.4 GHz band instead of automatic 20/40 MHz. I also have better luck with a fixed channel, either 1, 6 or 11, rather than automatic channel selection. After making these changes, you may need to reboot the router.

0

I need clearer instructions to follow which work on modern 2.4 GHz / 5 GHz mixed mesh router WiFi networks, such as what comes from my Quantum Fiber internet provider's W1700K pod and WiFi 7 router. So, here is my answer, expanding on @mchid's answer.

Forcing Ubuntu to connect to only 5 GHz WiFi networks for a given network name (SSID)

...even on modern 2.4 GHz / 5 GHz mixed mesh router WiFi networks.

Tested on Linux Ubuntu 22.04.

  1. Find your SSID for your network.

    iwconfig | grep -C7 ESSID
    

    Look for the name after "ESSID".

    Ex: this output:

    wlp0s20f3  IEEE 802.11  ESSID:"SmithsHome"  
              Mode:Managed  Frequency:2.462 GHz  Access Point: 02:01:23:18::9B
    

    ...means that the SSID is SmithsHome.

    You can also see just above that we are on the 2.4 GHz band at frequency 2.462 GHz in this case.

  2. Open up the corresponding .nmconnection file for this SSID in the gedit GUI text editor.

    Be sure to replace SmithsHome with your SSID in the file path!

    # Open the file in the gedit GUI text editor
    sudo gedit /etc/NetworkManager/system-connections/SmithsHome.nmconnection
    
  3. Change the [wifi] section from this:

    [wifi]
    mode=infrastructure
    ssid=SmithsHome
    

    ...to this:

    [wifi]
    mode=infrastructure
    ssid=SmithsHome
    band=a
    

    Notice the addition of band=a to the end. This forces the connection to use the 5 GHz band. To use only the 2.4 GHz band, use band=bg instead. To let it choose, which is the default, delete the band= line entirely, like it was before.

    Save and close the file.

    Note: be careful with copying this file. It contains your WiFi password in plain text under the [wifi-security] section.

  4. Restart the network manager to apply the changes.

    sudo systemctl restart NetworkManager
    
  5. Ensure you are reconnected to the network.

  6. Verify you are now connected to the 5 GHz band.

    iwconfig | grep -C7 ESSID
    

    Look for the "Frequency" in the output. If it is around 5 GHz, you are connected to the 5 GHz band.

    Ex: this output:

    wlp0s20f3  IEEE 802.11  ESSID:"SmithsHome"  
              Mode:Managed  Frequency:5.18 GHz  Access Point: 0A:01:23:18::9B
    

    ...means that you are now connected to the 5 GHz band, specifically at frequency 5.18 GHz in this case.

  7. Done! Now we can finally enjoy the faster speeds of the 5 GHz band, despite using the still-somewhat-clunky Linux Ubuntu OS.

  8. If you'd like to speed test the difference, run speedtest by Ookla at the command-line. You can get it here: https://www.speedtest.net/apps/cli. Or, run it in a browser here: https://www.speedtest.net/. I prefer the command-line.

    I generally find the 5 GHz band to be 5~10x faster than the 2.4 GHz band, even on really weak WiFi signals.

    Ex: if I get 10 Mbps down and 7 Mbps up on the 2.4 GHz band, I might get 70~100 Mbps down and 60~80 Mbps up on the 5 GHz band, even in the same exact location and with a weak signal, on my home 1 Gbps fiber connection.

References

  1. This answer is all my own, but I chatted with Microsoft Copilot in the Edge browser to figure it out. I've fully tested it.
  2. @mchid's answer
Gabriel Staples
  • 11,502
  • 14
  • 97
  • 142