Instead of going to sites like speedtest.net, I want to check my current Internet speed from the terminal on Ubuntu. How can I do it?
Asked
Active
Viewed 1.9M times
16 Answers
1243
I recommend the speedtest-cli tool for this. I created a blog post (Measure Internet Connection Speed from the Linux Command Line) that goes into detail of downloading, installing and usage of it.
The short version is this: (no root required)
curl -s https://raw.githubusercontent.com/sivel/speedtest-cli/master/speedtest.py | python -
With Python3:
curl -s https://raw.githubusercontent.com/sivel/speedtest-cli/master/speedtest.py | python3 -
Output:
Retrieving speedtest.net configuration...
Retrieving speedtest.net server list...
Testing from Comcast Cable (x.x.x.x)...
Selecting best server based on ping...
Hosted by FiberCloud, Inc (Seattle, WA) [12.03 km]: 44.028 ms
Testing download speed........................................
Download: 32.29 Mbit/s
Testing upload speed..................................................
Upload: 5.18 Mbit/s
Update in 2016:
speedtest-cli is in Ubuntu repositories now. For Ubuntu 16.04 (Xenial) and later use:
sudo apt install speedtest-cli
speedtest-cli
Update in 2018:
Using pip install --user speedtest-cli gets you a version that is probably newer than the one available from your distribution's repositories.
speedtest-cli
Update in 2022:
sudo apt install speedtest-cli
speedtest-cli --secure
Shubham A.
- 103
- 4
mweisel
- 12,570
86
If you can't be bothered to install iperf , you could precede any command that shifts a known amount of data with the time command and do a sum.
iperf is simple and easy to use.
It requires a client and server.
(on the server)
user@server$ iperf -s
(on the client)
 user@client$ iperf -c server.domain
 ------------------------------------------------------------
 Client connecting to 192.168.1.1, TCP port 5001
 TCP window size: 16.0 KByte (default)
 ------------------------------------------------------------
 [  3] local 192.168.1.3 port 52143 connected with 192.168.1.1 port 5001
 [ ID] Interval       Transfer     Bandwidth
 [  3]  0.0-10.0 sec    113 MBytes  94.7 Mbits/sec
38
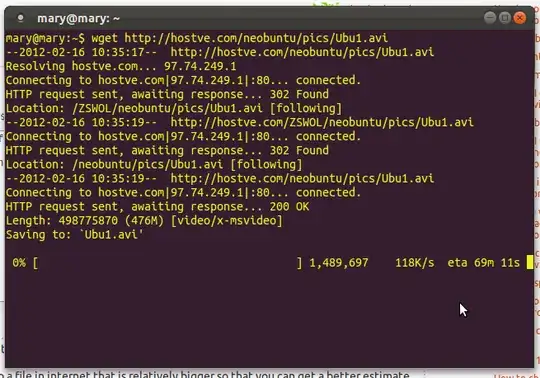
Well I use wget for it. That little tool tells me nicely what speed I have.
To use it just point to a file in internet that is relatively bigger so that you can get a better estimate of it.
For example
typing: wget http://hostve.com/neobuntu/pics/Ubu1.avi would start to download the Ubu1.avi file and show at what speed it is downloading.
Of course there are several recommendations:
Speed test yourself with good servers. In the case of my link the speed is less than 200KB so if you have a higher speed, the server will be the bottleneck for you, not your actual speed.
The highest speed you will see is the maximum speed that your connection and the server's connection can offer. If your connection is 512KB and the place where you are downloading is 400KB, your max connection will be 400KB because it is the max for the server you are downloading from.
You need to do the test at least 5 times to have a reliable speed check or at least do it for a minute or two. This will help you have a more accurate check.
You need to have at least 4 or 5 different testing sources to have a more accurate speed. Never test only from the same site as this can be affected by your distance to it, any problem in the server and the connections to it, etc. Always test from different servers.
ARIA2
This is an alternative to wget. The downside of wget is the lack of parallel connections. To use aria2 we fist need to download it:
sudo apt-get install aria2
To use it is simple:

In the image, the -x 4 is how many parallel connections we wish to use. The CN parameter in the next line shows how many active parallel connections were permitted to download from that site. In this case CN is 4. But if we tried to have more connections we would get something like this:

We set 8 parallel connections but the site only allowed a maximum of 5 as shown by CN:5. This could be solved by the -j option which tells aria2c the maximum concurrent connections we want (Which by default is 5) but if the server has limited this, -j will not work.
Luis Alvarado
- 216,643
21
Since speedtest-cli is a python application, it is much easier to install by doing:
pip install speedtest-cli
or:
easy_install speedtest-cli
Depending on how Python is installed on your system, you may need to be root to do the above.
BobC
- 319
17
I'm regularly using something like this:
% wget -O /dev/null --progress=dot:mega http://cachefly.cachefly.net/10mb.test ; date
--2020-01-06 03:31:05--  http://cachefly.cachefly.net/10mb.test
Resolving cachefly.cachefly.net (cachefly.cachefly.net)... 2607:7700::18:0:1:cdea:afaf, 205.234.175.175
Connecting to cachefly.cachefly.net (cachefly.cachefly.net)|2607:7700::18:0:1:cdea:afaf|:80... connected.
HTTP request sent, awaiting response... 200 OK
Length: 10485760 (10M) [application/octet-stream]
Saving to: <</dev/null>>

     0K ........ ........ ........ ........ ........ ........ 30% 3.02M 2s
  3072K ........ ........ ........ ........ ........ ........ 60% 3.97M 1s
  6144K ........ ........ ........ ........ ........ ........ 90% 3.94M 0s
  9216K ........ ........                                    100% 3.99M=2.8s

2020-01-06 03:31:08 (3.62 MB/s) - <</dev/null>> saved [10485760/10485760]

Mon Jan  6 03:31:08 CST 2020
%
You can change the 10mb part in /10mb.test to 1mb, 4mb, 5mb, 10mb, 50mb, 100mb, 200mb, 400mb, 2000mb, 4000mb, and possibly some other values.
You can also change the --progress=dot:mega part to --progress=dot:default, --progress=dot:binary, --progress=dot:mega and --progress=dot:giga; this setting helps you see how fast the download is going, and preserve more than a single reading over the whole duration of the download, which is helpful for when you need to share the results with someone, or just save it for your own records as a sort of a graph.
user273818
- 431
12
I happen to like the speedometer Ubuntu cli.
speedometer -r eth0
To watch a live graph of incoming data speeds.
6ft Dan
- 323
8
a simple one-liner that tests how long it takes to download 100MB (works on /bin/sh also):
t=$(date +"%s"); wget http://speedtest.tele2.net/100MB.zip -O ->/dev/null ; echo -n "MBit/s: "; expr 8 \* 100 / $(($(date +"%s")-$t))
explanation:
- store the timestamp in $t
- download 100mb but don't store anything
- calculate
8 * 100mb / $t
rubo77
- 34,024
- 52
- 172
- 299
5
Actually, Ookla, the provider of Speedtest released a command-line utility that is measuring your speed against a huge number of servers spread around the world. You can find instructions on how to install it on this link and you can use it fairly simple by executing:
speedtest -s XXXX -f csv|tsv|jsonl|json|json-pretty
where -s sets the server ID against which you want to test your Internet speed, -f is defining the format of the output. I think the most useful information is generated when you use json/json-pretty format for the output because a lot of the information of the test setup isn't printed if you are using the csv/tsv format. Both -s and -f are just optional but if you want to automate your measurement they might be useful.
In addition, you can find a list of the servers which speedtest is using on this address in the form of an XML file or on this address with a searchable field: link.
Georgi Stoyanov
- 263
- 1
- 4
- 11
3
I wanted something more advanced than speedtest.net and various solutions that rely solely on a single website. So I did the thing I normally do and wrote my own solution:
https://github.com/cubiclesoft/network-speedtest-cli
From the features list:
- SSH/SFTP (port 22) speed testing.
- Common TCP ports 80, 443, and 8080 as well as random TCP port speed testing using a custom TCP/IP server that supports speeds up to 2.2 Gbps down and 780 Mbps up.
- Fairly basic network latency testing.
- Spin up Digital Ocean droplets and speed test SSH/SFTP and various TCP ports.
- Speedtest.net and custom OoklaServer speed testing. Produces similar results to the single connection tests at single.speedtest.net.
- Pure JSON output in silent mode (-s).
It's a more generic solution that can be consumed by other applications. I managed to pinpoint an ISP network issue with it that resulted in doubling my SFTP downstream speed, which resulted in increased happiness.
CubicleSoft
- 141
3
Run several instances of wget with timeout command on large files:
#!/bin/bash

timeout 5 wget -q url_1/100MB.zip &
timeout 5 wget -q url_2/file.zip &
timeout 5 wget -q url_3/sample.mov &
timeout 5 wget -q url_4/speech.mp4 &
And then write a script to calculate the total bytes downloaded and divide 5 seconds you will get a bytes/sec figure. Should be quite accurate and you can add more instances to max your bandwidth.
I have yet to test the full script but the single line command "timeout 5 wget url" works, and you get a partially downloaded file as a result (if 5 secs is not enough to complete the download).
3
you can use tespeed . it is a Terminal network speed test that uses servers from Speedtest.net. It uses nearest test server but can also use one manually specified by the user.
 git clone git://github.com/Janhouse/tespeed.git
 cd tespeed
 git submodule init
 git submodule update
 ./tespeed.py

for more info use :
./tespeed.py -h
it will provide more option for speed test.
pl_rock
- 11,715
2
Simple bash script based on @rexis answer. You can put your own links for testing in links array or read them from file
#!/bin/bash
export LC_ALL=C  #make output in English eg for later use with "du | grep"

TMP_PATH=/tmp/speedtest_data/
TEST_TIME=5

rm -rf $TMP_PATH && mkdir $TMP_PATH

links=("http://client.cdn.gamigo.com/bp/eu/com/110a/BPClientSetup-2b.bin" "http://client.cdn.gamigo.com/bp/eu/com/110a/BPClientSetup-1b.bin" "http://client.cdn.gamigo.com/bp/eu/com/110a/BPClientSetup-1c.bin" "http://ftp.ntua.gr/pub/linux/ubuntu-releases-dvd/quantal/release/ubuntu-12.10-server-armhf+omap.img" "http://ftp.funet.fi/pub/Linux/INSTALL/Ubuntu/dvd-releases/releases/12.10/release/ubuntu-12.10-server-armhf+omap.img" "http://ftp.icm.edu.pl/pub/Linux/opensuse/distribution/13.2/iso/openSUSE-13.2-DVD-x86_64.iso")

echo "Testing download"

for link in ${links[*]}
do
    timeout $TEST_TIME wget -q -P $TMP_PATH $link &
done

wait

total_bytes=$(du -c -b $TMP_PATH | grep total | awk '{print $1}')

echo "Cleaning up"
rm -rf $TMP_PATH

speed=$(echo "scale=2; $total_bytes / $TEST_TIME / 128" |bc)

echo "Speed is $speed Mbit/s"

exit 0
1
To conveniently get my download speed in bits-per-second, I define the following in my $HOME/.bash_aliases file:
speed-test='wget --output-document=/dev/null --report-speed=bits http://speedtest.wdc01.softlayer.com/downloads/test500.zip'
where:
--output-document=/dev/null effectively discards the wget output
--report-speed=bits displays the wget download speed average in bits-per-second (bps) instead the default bytes-per-second (Bps)
trellem
- 61
1
For charts + the 30,000 feet view of representative actual speeds
I was looking for:
- A broad, multi-ISP, representative view of real-life speeds
- Upload-speeds + round-trip latencies. Not just download speeds
- Eliminate ISP bias and possible tricks they might play to make specific speed-tests appear faster than most other speeds are
- High-level graphical output rather than just numbers. One picture is worth a 1000 words
Not being able to find anything that answered all these requirements, I wrote my own while avoiding reinventing the wheel wherever possible.
Under the hood, I used speedtest-cli for the ISP selection and the metrics, and R/ggplot for plotting. The code has been well tested on Ubuntu 16.04, 18.04 & 20.04.
The output provides the 3 main metrics (download, upload, and ping round-trip times) for the closest 20 data-centers to you (the tester), plus estimated distances and Internet provider names.
Source code
All the code is available from github with howto, examples & my story of looking for better speeds.
All this code is CLI based. The image viewer can also be called from the command line.
Example of the charts it generates
After a plan upgrade (DL-speeds are great, UL-speeds not so much)

A manually annotated earlier test, testing a theory:

arielf
- 2,883
1
You can also try http://dl.getipaddr.net
They use curl (which is a well known command line utility) to run a speed test.
In short
wget https://raw.github.com/blackdotsh/curl-speedtest/master/speedtest.sh && chmod u+x speedtest.sh && bash speedtest.sh
user385795
- 11