3

I found few similar questions in this site but could not complete the process.

From the Answer of How can instantaneously extract text from a screen area using OCR tools? and How can I use OCR on a partial screen capture to get text?

First I installed the dependencies

sudo apt-get install tesseract-ocr
sudo apt-get install imagemagick
sudo apt-get install scrot
sudo apt-get install xsel

Then I put the following script in /home/blueray/Documents/Translate/screen_ts.sh

#!/bin/bash 
# Dependencies: tesseract-ocr imagemagick scrot xsel

SCR_IMG=`mktemp`
trap "rm $SCR_IMG*" EXIT

scrot -s $SCR_IMG.png -q 100    
# increase image quality with option -q from default 75 to 100

mogrify -modulate 100,0 -resize 400% $SCR_IMG.png 
#should increase detection rate

tesseract $SCR_IMG.png $SCR_IMG &> /dev/null
cat $SCR_IMG.txt | xsel -bi

exit

Please note that I removed

select tesseract_lang in eng rus equ ;do break;done
# Quick language menu, add more if you need other languages.

In the hope that it will only consider english. Please let me know if this is not the case.

Now when I put

bash /home/blueray/Documents/Translate/screen_ts.sh

It works as I wanted.

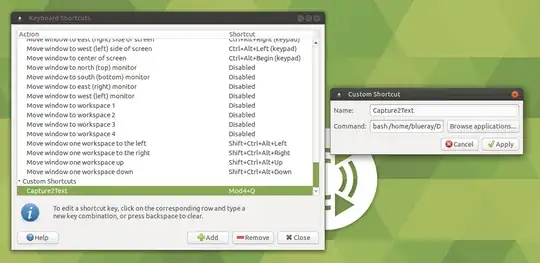
In windows, with Capture2Text, I used to use Win+Q to capture part of the screen as text. So, I checked How do I set a custom keyboard shortcut to control volume?

I went to Menu-> Searched for Keyboard Shortcuts -> Click

enter image description here

  1. Then I clicked Add
  2. Name: Capture2Text
  3. Command: bash /home/blueray/Documents/Translate/screen_ts.sh
  4. Clicked Apply
  5. Clicked On Shortcut on the right.
  6. Pressed WinQ

Now when I press WinQ, nothing happens. What am I doing wrong?
muru
  • 207,228

4 Answers4

3

You don't need "scrot". Imagemagick (which provided "mogrify") can do the job of screen capture. You also don't need to save an intermediate image, as "tesseract" can accept an image on standard input.

As such the above simplifies to...

convert x: -modulate 100,0 -resize 400% -set density 300 png:- |
  tesseract stdin stdout | xsel -bi

However I also added the following to my version of the script, to pop up the text on screen so you can check it.

xsel -po | xless - &

Of course tesseract could use some improvements for some fonts! For example 'f's in some fonts have a small hook that makes tesseract think they are 'P's! Arrghhhh...

EDIT: Full script I use is located at...

https://antofthy.gitlab.io/software/#capture_ocr

I link this to a 'hotkey' (Meta-Print) using my window manager (openbox), so I can use it at any time.

If you can't use a hotkey, and need to uncover the part of the screen containing the text you can always launch it with a delay...

sleep 5; capture_ocr

Enjoy

anthony
  • 334
1

I had to tweek @anthony 's script so it would work on my box (Kubuntu 18.04):

Instead of the convert line, I used:

import -resize 300% +dither png:- |

Also, I removed the trailing minus - sign from the last line, so:

xsel -ob | $XPAGER

Working great.

pasqal
  • 11
0

I use the following script:

#!/usr/bin/env bash

maim --hidecursor --format=png --select | tesseract - - -l eng --dpi 300 | xclip -selection clipboard

First - → Input from stdin (instead of a file)

Second - → Output to stdout (instead of a file)

notify-send "OCR" "Text copied to clipboard!"

Please bind it to a keyboard shortcut.

0

Here's my own version of the above script. It improves on several points:

  • uses command line parameter for language 3-letter code (default eng)
  • negate the image if white text on black to improve tesseract's readability
  • remove alpha channel as some desktops use transparency and it messes with the OCR
  • use a whitelist of characters to avoid weird characters in OCR
#! /bin/bash
# Dependencies: tesseract-ocr imagemagick scrot xsel

Quick language menu, add more if you need other languages.

List possible ones with --list-langs

#select tesseract_lang in eng fra ita; do break; done

Use command line parameter. Default to english

tesseract_lang=${1:-eng}

SCR_IMG=$(mktemp) trap "rm $SCR_IMG*" EXIT

For X11

#scrot -s "$SCR_IMG.png" -q 100

For Wayland

#grim -o "$SCR_IMG.png"

For X11 without artifacts

#scrot -a $(slop -f '%x,%y,%w,%h') -s "$SCR_IMG.png" -q 100 maim -s "$SCR_IMG.png"

increase image quality with option -q from default 75 to 100

Get the color of the 1st pixel: if black, negate the image below to increase detection rate

Pix=$(convert -type bilevel "$SCR_IMG.png" -format "%[pixel:u.p{0,0}]\n" info:)

Also remove possible transparency

if [ "$Pix" = "gray(0)" ]; then mogrify -alpha off -negate -modulate 100,0 -resize 400% "$SCR_IMG.png" else mogrify -alpha off -modulate 100,0 -resize 400% "$SCR_IMG.png" fi

Use a whitelist of chars to improve detection

You might want to make it language specific

tesseract -l $tesseract_lang -c 'tessedit_char_whitelist= !"&'"'"'(),-.0123456789:;?#@ABCDEFGHIJKLMNOPQRSTUVWXYZabcdefghijklmnopqrstuvwxyz' "$SCR_IMG.png" "$SCR_IMG" &> /dev/null

cat "$SCR_IMG.txt" | xsel -bi # Copy to clipboard cat "$SCR_IMG.txt"

dargaud
  • 1,028