576

I just read Meet Etcher, A Stylish Open-Source USB Image Writer Tool. It talks about downloading an AppImage.

Yes, Linux; the Linux packages are distributed as a .appimage for 32-bit and 64-bit distributions, and should run across all major Linux distributions without any issues. The team currently has no plan to provide a native .deb (or .rpm) installer.

What are AppImages? How do they differ from snaps?

DK Bose
  • 44,553

8 Answers8

649

Basic Information

Regarding installation

I am quoting the appImage project page here:

AppImages can be downloaded and run without installation or the need for root rights.

Making it executable

You can make the appImage executable as follows:

chmod a+x exampleName.AppImage

Executing it

You can execute an appImage as follows:

./exampleName.AppImage

Additional Information

About appImage

You can find some general informations about appImage here.

I am quoting the appImage project page here:

The key idea of the AppImage format is one app = one file. Every AppImage contains an app and all the files the app needs to run. In other words, each AppImage has no dependencies other than what is included in the targeted base operating system(s).

Wikipedia adds

AppImage (and the predecessors klik and portablelinuxapps) do not install software in the traditional sense (i.e., it do not put files all over the place in the system).

It use one file per application. Each one is self-contained: it includes all libraries the application depends on and that are not part of the base system. In this regard, it is similar to "application virtualization". One can use a AppImage file even if they are not a superuser, or they are using a live CD. AppImage files are often simpler than compiling and installing an application, as no installation actually took place. The AppImage file is a compressed image which is temporarily mounted to allow access to the program, but not having to extract the program or modify the underlying system.

The README.md of the AppImageKit-project offers a lot additional informations like Use cases, the problem space and objectives.

Use Cases

  • As a user, I want to go to an upstream download page, download an application from the original author, and run it on my Linux desktop system just like I would do with a Windows or Mac application.

  • As a tester, I want to be able to get the latest bleeding-edge version of an application from a continuous build server and test it on my system, without needing to compile and without having to worry that I might mess up my system.

  • As an application author or ISV, I want to provide packages for Linux desktop systems just as I do for Windows and OS X, without the need to get it 'into' a distribution and without having to build for gazillions of different distributions.

Objectives

  1. Be Simple.

AppImage is intended to be a very simple format that is easy to understand, create, and manage.

  1. Maintain binary compatibility.

AppImage is a format for binary software distribution. Software packaged as AppImage is intended to be as binary-compatible as possible with as many systems as possible. The need for (re-)compilation of software should be greatly reduced.

  1. Be distribution-agnostic.

An AppImage should run on all base operating systems (distributions) that it was created for (and later versions). For example, you could target Ubuntu 9.10, openSUSE 11.2, and Fedora 13 (and later versions) at the same time, without having to create and maintain separate packages for each target system.

  1. Remove the need for installation.

AppImages contain the app in a format that allows it to run directly from the archive, without having to be installed first. This is comparable to a Live CD. Before Live CDs, operating systems had to be installed first before they could be used.

  1. Keep apps compressed all the time.

Since the application remains packaged all the time, it is never uncompressed on the hard disk. The computer uncompresses the application on-the-fly while accessing it. Since decompression is faster than reading from hard disk on most systems, this has a speed advantage in addition to saving space. Also, the time needed for installation is entirely removed.

  1. Allow to put apps anywhere.

AppImages are "relocatable", thus allowing the user to store and execute them from any location (including CD-ROMs, DVDs, removable disks, USB sticks).

  1. Make applications read-only.

Since AppImages are read-only by design, the user can be reasonably sure that an app does not modify itself during operation.

  1. Do not require recompilation.

AppImages must be possible to create from already-existing binaries, without the need for recompilation. This greatly speeds up the AppImage creation process, since no compiler has to be involved. This also allows third parties to package closed-source applications as AppImages. (Nevertheless, it can be beneficial for upstream application developers to build from source specifically for the purpose of generating an AppImage.)

  1. Keep base operating system untouched.

Since AppImages are intended to run on plain systems that have not been specially prepared by an administrator, AppImages may not require any unusual preparation of the base operating system. Hence, they cannot rely on special kernel patches, kernel modules, or any applications that do not come with the targeted distributions by default.

  1. Do not require root.

Since AppImages are intended to be run by end users, they should not reqiure an administrative account (root) to be installed or used. They may, however, be installed by an administrator (e.g., in multi-user scenarios) if so desired.

dufte
  • 14,198
  • 5
  • 41
  • 43
69

Before you can run an AppImage, you need to make it executable. This is a Linux security feature. There are two main ways to make an AppImage executable:

Using the GUI

How to make an AppImage executable

or

Using command line

chmod a+x Some.Appimage

Now double-click your file to run it OR Right-click > Run

Pablo Bianchi
  • 17,371
probono
  • 1,269
38

The basic idea might look similar between the two systems, but there are some design differences between snaps and Appimages.

Some "big" ones that come to my mind are:

  1. Security, in terms of confinement: Snap packages run in a sandbox, and they are not allowed to escape from it and reach other parts of the system that they should not touch. This is a stronger security layer that runs parallel to the permission's system. Obviously, it is a bit frustrating when dealing with it at the beginning (and also later on), but if you think about it in terms of system administration, this is the thing that an administrator wants for their users.

  2. Security: Installing software taken from around the net, is as safe as going around licking poles in the streets. Sometimes nothing happens, sometimes you get some very big health issues. Snap packages have their proper repositories, that are controlled by Canonical, like the usual standard Ubuntu repositories. You can go on and install .deb files from around, but that will be your choice and not a design issue.

  3. Installation: AppImages are meant to be the equivalent of the "portable Windows executables". All the libraries are self-contained and any user can just download and execute one of those. On the other hand, snap packages are proper packages, and they need to be installed (as root, or with sudo) via the apposite package manager (snap install tic-tac-toe throws an error: it needs sudo!)

  4. Removal: To remove a snap package, you need to use the package manager snap remove ... with the right permissions to do so. AppImages, on the other hand, are just "there". So any user does not want that AppImage? He/she just removes the file and it is gone.

While I strongly suggest being cautious when using AppImages, I personally use some of them myself.

I find them particularly useful on my work system, where I do not have root access (only the admin has that) but I need the latest version of particular software that, fortunately, the developer has provided in Appimage form.

I am a bit afraid that some malign code is indeed contained in them, so I checked as much as possible the identity of the publisher. I am not 100% sure that this software is benign, but I have done all I could.

dadexix86
  • 6,776
27

AppImages require FUSE to run. Filesystem in Userspace (FUSE) is a system that lets non-root users mount filesystems.

Install FUSE

Many distributions have a working FUSE setup out-of-the-box. However if it is not working for you, you may need to install and configure FUSE manually.

For example, on Ubuntu:

sudo apt-get install fuse
sudo modprobe fuse
sudo usermod -a -G fuse $USER

For example, on openSUSE:

sudo zypper install fuse

Fallback

If you don't want to install FUSE, you can either mount or extract the AppImage.

To mount the AppImage and run the application, simply run

sudo mount -o loop Some.AppImage /mnt
/mnt/AppRun

If that does not work, you might have an experimental type 2 AppImage. These require you to pass -o offset=... to the mount command. Run the AppImage with --appimage-offset to find out the correct number for the offset.

George Udosen
  • 37,534
insign
  • 397
21

None of above answers helped me, because none actually shown how to install AppImage. By install, I usually mean: place executable where executables are usually stored on disk and make it accessible via app launcher.

On example of Arduino IDE:

  1. Make AppImage executable
chmod +x ./arduino-ide_nightly-20230209_Linux_64bit.AppImage
  1. Move it to Applications directory:

Citing AppImage docs:

An important point about the AppImage format is that you can store AppImage files wherever you want. [...] If you don’t want to leave them in $HOME/Downloads, then $HOME/Applications is a good choice. Many third-party tools (especially the ones managing desktop integration) use this location, too. Other options involve $HOME/.local/bin and $HOME/bin, which are useful mainly for CLI tools.

mv arduino-ide_nightly-20230209_Linux_64bit.AppImage ~/Applications/
  1. Adding it to app launcher:

In order to do that, we need to add Desktop Entry (more info here)

touch ~/.local/share/applications/arduino-ide.desktop

Open it in your favorite text editor and add configurations, similar to that:

[Desktop Entry]
Version=1.0
Name=Arduino IDE
Exec=/home/piotrek/Applications/arduino-ide_nightly-20230209_Linux_64bit.AppImage
Terminal=false
Type=Application
Categories=Utility;Development;

Just remember to change "Exec" to point to place where your AppImage is stored.

  1. Make it executable
chmod +x ~/.local/share/applications/arduino-ide.desktop

At this point, you should have your app in App Launcher.

If you use KDE, you may need to right-click on app launcher icon on the taskbar, choose "Edit applications" and just click "Save". KDE will then refresh its cache and app will appear in launcher.

If you use GNOME, run gsettings reset org.gnome.shell app-picker-layout to refresh list (or login/logout)

Piotrek
  • 401
21

While snap focuses on Ubuntu only, AppImage is cross-distribution and also runs on Fedora, Debian, OpenSUSE, CentOS, etc.

AppImage needs no runtime or infrastructure support from the Linux distribution and therefore runs next to everywhere. It enables application authors to ship their software directly to Linux users like they do for Windows and OS X; without Canonical or anyone else "in-between" the software author and the end-user.

If an application is provided in AppImage format, then a user can go to the original author's website to download it, e.g., MuseScore from https://musescore.org/en/download. Make the AppImage executable (either using your file manager or chmod a+x ./yourAppImage), then you can run the application simply by double-clicking.

probono
  • 1,269
8

Now AppImageLauncher makes it really easy and convenient to launch/create a desktop file. Try it out

1

Once installed you'll want to hook it up to your desktop menu.

To quickly integrate into your desktop menu, one dirty trick is to load the older Debian repository (assuming an older version is in the repo), for example,

$ sudo apt-get install digikam

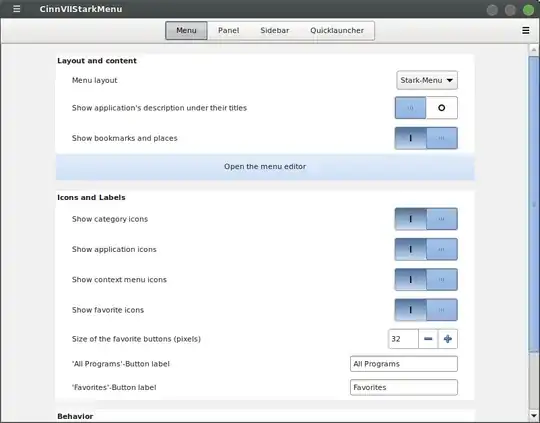
Then once that's done, right-click on your menu starter, and select configure....

(This is what it looks like in Cinnamon. Your desktop may look different.)

enter image description here

Then open the menu editor.

enter image description here

Find the app and edit its properties and update the 'Command:' Change it to the pathname of your new AppImage file.

enter image description here

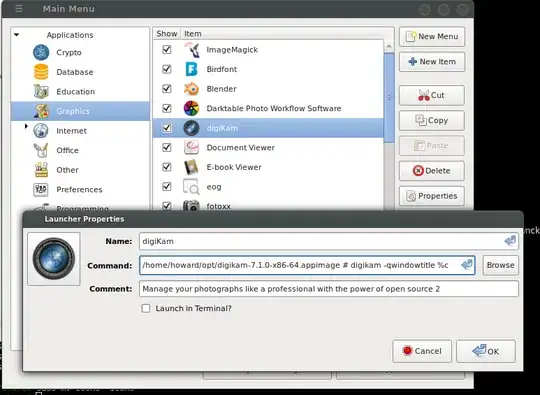
(!! This leaves the older version on your disk, wasting space, and there are ways to make this cleaner, but this is really quick to get your new AppImage working from your menu.)


...Now to clean this up:

You want to remove the old package, but still keep its desktop and icon files.

  1. Find any digikam desktop files. One way to find them is with locate:

    $ locate digikam.desktop
    /usr/share/applications/org.kde.digikam.desktop
    ~/.local/share/applications/org.kde.digikam.desktop

The first is your system defaults (for all users), and the 2nd is just for you. The second one (the local one) normally overrules the first if they both exist.

And if you diff them you'll notice that you have only edited the .local one with the menu editor, not the one in /usr...

Furthermore, you don't need both. So if you want you can delete the .local one and rely on just the /usr one. It keeps things simpler.

The simplist way to fix this is with a move which overwrites as follows:

$ cd /usr/share/applications  
$ sudo mv ~/.local/share/applications/org.kde.digikam.desktop .  
  1. Next you have to rename this file to avoid the package purger from removing it when you run that in a moment. Note, once you save your edits or changes to a desktop file, the menu will automatically find your changes and update itself.

    $ sudo mv org.kde.digikam.desktop org.kde.digikam.appimage.desktop

  2. Now look in it to find the icon name it's currently using (pointing to):

    $ sudo grep Icon org.kde.digikam.appimage.desktop # Note caps 'I'
    Icon=digikam

  3. Now find the related icon files

    $ locate digikam | grep icons
    /usr/share/icons/hicolor/128x128/apps/digikam.png
    /usr/share/icons/hicolor/16x16/apps/digikam.png
    /usr/share/icons/hicolor/22x22/apps/digikam.png
    /usr/share/icons/hicolor/256x256/apps/digikam.png
    /usr/share/icons/hicolor/32x32/apps/digikam.png
    /usr/share/icons/hicolor/48x48/apps/digikam.png
    /usr/share/icons/hicolor/64x64/apps/digikam.png
    /usr/share/icons/hicolor/scalable/apps/digikam.svgz
    /usr/share/icons/oxygen/base/128x128/apps/digikam.png
    /usr/share/icons/oxygen/base/16x16/apps/digikam.png
    /usr/share/icons/oxygen/base/22x22/apps/digikam.png
    /usr/share/icons/oxygen/base/256x256/apps/digikam.png
    /usr/share/icons/oxygen/base/32x32/apps/digikam.png
    /usr/share/icons/oxygen/base/48x48/apps/digikam.png
    /usr/share/icons/oxygen/base/64x64/apps/digikam.png
    /var/lib/app-info/icons/debian-buster-main/48x48/digikam_digikam.png
    /var/lib/app-info/icons/debian-buster-main/64x64/digikam_digikam.png

The ones you care about are in the /usr/share/icons/ tree.

Renaming these is hard. It's simpler to just rename the entire tree (to save it away), uninstall, and put the tree back when you're done.

$ cd /usr/share  
$ sudo mv icons icons~  # save icons tree  
$ sudo apt-get purge digikam && sudo mv icons~ icons  #uninstall & restore tree