54

I installed Ubuntu 12.10 Server AMD 64 with VirtualBox 4.2 latest version. I've installed it successfully. I've to install now Guest Additions but I am getting a error message like the below exactly same

Unable to mount the CD/DVD image
/usr/share/virtualbox/VBoxGuestAdditions.iso on the machine Sandbox. Would you like to force mounting of this medium?

Could not mount the media/drive
'/usr/share/virtualbox/VBoxGuestAdditions.iso'
(VERR_PDM_MEDIA_LOCKED).

Details

Result Code: NS_ERROR_FAILURE (0x80004005)

Result Code: NS_ERROR_FAILURE (0x80004005)
Component: Console
Interface: IConsole {db7ab4ca-2a3f-4183-9243-c1208da92392}
Callee: IMachine {22781af3-1c96-4126-9edf-67a020e0e858}

I research a lot with Google and other places and I removed the installation disc image from ~/.VirtualBox/VirtualBox.xml file to edit a line but didn't get any luck

I installeddkms too but still didn't get any luck

Can anyone please help me about that? I am stuck now :(
Braiam
  • 69,112

13 Answers13

81

I struggled with this for about 2 hours on a Windows 7 host running Ubuntu 13.10 Server guest. In the end, I just copied over the VBoxGuestAdditions.iso to the guest (using WinSCP), mounted it, and then ran VBoxLinuxAdditions.run from the guest.

Here are the steps I took:

  1. Locate VBoxGuestAdditions.iso on your host (in my case, C:\Program Files\Oracle\VirtualBox\VBoxGuestAdditions.iso).

  2. Copy VBoxGuestAdditions.iso to your guest (in my case, I used WinSCP).

  3. In the terminal for the guest mount the ISO using the following:

    sudo mkdir /media/GuestAdditionsISO

    sudo mount -o loop path/to/VBoxGuestAdditions.iso /media/GuestAdditionsISO

  4. At this point you'll probably get a message that the ISO has been mounted as READ-ONLY. That's perfectly fine. If you change into the directory /media/GuestAdditionsISO you should see VBoxLinuxAdditions.run and it should be executable:

    cd /media/GuestAdditionsISO

    ls -l

  5. Now just run VBoxLinuxAdditions.run:

    sudo ./VBoxLinuxAdditions.run

You also have the option of extracting VBoxGuestAdditions.iso in Windows (or whatever host OS you're using) and then SCP'ing (or WinSCP'ing) it over to the Ubuntu guest, and then just running: sudo ./VBoxLinuxAdditions.run

Better doing what I have listed above instead of wasting time and putting faith in methods that may or may not work on your particular configuration.

Hope this helps.

Andy Turfer
  • 1,658
49

The trick is to

  1. shut down the guest OS
  2. in the VM manager, right-click the relevant VM and select 'settings'
  3. in the Storage tab, select the cd drive w/ the guest additions in it
  4. in the attributes section click the little CD symbol and select 'remove disk...'

Then, after starting the VM the guest additions should be mountable again. hth

35

In my case (VM ubuntu 14.04 on an WIN7 system), I open /var/log/kern.log, and search for CD-ROM, I find that in ubuntu 14.04, VBOX CD-ROM is recognized as SCSI CD-ROM, and attached to /dev/sr0

kernel:[      1.456xxx] scsi 1:0:0:0: CD-ROM VBOX CD-ROM 1.0 PQ: 0 ANSI: 5

kernel:[      1.460xxx] sr 1:0:0:0: Attached scsi CD-ROM sr0

Now, after click the menu 'Device' -> 'Install Guest Additions', then type the following command:

sudo mount /dev/sr0 /media/cdrom

and the ISO file is mounted on /media/cdrom

so, after this run:

cd /media/cdrom
sudo ./VBoxLinuxAdditions.run
ntg
  • 571
14

Just mount the optical drive, which should be in /dev/cdrom

First, in your VirtualBox main screen, go to Settings -> Storage and make sure VBoxGuestAddidtions.iso shows under Controller: IDE. If it doesn't, add it there. It is in C:\Program Files\Oracle\VirtualBox

Then start the guest machine, open a terminal, and mount the drive like so:

sudo mount /dev/cdrom /media/cdrom0
cd /media/cdrom0
sudo ./VBoxLinuxAdditions.run
cd
sudo umount /media/cdrom0
7

I stuck with the same problem. Removing and adding iso in virtualbox anew didn't help me too either.

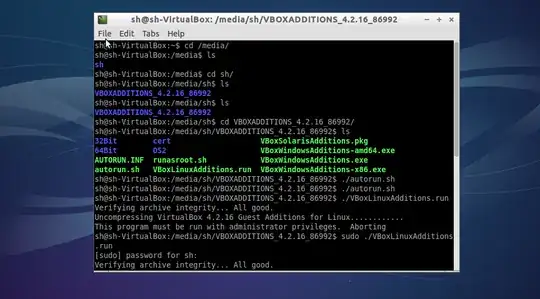
The problem is that auto-installation doesn't work. So we can run it manually as:

enter image description here

As result additions were successfully installed (at least terminal said so), but I didn't notice any improvements after installing.
Maybe it'll work for you.
Good luck!

Tebe
  • 271
4

Eject the image while VM is running then retry. Works like a charm.

Apli
  • 41
2

This is what worked for me...

  1. Shutdown guest OS
  2. Go to Settings -> Storage
  3. Dismount all drives, including CD drive and Hard drive
    • My hard drive was mounted under SATA
    • CD drive was mounted under IDE
  4. Re-mount hard drive under IDE (not SATA)
    • Browse to C:\Users[your username]\VirtualBox VMs[VM name]
  5. Re-mount an empty CD drive under IDE
  6. Press OK, start VM
  7. Try mounting/installing guest additions again
1

Right click on the window bottom of the disk icon, and click Remove the virtual disk -> click Insert Guest Additions, and then

sudo mount -r /dev/cdrom /mnt
cd /mnt
sudo ./VBoxLinuxAdditions.run
Fangxing
  • 281
0

I had the same problem as the OP. After many trials I found that the VBOXGuestadditions iso was also mounted in other VMs. I remember after creating the VM, virtualbox automatically attaches the iso to the VM. I unmounted the iso from all other VMs and then from the current one also as suggested by @MakerMax. Restarting the VM resulted in the CD being seen fine. (FYI my guest was Fedora 20, and host Mint 17. Of course had further problems with the Shared Folders when running the install script)

0

Just an update - 14.04 LTS guest on a windows 8.1 host. Display by default was not correctly set on the new machine... I could not change the resolution. I went to install guest additions ( as recommended fix from oracle), but received the same unable to mount error.

I opened the explorer, and noticed that the file was mounted, just autorun did not work. I just went to the drive and ran the program. was prompted for credentials, but everything worked.

Installed for me (:

0

The following works for me:

  1. Shutdown Ubuntu
  2. Go to oracle VM virtual box manage -> settings -> storage. Delete the mounted .iso file under controller: IDE, and then add an empty disk.
  3. Start Ubuntu and go to Device -> Insert Guest Additions CD image -> browse to the .iso file you'd like to mount and then install.
  4. After installation, reboot Ubuntu and the screen should be adjusted.
0

THIS WILL WORK - I hope! Like everyone I scoured the net and tried almost everything

For me - removing CD device under storage/controller, CLONING the VM, adding a NEW/empty IDE CD/DVD drive, starting VM, and restarting worked

It was important to understand - are guest additions working for any 1 VM and not for a particular VM. If yes, then the above will work.

If not, Make sure guest additions are installed under File - Preferences - Extensions

Good luck

Aveesh
  • 170
-1

I got it installed - Go to VM Manager -- select the VM -- Select Storage -- Controll IDE Select the icon with + sign "Add CD/DVD device" Add the VBoxGuestAdditions.iso from Programs\Oracle\VirtualBox Boot into Ubuntu on VM Open files and Select the CD under Devices I had an option to run the CD on top right. But it is same as running the autorun.sh file. Let the installations run. Shutdown ubuntu VM Go to VM Manager and remove the disk. Boot into vm and it should be in full screen mode. Good luck!!!