I can't use my digital camera ( Canon ixus 160) as webcam is there an application for that ? or just in the settings?
4 Answers
Here's another solution.
List of gphoto2 supported cameras: http://gphoto.org/proj/libgphoto2/support.php
You need install gphoto, v4l2loopback-utils and ffmpeg.
Then
sudo modprobe v4l2loopback
and
gphoto2 --stdout --capture-movie | ffmpeg -i - -vcodec rawvideo -pix_fmt yuv420p -threads 0 -f v4l2 /dev/video1
Now you have webcamera from your digital camera.
This can be done but requires a number of steps. First, you must install gphoto and v4l2loopback-utils.
sudo apt-get install gphoto2 v4l2loopback-utils
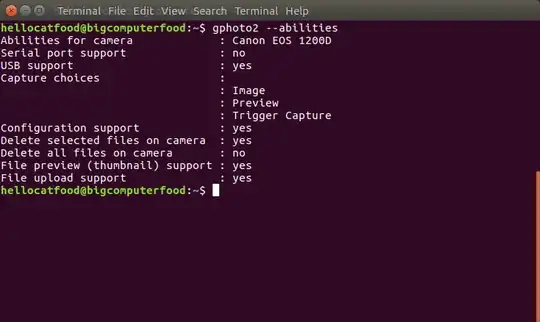
Plug in your camera via USB (when the camera mounts automatically, unmount it). Then run gphoto2 --abilities to see if your camera is capable of doing this. Here's the output when connecting a Canon EOS 1200D
Then run sudo modprobe v4l2loopback to activate the kernel module needed to create a video device from your camera.
I've seen older tutorials on this task that use gst-launch-0.10 to achieve the next step of this task (e.g. this one). I am using Ubuntu 17.04 which uses gst-launch-1.0. Below is the updated command to create a video device from your digital camera:
gphoto2 --stdout --capture-movie | gst-launch-1.0 fdsrc ! decodebin3 name=dec ! queue ! videoconvert ! v4l2sink device=/dev/video1
This will create a video device in /dev/video1, which you can now use in programs like VLC.
If you see any errors about the device being in use you need to kill the gvfs-gphoto2-volume-monitor process by running killall gvfs-gphoto2-volume-monitor.
- 43
- 3,379
I was able to get video & image recording with a Canon DSLR 600D
sudo apt get install guvcview ffmpeg gphoto2 v4l2loopback-dkms v4l2loopback-utils ffmpeg
Plug in camera, any mode seemed to work, test with the basics:
Prep
sudo modprobe v4l2loopback
killall gvfs-gphoto2-volume-monitor
Test
lsusb
gphoto2 --auto-detect
LANG=C gphoto2 --summary
LANG=C gphoto2 --list-all-config
Try
gphoto2 --capture-image
gphoto2 --stdout --capture-movie | ffmpeg -i - -vcodec rawvideo -pix_fmt yuv420p -threads 0 -f v4l2 /dev/video1
Visualize (in another terminal)
guvcview
or
guvcview-brlin.guvcview
You can try different /dev/video1 commands
There's also EOS Movie Recorder
Unzip this: https://sourceforge.net/projects/eos-movrec/files/eos-movrec/0.3.3_beta/eos-movrec-0.3.3_beta.zip/download
cd eos-movrec-0.3.2_beta
sudo apt install libgphoto2-dev
mkdir build
cd build
cmake -DCMAKE_BUILD_TYPE=Release ..
make
- 3,984
I found this very useful for me and it did work with my Canon 5D Mark 3
How to use you DSLR camera as a webcam
OBS is a great tool for live streaming and recording a presentation or training. It can also be used to create a virtual webcam to act as input to tools such as Jitsi, Skype and Zoom. Lots of us have good DSLR type cameras, and these can act as a webcam for input to OBS (and any other tool that can use a webcam source). This allows you to use a high quality camera for the video input, and gives you the full control that you get with a digital camera. In this video, I show you how to use pretty much any camera as a webcam for OBS without any special software or hardware adapters. All you need is a camera and a USB cable. This is achieved using the combination of gphoto2, ffmpeg, and v42loopback.
Make sure your camera make and model is supported. You will find a list of cameras supported by this method at http://gphoto.org/proj/libgphoto2/support.php Fortunately, my Canon cameras are all supported. You will need a supported camera and a USB cable to connect the camera to your computer.
Set your camera so that it does not automatically power off. On my Canon 6D Mark ii this is "Auto power off: Disable" on the wrench screen 2.
If you have back-button focus enabled, you need to set focus back the the half press of the shutter key. If you use back button-focus you already know how to do this. If you leave back-button focus on, you will get errors relating to shutter button half press.
If you don't have gphoto2 installed, you need to install it first.
sudo apt install -y gphoto2If you don't have the video loopback driver installed, you need to install it first.
sudo apt install -y v4l2loopback-utilsIf you don't have ffmpeg installed, you need to install it first.
sudo apt install -y ffmpegPlug in your camera via USB (if the camera mounts automatically, unmount it) by selecting it in your file manager (Nautilus if you are using Gnome) and right click, and select "Unmount" from the popup menu.
Enable and determine the virtual video device First unload v4l2loopback so you can determine which device it is creating.
sudo rmmod v4l2loopbackIgnore any errors.
List all video devices so you know which one is next in line
ls /dev/video*You will see something like/dev/video0 /dev/video1which indicates video devices already on my computer. If you see nothing here, then you have no video devices.Activate v4l2loopback Run
sudo modprobe v4l2loopback exclusive_caps=1 max_buffers=2
to activate the kernel module ('loopback driver') that enables the creation of a video device from your DSLR camera.
List all video devices so you know which one is the one to use
ls /dev/video*You will see something like/dev/video0 /dev/video1 /dev/video2The last one will be the one used by the loopback driver, in this case video2.TESTING Now you can do some testing using gphoto 2. List auto-detected cameras and the ports to which they have been connected.
gphoto2 --auto-detectYou will see something like:
Model                          Port
----------------------------------------------------------
Canon EOS 6d Mark II           usb:001,013
Capture the video and pipe ot out to the virtual webcam device
gphoto2 --stdout --capture-movie | ffmpeg -i - -vcodec rawvideo -pix_fmt yuv420p -threads 0 -f v4l2 /dev/video2That is it. Now you can go and add it to your source in OBS.
All simple, and all free thanks to Free and Open Source Software.
- 61
- 1
- 1
