40

I downloaded Android Studio from the official website, started the installer with the terminal (studio.sh) it installed completely, wrote some lines of code, closed Android Studio, now I don't know how I can open it again. the studio.sh just starts the setup wizard again and I also can't find the directory where it could be installed in.

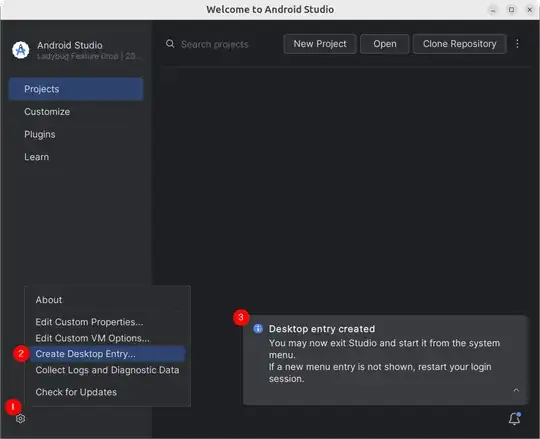
So where are the installed programs at and how can I run them?

nintschger
  • 515
  • 1
  • 4
  • 5

7 Answers7

38

Short answer

You need to run it via the studio.sh, every time, as that is the startup script.

Long answer

It will not truly 'install'. It is kind of an annoyance for first time users, but it is truly a stand-alone package, it will drop the SDK in your /home and you need the android-studio and jdk1.8.0_45 folders at a fixed location.

First, you need to set the JAVA_HOME path in your /etc/environment or ~/.bashrc configuration to the jdk1.8.0_45 folder before it will run.

After setting your JAVA_HOME, run studio.sh again and it will boot the IDE. Then at the menu, hit the Configure button then hit Create Desktop Entry. You should now have a start menu icon, and desktop icon which you can easily use.

Next time you boot and create a project it should download the SDK required for building.

woahguy
  • 592
31

Just wanted to let you know that you don't have to run the install every time. Here is how I installed Android Studio, and how I run it from my applications menu.

At the Android Studio start screen, click on the Options Menu (⚙️ icon in the lower left corner), then choose Create Desktop Entry.

Android Studio welcome screen

Now you should have a shortcut in your applications menu.

devturtle
  • 319
18

Use these commands in the Terminal

cd /opt/android-studio/bin
./studio.sh
edwinksl
  • 24,109
12

You can create a file "studio.desktop" in /usr/share/applications with the following contents:

[Desktop Entry]
Name=Android Studio
Comment=Android Studio
Exec=/opt/android-studio/bin/studio.sh
Icon=/opt/android-studio/bin/studio.png
Terminal=false
Type=Application
Categories=Development

Assuming you put android-studio in /opt, this allows you to launch from the application launcher. Otherwise adjust to your android-studio folder location.

drice304
  • 121
  • 1
  • 2
5

To add shortcut command for Terminal to open Android-Studio::

To run from Terminal create a file named studio inside /bin folder and write following contents inside the file named studio.

cd /opt/android-studio/bin 
./studio.sh

Then type in terminal cd /bin and chmod +x studio.

Now, if you want to open it just type studio in Terminal.

To add shortcut Application Icon to open Android-Studio::

Create file inside /usr/share/applications named studio.desktop with the following contents:

[Desktop Entry]
Name=Android Studio
Comment=Android Studio
Exec=/opt/android-studio/bin/studio.sh
Icon=/opt/android-studio/bin/studio.png
Terminal=false
Type=Application
Categories=Development

After that you can Android Studio Application launcher is added automatically.

1

There are a few steps to run Android Studio by clicking the Launcher icon.

  1. Execute your studio.sh file located in bin folder of Android Studio, like my Android Studio is located in Downloads (~/Downloads/android-studio/bin). You are in bin folder, now run this command: ./studio.sh

In Ubuntu System-Product-Name:~/Downloads/android-studio/bin$ ./studio.sh

  1. Android Studio will be launched using the above command, next close the project using File -> Close Project from Android Studio, then you'll find this screen:

    enter image description here

    At the Android Studio start screen below, click on Configure then create a desktop entry.

  2. Finally you have to lock Android Studio to Launcher icon when you press right-click on Android Studio (on the left of the screen) click Lock to Launcher or Add to Favorites.

0

After you start Android Studio for first time from the terminal with the command /path/to/android-studio/studio.sh there will be shown an icon on your launcher. Just right click it and choose "lock to launcher" and that's it - now you can start it from there