135

Is it possible to mount a VirtualBox drive image (.vdi) so the contents can be viewed in Nautilus etc.?

I have a windows 2000 .vdi which won't boot ("inaccessible boot device") after upgrading from VirtualBox 2.x to 3.1.6. I believe the IDE drive details have changed and that all I need to do is access the internal drive image and edit the Windows boot.ini to point to the new location.

Bruno Pereira
  • 74,715
matt wilkie
  • 2,250

12 Answers12

159

Use qemu-nbd, the process is explained on serverfault and in this blog.

Basically, you'll have to install qemu if needed:

sudo apt-get install qemu qemu-utils

Then you'll need to load the network block device module:

sudo rmmod nbd
sudo modprobe nbd max_part=16

Attach the .vdi image to one of the nbd you just created:

sudo qemu-nbd -c /dev/nbd0 drive.vdi

Now you will get a /dev/nbd0 block device, along with several /dev/nbd0p* partition device nodes.

sudo mount /dev/nbd0p1 /mnt

Once you are done, unmount everything and disconnect the device:

sudo qemu-nbd -d /dev/nbd0
Maxime R.
  • 3,920
73

You can convert into standard image and then mount it.

VBoxManage clonehd --format RAW ubuntu.vdi ubuntu.img

Then

mount -t ext3 -o loop,rw ./ubuntu.img /mnt

You will need to KNOW the type of file system, ext3 in this case. After it is mounted, go in and edit away with the editor of your choice. Don't confuse files inside the /mnt location with the running host, or it will be bad.

To check details about your VDI file, run: VBoxManage showhdinfo ubuntu.vdi.

Source: [SOLVED] Open .vdi with archive manager? - ubuntuforums.org

kenorb
  • 10,944
40

It looks like vdfuse is the tool you are looking for. It is in the Ubuntu repositories. If you want to compile yourself (2010 source) you can do that too.

However for most of us it boils down to a simple:

sudo apt-get install virtualbox-fuse

It seems it now supports dynamic vdi as well.

And to mount the .vdi file in /mnt dir use the command:

sudo vdfuse -a -f /path-to-vdi-file /mnt

The entire disk will be mounted with partitions Partition1 , Partition2 naming format. Then those files can be loop mounted. For example,

sudo mount -o loop /mnt/Parition1 /mountpoint
stwissel
  • 6,451
17

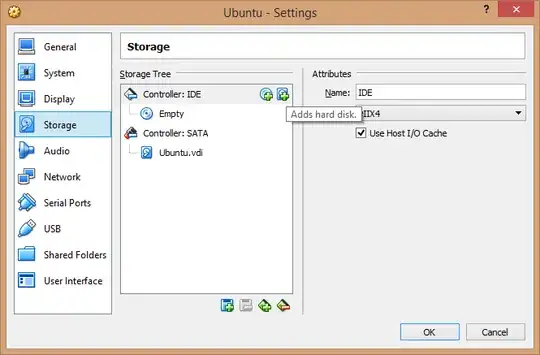
Set the disk as secondary master for another virtual OS, then boot into this (virtual) OS and you can mount it.

Step 1: Assuming you have a virtual os(say Ubuntu 16.04) already installed in Virtual box, add a new storage from settings of that virtual os. enter image description here

Step 2: Browse the Vdi file you want to access and select it.

Step 3: Logon to the virtual OS.

Step 4: The virtual disk will probably be available inside the OS. If not, follow step 5

Step 5: Inside the virtual OS, use Gparted and check the disks. and ensure the disk is of type which is accessible by the virtual OS. If it is not, you may have to edit the disk, but then you will lose the existing contents.

Sharun
  • 117
josef
  • 283
13

Make VirtualBox disk images available to the host by using vboximg-mount utility:

Open VDI

sudo mkdir -p /mnt/vdi/expanded
sudo vboximg-mount -i <path-to-vdi> -o allow_other /mnt/vdi/expanded
Output Example
ls /mnt/vdi/expanded
<filename.vdi>  vhdd  vol0  vol1

Mount Disk

mkdir /mnt/vdi/vol1
sudo mount /mnt/vdi/expanded/vol1 /mnt/vdi/vol1

Unmount

cd /mnt                       # Optional (avoid mount: ... target is busy)
sudo umount /mnt/vdi/vol1     # Order importent
sudo umount /mnt/vdi/expanded
rm -rf /mnt/vdi               # Optional (clean-up resources)
Benny
  • 5,100
10

Moderator Notice: The vdfuse module and packages have been obsolete since 2016 as they were removed from the Ubuntu repositories. While this answer is now obsolete, due to the age of the post and the fact it has upvotes, the answer here has been retained for historical purposes.

I haven't tested myself but there is a fuse module to mount them (vdfuse), check the following page:

Please note that using it for write access is risky.


Usage:

$ ./vdfuse-v<version> -h
USAGE: ./vdfuse [options] -f image-file mountpoint
   -h   help
   -r   readonly
   -t   specify type (VDI, VMDK, VHD, or raw; default: auto)
   -f   VDimage file
   -a   allow all users to read disk
   -w   allow all users to read and write to disk
   -g   run in foreground
   -v   verbose
   -d   debug

To mount an image directly using its filename:

$ ./vdfuse-v<version> -f image.vdi /mnt/vdi
$ mount -o loop /mnt/vdi/Partition1 /mnt/WindowsXP

To mount an machine disk (including snapshots):

$ ./vdautomount-<version> -p /path/to/vdfuse WinXP /mnt/vdi
$ mount -o loop /mnt/vdi/Partition1 /mnt/WindowsXP
Thomas Ward
  • 78,878
João Pinto
  • 17,323
9

You can use vboximg-mount program which is a part of the VirtualBox's command line tools.

7

As Vojtech Trefny mentioned above,

1) first convert your VDI -> IMG

VBoxManage clonehd --format RAW ubuntu.vdi ubuntu.img

2) Then mount the IMG

mount -t ext3 -o loop,rw ./ubuntu.img /mnt

3) However, as I got this error message:

mount: wrong fs type, bad option, bad superblock on /dev/loop0,
       missing codepage or helper program, or other error
       In some cases useful info is found in syslog - try
       dmesg | tail  or so

and dmesg said:

[3105578.013671] EXT4-fs (loop0): VFS: Can't find ext3 filesystem

you need to check out the partition structure of the .img:

fdisk -l ubuntu.img

Disk ubuntu.img: 21.0 GB, 20971520000 bytes
255 heads, 63 sectors/track, 2549 cylinders, total 40960000 sectors
Units = sectors of 1 * 512 = 512 bytes
Sector size (logical/physical): 512 bytes / 512 bytes
I/O size (minimum/optimal): 512 bytes / 512 bytes
Disk identifier: 0xf45bc910

   Device Boot      Start         End      Blocks   Id  System
ubuntu.img1   *        2048    12582911     6290432   83  Linux
ubuntu.img2        12584958    16775167     2095105    5  Extended
ubuntu.img3        16775168    40959999    12092416   83  Linux
ubuntu.img5        12584960    16775167     2095104   82  Linux swap / Solaris

4) As you can see, the main partition is starting at bytes 16775168. However, note that the sector size is 512 bytes, so you need to multiply the results 16775168 x 512 = 8588886016 so you need to offset the mount like this:

mount -t ext3 -o loop,rw,offset=8588886016 ./ubuntu.img /mnt

5) Actually this didn't work for me in case where the filesystem was dirty after resize. In this case I further did this:

dd if=ubuntu.img of=ubuntu.disk bs=512 skip=16775168 count=12092416
e2fsck ubuntu.disk
mount ubuntu.disk /mnt
3

P7Zip will open VDI files

  • Install P7Zip - Desktop from Ubuntu Software from this link or by running:

    sudo snap install p7zip-desktop
    
  • Launch P7Zip Desktop and navigate to the folder containing the .vdi file (probably under VirtualBox VMs in your home directory)

  • Double click the VDI file in the P7Zip window.

  • View or extract files as you like.

Flimm
  • 44,031
C.S.Cameron
  • 20,530
  • 12
  • 78
  • 125
3

Not what you requested, but if it's just a matter of getting files off of the vdi, and you want a very quick solution:

  1. Run an ssh server on your host (apt-get install openssh-server && service ssh restart)
  2. Use VirtualBox to build a virtual machine from the existing vdi file, then boot up that virtual machine. (I just kept the default Network Adapter (NAT) when building the VM.)
  3. Within the virtual machine, sftp to your host. (sftp hostuser@hostip)
  4. In the sftp session, put as many files to the host as you need.
Jellicle
  • 908
2

Since many answers seem to be either outdated or overcomplicated - my 5 cents (as I have just used probably the simplest solution). You need vboximg-mount and ntfs-3g.

  1. Mount VDI
vboximg-mount -l     (to list the images)
vboximg-mount --rw --root -i <UUID or full path to the VDI> mountdir/

you should see there something like (where volN are partitions):

ls -l mountdir/

lr--r--r-- 1 root root 0 Apr 9 13:58 data.vdi -> '/home/username/VirtualBox VMs/winxp/data.vdi' -rw-r--r-- 1 nobody nogroup 10737418240 Apr 9 14:12 vhdd -rw-rw-rw- 1 root root 10733958144 Jan 1 1970 vol0

  1. Mount filesystem from the selected partition
ntfs-3g mountdir/vol0 mountdir2 -o ro

(or -o rw for read-write).

After that you have contents of the filesystem in mountdir2/, available for reading or writing.

Since this is fuse (both), you have to just umount them (in the reverse order) after use.

I do not think it can be any simpler (no sudo, no qemu and nbd tricks, no extra modules or whatever).

t-w
  • 31
  • 2
1

The qemu approach from this answer needed to be modified a bit to work in Ubuntu 20.04.1. First I had to load the nbd module, by:

lsmod | grep nbd
modprobe nbd

This did not work:

sudo mount /dev/nbd0p1 /mnt

I needed to do this instead:

sudo mount /dev/nbd0p2 /mnt
Eliah Kagan
  • 119,640