I'm sure this must be fairly simple but can't find it here.
How does one go from having a blank SD card to having an SD card that boots a Raspi?
I'm sure this must be fairly simple but can't find it here.
How does one go from having a blank SD card to having an SD card that boots a Raspi?
You can do it from the command line as well. No need to install anything.
Find the name of the device of the plugged in SD-card. For instance I typed ls -la /dev/sd* before and after plugging in the sd-card. I saw the date of /dev/sdc change and thus decided that that was the one.
Find the place of the unzipped image, which was /home/username/Downloads/2012-10-28-wheezy-raspbian.img for me.
Type the following (mutatis mutandis):
sudo dd if=/home/username/Downloads/2012-10-28-wheezy-raspbian.img of=/dev/sdc
or with improvements suggested by other users:
sudo dd if=/home/username/Downloads/2012-10-28-wheezy-raspbian.img of=/dev/sdc status=progress bs=4M && sync
and wait for the command to return. It may be quite a while, especially over usb2.
Resizing can be done from the Pi itself in the raspi-config program that starts automatically the first time you boot.
Be careful. Make absolutely sure the device name is that of the SD-card. If you replace it with the device name of your hard drive, your hard drive will be overwritten.
On Ubuntu versions 14.04, 16.04 and 18.04, right click on the installer image and choose Open with disk images writer. Select your SD card unit and press Start.
Easy Install & Resize the SD Card on the Raspberry Pi on Ubuntu.
First, open a terminal and install the ImageWriter and GParted utilities with apt-get:
sudo apt-get install usb-imagewriter gparted
Assuming you are starting with a fresh install, download the newest release from the Raspberry Pi download site.
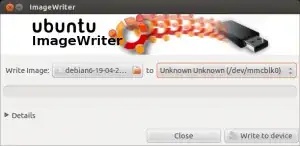
Extract the downloaded archive, and then open ImageWriter by typping in a console:
sudo imagewriter
Select the desired .img file and target device, in this case, debian6-19-04-2012.img, and /dev/mmcblk0
Once the image write has completed, the next task is to repartition the SD card. Note: this process can be done at any later as well, it is not limited to only during initial setup!
For 13.04 you can find packages here.
If you're interested on resizing your SD CARD, check the source of this answer
On 13.10 I couldn't get usb-imagewriter to install E: Unable to locate package usb-imagewriter.
I found that plain old gnome-disks command Disks from desktop worked. You can select the usb drive and have the option to Restore disk image.
Those are all really great answers...
I like to add status=progress to the dd command:
sudo dd if=rasidiskimg.img of=/dev/mmcbl.. status=progress bs=4M

#it reports like so:
2037383168 bytes (2.0 GB, 1.9 GiB) copied, 198.548 s, 10.3 MB/s
Some answers mention usb-imagewriter but that doesn't exist anymore (at least on Ubuntu 16.04).
I used usb-creator-gtk, and that did the trick for me.
In addition to Wilbert's excellent answer, in order to do this often, the following has the added benefit of compressing and uncompressing the image on the fly, and shows progress using pv (you may need to apt-get install pv):
I do a backup with:
sudo dd if=/dev/mmcblk0p7 | pv -c -N filesystem | \
gzip -c | pv -c -N compressed > backup/mmcblk0p7.img.gz
And a restore with:
cat mmcblk0p7.img.gz | pv -c -N compressed | \
gunzip | pv -c -N filesystem | sudo dd of=/dev/mmcblk0p7
Make sure to replace mmcblk0p7 with the partition you want to backup/restore.
Install the usb-creator-gtk package using the following command:
$ sudo apt install usb-creator-gtk
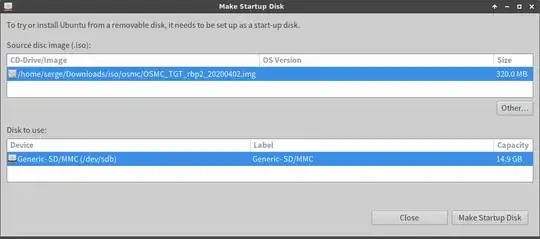
After installation, the new tool can be found under the name Startup Disk Creator:
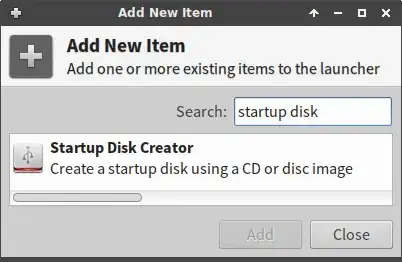
Startup Disk Creator is pretty straightforward to use:
In 2020, the Raspberry Pi Imager was released.
It is available for Linux, Windows and Mac.
The current version can be found in their official GitHub repository.
This application has a graphical interface, localization in many languages.
The main window of the application.

Install an image to Rasperry Pi by cloning (sometimes called flashing, burning, restoring). If the image is compressed, extract it before cloning, or use a tool that can extract and clone.
The basic tool for cloning is dd. You can also use cp or cat for the same purpose. But these three tools are risky, when used to clone, to write to a mass storage device, because they do what you tell them to do without questions. So if you tell them to wipe the family pictures ... and it is a minor typing error away. dd is sometimes nicknamed 'data destroyer'.
There are several tools, that help you clone from an image file or a compressed image file, and that provide more security. There is a 'final checkpoint' and the target device is 'seen' in such a way, that it is easy to identify and make sure, that it is the correct target device (not the drive where you store the family pictures).
Disks alias gnome-disks has a built-in cloning tool, that you use when you 'restore' from an iso file or image file to a mass storage device, for example an SD card for Raspberry Pi. Disks is built into Ubuntu, so you need not install it. Extract from a compressed image file separately before using Disks (because there is a bug in some versions, bug #1571255).
mkusb uses dd to clone. It 'wraps a safety belt' around dd. mkusb can also install directly from compressed image files, if compressed with gzip or xz ('file.img.gz' or 'file.img.xz'). Install and use mkusb according to the following links,
help.ubuntu.com/community/mkusb
Expansion and imaging from a compressed image file
sudo add-apt-repository universe  # only for standard Ubuntu

sudo add-apt-repository ppa:mkusb/ppa  # and press Enter
sudo apt-get update
sudo apt-get install mkusb mkusb-nox usb-pack-efi
When we have only an ubuntu 21.04 live cd and no internet, the stock application is:
gnome-disks
Click the sd card and the three dots and:
Restore Disk Image...
It is possible to go there also with right click on the .img file and:
Open with Other Application
Disk Image Writer
Wait for the process to finish.
Tested on Ubuntu 16.04