Foreword
I've done a lot of research and didn't found a all-in-one guide for my case. So I collected all the information I could find for the different steps & tested it a lot of trial & error with a VM before I got the guide written below. This i by no means a guarantee that it will work for you. Use it at your own risk.
Preparation
- Make a complete backup (e.g. with clonezilla) befor you begin! Data loss is very likely if you do something wrong.
- Install all available updates in Ubuntu
- Make you have the following unallocated space:
- +-5 MiB at the end of the disk (else you get a warning that the last partition overlap see link)
- +- 500 MiB for the boot partition. If you set this at the end of the disk, you don't need to take into account the first ponit
- Have the following usb sticks ready
- Ubuntu with boot-repair installed on (see link) (the boot-repair live disk won't boot on my pc with secure boot enabled hence the need for Ubuntu usb)
- Windows installation usb
- OPTIONAL: Uninstall the following Windows 10 updates:
(upon first update after enabling secure boot I got these updates & afterwards Windows couldn't boot until these updates were deleted)
- Remark: upon enabling secure boot, Ubuntu didn't load the wifi drivers. If possible have a utp connection or a wifi usb dongle available
Below my disk layout after repartitioning:
- sda1: windows
- sda2: extented partition
- sda5: root for ubuntu
- sda6: swap
- sda7: home partition
](../../images/fbf3f3c355db5d3a3050c03cd2831e34.webp)
Convert to GPT + create boot partition with Gdisk
This is based on this post with some alterations (e.g. a separate bios partition is not needed when you switch to UEFI immediately after these steps). Other info can be found here
Boot to Ubuntu
Use gdisk to convert the partition table to GPT.
gdisk /dev/sda
Press n to create a new partition
Choose the partition number (e.g. 3) & first + last sector. The filesystem doesn't matter as we change this later on
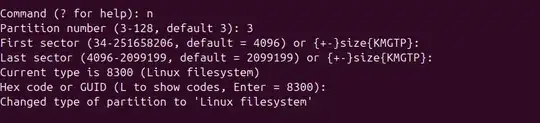
Give the ESP a distinctive label without whitespace like EFI-system, because we'll reference the partition label in fstab.
c to set the label & select the partition number (e.g 3). Enter a name (e.g. EFI-system)
Press w to write the partition table and confirm with y

Reload the partition table.
sudo partprobe /dev/sda
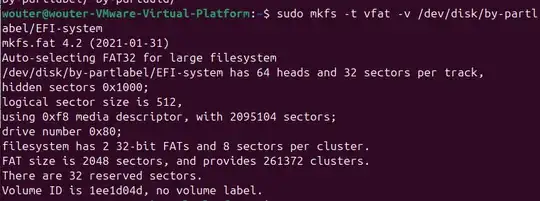
Build the filesystem for the ESP.
sudo mkfs -t vfat -v /dev/disk/by-partlabel/EFI-system
Create the ESP mount point.
mkdir /boot/efi
Add the ESP to /etc/fstab. It should look like this:
/dev/disk/by-partlabel/EFI-system /boot/efi vfat defaults 0 2
Reload systemd to read new fstab
sudo systemctl daemon-reload
Mount the ESP
sudo mount /boot/efi
Open gparted & mark the following flags on this boot partition: esp & boot

Install EFI package on Ubuntu/Debian.
apt install grub-efi-amd64
install shim-signed (for secure boot, also see this link for recent changes in 2024 if you encounter problems with secure boot later on)
sudo apt install shim-signed
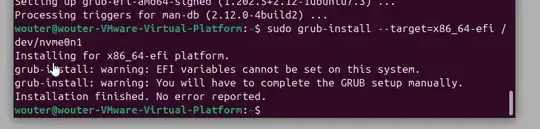
Install the GRUB EFI bootloader.
grub-install --target=x86_64-efi /dev/sda
You will encounter this error but you may ignore this for the time being
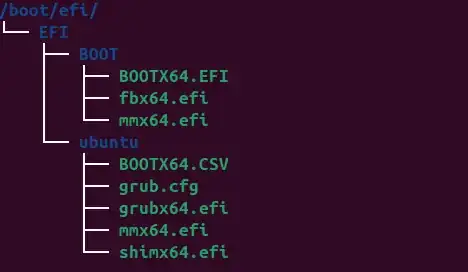
Your /boot/efi partition should now contain the following files:
- Reboot your pc & change the BIOS from BIOS boot to UEFI boot + secure boot
- If all went well, your pc will show grub and boot to ubuntu but will throw an error when booting to windows (
bad shim signature) which is normal as there are no efi files for windows yet in the boot partition
Windows RE
Boot to windows RE using the usb and open a terminal.
Some useful links: askubuntu & dell site
Execute the following commands:
bootrec /fixmbr
bootrec /fixboot
Note: it's ok if the /fixboot step returned access denied or something like that
bootrec /rebuildbcd
bcdboot c:\windows /s c:
Note:
You may need to change the driveletter to the driveletter your Windows partition was assigned to in Windows RE
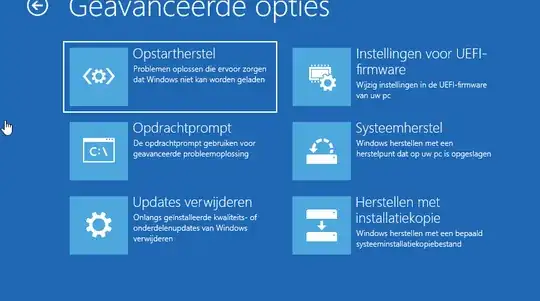
Exit the terminal and choose 'Startup repair'
Your PC will auto reboot when done
Boot-repair
In grub boot to Ubuntu (if you choose Windows you'll get the same errror regarding shim signature)
Install boot-repair & execute recommended repair et voila, upon next reboot you should be greeted with grub and both Ubuntu & Windows should start with secure boot enabled
Optional: change boot order in bcdedit
If your PC boots automatically to Windows & you can't change the boot order in UEFI, you can still do this in de Windows bootloader in this way:
First, check the contents of the boot partition. Use the following commands to mount this partition on b:\
diskpart
Select the correct disk
select disk 0
Type and run the command:
list vol
Select the boot partition - use the size as a guide
select vol <number of volume>
Type and run the command:
assign letter=B
Now exit and check the contents of this directory
dir b:\EFI\ubuntu\
](../../images/2171feef2a6dd18e891ce5899b056392.webp)
Now we're going to change the windows bootloader
- execute
bcdedit

the entry for {bootmgr} needs to be changed to \EFI\ubuntu\grubx64.efi with this command
bcdedit /set {bootmgr} path \EFI\ubuntu\grubx64.efi
](https://i.sstatic.net/KnIMWsDG.png)


](https://i.sstatic.net/5116oUpH.png)
