This is my first time setting up virtual server with Ubuntu and I have some questions regarding Apache2.
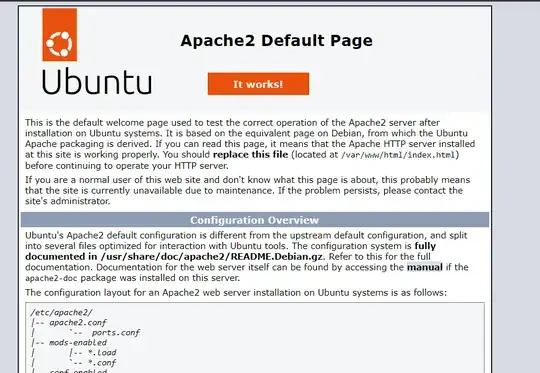
When I turn the virtual server on, it was started with lightppd. Since (I thought) I'm more familiar with Apache setups in my past with XAMPP interface, I uninstalled that and installed Apache instead. Now having Apache2 for two weeks, my website, that is connected to mentioned VPS, keeps showing Apache successful setup page. I have tried every solutions in Ubuntu stackExchange and other forums, yet the result still stay the same. So starting today, I uninstalled Apache and tried my luck with other server such as NGINX.
But after I uninstalled it, the page still persists as if whatever I do to it do nothing. I restart my VPS, I restart the system, I delete everything related to Apache, and the page still shown in my website. Does anyone knows what should I do with this and where to look for the source of the problem?
Ubuntu version is 22.04.3 LTS,
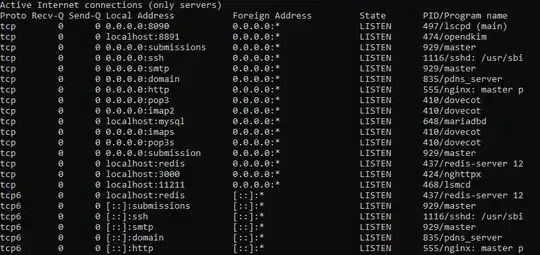
netstat -tulp doesn't show any Apache services:

I've seen this help page Cannot shutdown apache2 on 16.04 LTS but the Apache is working page still persists. Thank you for your help.
The deletion of apache seems like should also includes /var/www directory, but since I also have nginx it looks like we can have both having one /var/www directory
In the /var/www directory, I see two folders: one named html and my own personal website directory, let's say it's myOwnBlog.com. Inside the /var/www/html directory there are two files named test.html and index.nginx-debian.html
html
|-- index.nginx-debian.html
`-- test.html
We can ignore /var/www/myOwnBlog.com since it's empty. Even if I add content here the content won't appear instead of Apache successful message.
sudo service apache2 status shows:
sudo service apache2 status
Unit apache2.service could not be found.
So it can be verified that apache2 is completely uninstalled.
sudo service nginx status shows:
nginx.service - A high performance web server and a reverse proxy server
     Loaded: loaded (/lib/systemd/system/nginx.service; enabled; vendor preset: en>
     Active: active (running) since Tue 2023-11-28 13:25:43 UTC; 1h 15min ago
       Docs: man:nginx(8)
    Process: 419 ExecStartPre=/usr/sbin/nginx -t -q -g daemon on; master_process o>
    Process: 519 ExecStart=/usr/sbin/nginx -g daemon on; master_process on; (code=>
   Main PID: 538 (nginx)
      Tasks: 3 (limit: 9553)
     Memory: 10.6M
        CPU: 114ms
     CGroup: /system.slice/nginx.service
             ├─538 "nginx: master process /usr/sbin/nginx -g daemon on; master_pro>
             ├─539 "nginx: worker process" "" "" "" "" "" "" "" "" "" "" "" "" "" >
             └─540 "nginx: worker process" "" "" "" "" "" "" "" "" "" "" "" "" "" >
and it can be verified that nginx is the one that is actually still running.
Edit 1: Adding details requested by sotirov:
There is a sites-available inside /etc/nginx/ directory, and the content is indeed as requested:
tree sites-available
sites-available
`-- default
The content of index.nginx-debian.html is, as expected, a welcome page of nginx with 'Welcome to Nginx!' and so on.
Here's the content, it is what supposed to appear instead of Apache successful page I think:
  GNU nano 6.2               index.nginx-debian.html                         <!DOCTYPE html>
<html>
<head>
<title>Welcome to nginx!</title>
<style>
    body {
        width: 35em;
        margin: 0 auto;
        font-family: Tahoma, Verdana, Arial, sans-serif;
    }
</style>
</head>
<body>
<h1>Welcome to nginx!</h1>
<p>If you see this page, the nginx web server is successfully installed and
working. Further configuration is required.</p>
<p>For online documentation and support please refer to
<a href="http://nginx.org/">nginx.org</a>.<br/>
Commercial support is available at
<a href="http://nginx.com/">nginx.com</a>.</p>
<p><em>Thank you for using nginx.</em></p>
</body>
</html>
Edit 2: Trying sotirov tips regarding obsolete method of erasing Apache,
I cannot paste the results because the ssh restarted it's session after a while. But it found these packages and recommend me to sudo apt autoremove:
The following packages will be REMOVED:
  apache2-bin apache2-data apache2-utils libapr1 libaprutil1
  libaprutil1-dbd-sqlite3 libaprutil1-ldap
0 upgraded, 0 newly installed, 7 to remove and 91 not upgraded.
After this operation, 7,160 kB disk space will be freed.
Do you want to continue? [Y/n] y
(Reading database ... 101786 files and directories currently installed.)
Removing apache2-bin (2.4.52-1ubuntu4.6) ...
Removing apache2-data (2.4.52-1ubuntu4.6) ...
Removing apache2-utils (2.4.52-1ubuntu4.6) ...
Removing libaprutil1-dbd-sqlite3:amd64 (1.6.1-5ubuntu4.22.04.2) ...
Removing libaprutil1-ldap:amd64 (1.6.1-5ubuntu4.22.04.2) ...
Removing libaprutil1:amd64 (1.6.1-5ubuntu4.22.04.2) ...
Removing libapr1:amd64 (1.7.0-8ubuntu0.22.04.1) ...
Processing triggers for man-db (2.10.2-1) ...
Processing triggers for libc-bin (2.35-0ubuntu3.4) ...

