132

I want to scale all images in a given folder to the same width (but different appropriately scaled heights). How can I do this using a GUI-based or command-line tool?

For bonus points, is it possible to restrict which images are scaled based on their initial width (that is, only scale images that have a width > x and/or a width < y)?

Braiam
  • 69,112
lofidevops
  • 21,912

7 Answers7

187

This is very easy to do with imagemagick. You should be able to install it in the Software Center. I would suggest it for batch processing of images.

The batch resizing is incredibly simple (I tested it with Ubuntu 11.10). Use the following command to resize every .jpg file to 200 pixel width, keeping the aspect ratio:

$ convert '*.jpg[200x]' resized%03d.png

you can maintain the filename by using -set option. Ex:

convert "images/*.jpg[250x]" -set filename:base "%[basename]" "images/new_folder/%[filename:base].jpg"

If you have more files you should use with find

find /folder -iname '*.JPG' -exec convert \{} -verbose -set filename:base "%[basename]" -resize 1920x1080\> "/folder/images/%[filename:base].JPG" \;

This is only scratching the surface of the power of imagemagick. Resizing can be tuned endlessly. For more advanced resizing you have to use the -resize option.

You can limit the resizing to shrinking:

$ convert '*.jpg[300x>]' thumb-300-%03d.png

or enlarging:

$ convert '*.jpg[300x<]' thumb-300-%03d.png

Have look at the geometry documentation to see more options.
Hinrich
  • 103
bandi
  • 2,660
34

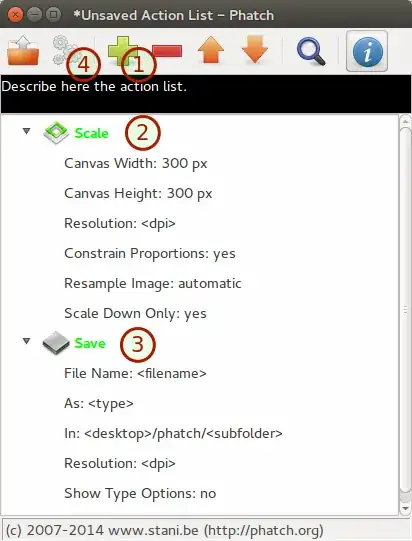
For GUI, Phatch "one click is worth thousand photos" is the best for such quick job. It is already in Ubuntu repository.

sudo apt-get install phatch
  1. Add Scale & Save item
  2. Set scale/resize options
  3. Set save/output options
  4. Run
  5. Set input folder
  6. Click batch to execute

enter image description here enter image description here

user.dz
  • 49,176
31

Try this:

sudo apt-get install gimp-plugin-registry

Then, open up Gimp and open the Batch plugin found in Filters > Batch > Batch Process.

Select your images in the Input tab, and define the Resize operation in the surprisingly-named Resize tab.

More information can be found here.

SirCharlo
  • 40,096
30

Try mogrify command from ImageMagick tools.

  • give a path to separate the output from originals
  • give desired thumbnail width or height, below a width example
  • this way you keep the original filename :-)

Example:

$ mogrify -path small/ -auto-orient -thumbnail 300x *.jpg
kenorb
  • 10,944
miguelfg
  • 401
13

Answered and accepted (and I use ImageMagick) but for completeness... I have a non-technical boss that wanted a simple viewer with some basic tools and it had to be GUI. I decided on gThumb for him.

In the thumbnail view you...

  • Select any images you want resized
  • Start the resize function (click the Wrench icon > Resize Images..)
  • Put in a new size based on pixels or percentage
  • Select an output folder, and off you go.
Gunith D
  • 105
Dennis
  • 2,513
10

Here is how I did it by shrinking only larger images:

find . -iname \*.jpg -exec convert -verbose -quality 80 -resize 1600\> "{}" "FOO_FOLDER/{}" \;

It will appropriately scaled the heights.

To use the convert command, you need to install Imagemagick via sudo apt-get install imagemagick.

For Windows, see: A Batch Script To Resize Images.

kenorb
  • 10,944
5

For batch image resizing I’ve looked at many packages and finally found one with a usable interface – converseen. Once you discover that the important settings are somewhat hidden on the scrollable left pane, all is well.
Not sure if this meets all of the OPs use cases, but you may not have to look at the quirky UIs of imagemagick or phatch.
Oddly, photo management packages like digikam, f-spot, fotoxx or shotwell don't seem to recognize the need for copying/resizing batches of images before uploading to online services like photobucket or (gag) flickr. These services want us to do things their way only so I do not trust them for backing up originals.

Mike
  • 51