9

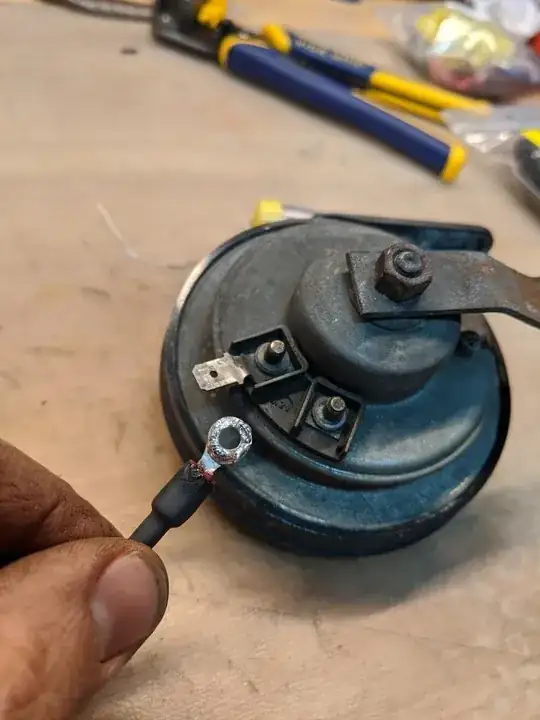
I have a horn with spade connectors. They are stamped to the horn body and one is broken. I figured I could just use a stud ring terminal and solder it to the stud.

I cleaned the stud with a copper wire brush, but the solder just wouldn't stick to it?? Any ideas?

Pic: enter image description here

wild.coast
  • 348
  • 4
  • 16

10 Answers10

13

To solder this, you need:

  • heat
  • heat
  • and finally: heat

The horn is a massive piece of metal, and will draw away the heat from soldering irons for electrics quite fast. You'll for sure need an iron with 180W or more to get the parts hot enough. A small tourch will also work. BUT... Is that plastics there? That won't like so much heat...

Next, not each metal can be soldered easily. Electric solder and its flux work for copper, copper alloys, tin, zinc, gold, silver and so on. However, the surface must be metallic clean, free of dirt, grease and oxided. (Though, flux is very good in removing that stuff)
For iron, there are special types of solder and flux. It requires higher temperatures, the flux is quite aggressive (yet, the surface must be much cleaner), but still, soldering is not easy.
Aluminum is next to unsolderable. There are products to do so, but that look more like an adventure that a reliable process. Unfortunately, aluminum is a favorite material for rivets etc. May be, this hat-like bolts in the picture are aluminum...

sweber
  • 7,067
  • 5
  • 24
  • 43
6

I don't think it's wise to solder it back on. A car is subjected to a lot of vibrations, and solder does not make a good mechanical bond (it will break).

I would try instead to break that pressed rivet thing with a Dremel-like tool and then replace the tab and press a new rivet into place using a small washer, small tube and a hammer. Fill the voids with solder.

Another option would be to attempt to weld a new tab on, but considering the small size, you would need high quality welding equipment to avoid just vaporizing what's left of the tab. Also you would need to figure out how to ground the part…

If you want to go the solder way, try to find a way to nudge your wire under what's left of the tab. Clean it thoroughly using abrasives and flux, then pry the tab and rivet, wrap the wire around it and fill any gap you see with solder, to stop the wire from unwrapping itself.

Is all the trouble worth the repair? A horn is a critical safety element and you will know it does not work only when you actually need to use it.

Just to reiterate: putting the ring terminal onto the rivet post thingy and adding solder will not hold it in place. The solder will break. Think of solder not as glue, but as being similar to tying the loose end of a rope just to help prevent the main knot from untying.
sleblanc
  • 259
  • 1
  • 6
5

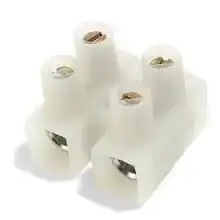
Could you use the inside of a suitable chocolate block connector?

Remove the plastic case, push the connector over the post, then tighten the screw to secure. Put the wire in the other end of the connector and screw it down.

enter image description here

Image copied from - http://www.lightwiring.co.uk/tag/5-amp-4-terminal-junction-box/

HandyHowie
  • 25,681
  • 3
  • 40
  • 76
4

Look at the nut that the broken tab is on. It's a Hex bolt. Unscrew it, and just slip a new spade connector on (or that ring connector you're showing)

PeteCon
  • 8,722
  • 17
  • 30
4

And if you want to solder it, then you need to get both bits clean ie shiny and use a good flux with the solder or a flux-cored solder.

But Pete is right - use the nut...

Solar Mike
  • 34,681
  • 2
  • 30
  • 59
2

You could drill a hole in the stud and tap threads in the hole, then use washers and a machine screw to hold down the spade ring.

poleguy
  • 121
  • 1
2

Soldering is a chemical reaction!

Like all chemical reactions, several things need to be correct for soldering to go as intended.

  • You need to be using the right reagents (chemicals.)
  • You need to have removed all impurities/contaminants.
  • You need to get things to the correct temperature.

There are a whole bunch of different types of solder. 60/40, 63/37, lead-free, etc. etc. Further more, there are a whole bunch of different metals with which that solder must get along with. Try soldering Aluminum with 60/40 and you're going to have a rough time. Your solder and metal needs to be compatible.

Creating metal to metal (inter-metallic) bonds require that there be nothing between those metals. Obviously this means things like paint, dirt, rust, and grime; somewhat less obviously is that the things that you can't see also matter, like oxygen, or finger salts/oils. Your solder and metal needs to be clean clean clean.

After everyone is all close, clean, comfortable, compatible, and no one is there to interfere, you can turn up the heat a bit. Do that, and interesting reactions might take place. When atoms get hot and heavy enough for them to rub together, it's pretty natural for them to hook up. ;)

user56927
  • 44
  • 1
2

As sweber mentions, not all metals are easy to solder. Cored solder for electronics work contains a non-corrosive rosin flux which is fine for copper and brass but will not work on steels for example. In this case, pouring on more rosin flux will get you nowhere. If the stud is steel, you may be able to solder it using an acid flux such as Hampton paste (sometimes used for plumbing joints), assuming you can get it hot enough with your soldering iron. You'll need to clean the joint well afterwards - this type of flux is generally not recommended for electrical work as any residue you don't clean off can attack the metals and create a bad contact months or years later. If it's aluminium, forget soldering.

JimB
  • 21
  • 1
1

Are you trying to connect both components by holding them together and then adding solder? It doesn't look like there's any solder adhering to the spade connection at all, something I've run into in the past where components have a higher thermal mass than I expected (e.g. the back of a metal potentiometer).

The way I've done similar soldering jobs in the past is by building up a pool of solder on the flat surface (the horn in your case) and then bringing the parts together and heating to melt the solder. This gives a better indication of when the part is hot enough:

http://www.youtube.com/watch?v=EHA4SLN4qeA&t=0m47s

thesketh
  • 111
  • 1
1

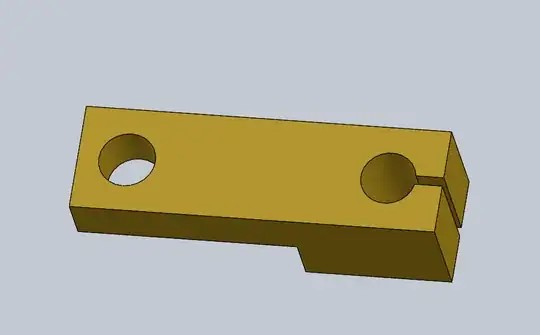
Take a scrap of brass, saw and drill it as below. You'll make the hole for the post a bit undersize so the sides have to spring open.

Tap the second hole to fit a convenient size of machine screw.

enter image description here

Clean the post with a wire brush or a little strip of emery cloth, and press the brass on. Fix it with a bit of epoxy.

Only tools required, drill press, hacksaw and jeweler's saw.