17

I'm trying to change the framerate of an MP4 video (it's a 120fps GoPro video, I want to play it back at 30fps for a slow-motion effect).

I'm using avconv for this:

avconv -i SourceMovie.mp4 -vf setpts=4.0*PTS -r 30 DestMovie.mp4

That technically works, but it reencodes the movie. In addition to being slow, it's obviously a quality issue. Technically there should be a way to just set the fps in the header of video, how can I change that? (Any tool other than avconv would work too.)

EboMike
  • 478

5 Answers5

20

MP4Box can do it.

The command

MP4Box -add SourceMovie.mp4#video -raw 1 -new test

creates the files test and test_track1.h264. You can now create an mp4 file with whichever supported framerate you would like (30 in this example):

MP4Box -add test_track1.h264:fps=30 -new DestMovie.mp4

MP4Box is part of the gpac package, so make sure it's installed.

qubodup
  • 271
  • 2
  • 5
Mitch
  • 109,787
6

Changing framerate in the header of the video(container) has no effect on the videostream (or audiostream) itself. Reencoding is the only option.

Videostreams have timestamps and in most video's the frames are interdependent to each other due to interframe compression. Some players can speed up and slow down the video but not by embedded commands or something. No player can change the framerate on the fly when a containercommand asks to do so. The videofile will end up out of specification (i.e. not following the standards) and 99.9% of the players will refuse to comply to it. It is quite impossible to do what you want without recoding. Of course you can wait with recoding until the last step in your editing.

thom
  • 7,742
4

In the event that your major intent is to play it in slow motion, and not to keep the file as MP4, you can use MKVmerge GUI tool to remux it into a Matroska container which can easily change the framerate. Remuxing is much better than reencoding, because it only changes the metadata, and not the stream itself.

First you install the package

sudo apt-get install mkvtoolnix-gui

Then you start MKVmerge GUI. You'll be faced with a window like this

mkvmerge gui 1

Simply press add button and select your file or even just drag-n-drop the file into "Input files" area. At this point you should be able to select the video stream in your video. You can also delete other streams, since they will just get in the way anyhow.

After you've selected it you should see the bottom tabs becoming active:

enter image description here

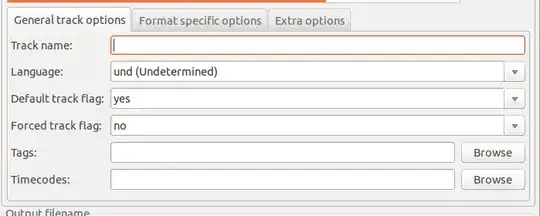
Change to "Format specific actions"

enter image description here

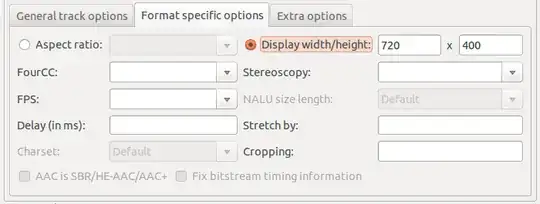
You can see that there is a field "FPS", where you can input the value of frames per second. It looked like you were planning to slow things down four times, so about 7 frames per second would be your goal. You can also use "Stretch by" option.

After that you can just change the name of the output file (if you want) and press "Start muxing".

The program will run and you should have your file.

v010dya
  • 1,502
4

I also wanted to lossless slow down of my 120 FPS movies to 30 FPS. I made script which does it by changing sound tempo and modifying FPS directly in MP4 container. Following tools are required:

  1. avconv to convert audio streams
  2. sondstretch to slow down audio tempo
  3. gpac to get MP4Box to change FPS

Script used for conversion is here:

#!/bin/bash
#########################################
# Lossless slow down from 120 to 30 FPS #
#                                       #
# Use:                                  #
#                                       #
#   slow.bash <mp4_file>                #
#                                       #
#                           #-= OSi =-# #
#########################################


# Prepare basic variables
IN_FILE="$1"
NAME=$(echo "${IN_FILE}" | sed 's/\.[^.]*//')


# Clean up before start
rm -f "${NAME}.ac3" "${NAME}.wav" "${NAME}_.wav" "${NAME}" "${NAME}_track1.h264" "${NAME}_slow.mp4"


# Slow down sound
avconv -i "${IN_FILE}" -vn -acodec pcm_s16le "${NAME}_.wav"
soundstretch "${NAME}_.wav" "${NAME}.wav" -tempo=-75
avconv -i "${NAME}.wav" -vn -codec:a ac3_fixed -b:a 448k "${NAME}.ac3"


# Change video frame rate and multiplex with slowed sound
MP4Box -add "${IN_FILE}#video" -raw 1 -new "${NAME}"
MP4Box -add "${NAME}_track1.h264:fps=30" -add "${NAME}.ac3" -new "${NAME}_slow.mp4"


# Clean up when we are done
rm -f "${NAME}.ac3" "${NAME}.wav" "${NAME}_.wav" "${NAME}" "${NAME}_track1.h264"

This script creates copy of MP4 with _slow postfix.

OSi
  • 51
0

If you have a .mp4 file and you wish to change the rate at which video players render the frames without any recoding, you can do this by changing the 'Sample duration' value(s) in the stts atom. There are probably packages (MP4Box?) that can do this, but if you want to do it yourself it is very straightforward with either a hex editor (doesn't really scale) or very simple python code. Either way, there are three simple steps:

  1. Identify the 'Time scale' value in the mdhd atom. The mdhd atom is described in detail here: https://developer.apple.com/documentation/quicktime-file-format/media_header_atom. In a hex editor, searching for 'mdhd' will put you at the start of the 'Type' field in the mdhd atom. The Time scale is a four byte field that begins 16 bytes further on from the Type field start (i.e., skip 12 bytes after the end of the Type field).
  2. Compute the desired Duration by dividing Time scale by your desired playback fps: Convert the hex Time scale to int, divide by fps, take the floor, and then convert back to hex. e.g., if Time scale is 00 00 40 00, that converts to 16384. If you want playback to be at 10 fps, then floor(16384/10)=1638, which is 00 00 06 66 in hex.
  3. Now you are ready to set the frame duration in the stts atom, which is described here: https://developer.apple.com/documentation/quicktime-file-format/time-to-sample_atom. Searching for 'stts' will put you at the beginning of the 'Type' field in the stts atom. Eight bytes further on is the four byte 'Number of entries' field which tells you how many entries are in the 'Time-to-sample' table that immediately follows. Each entry in that table, which often has just one entry, consists of two 4 byte values: sample count and sample duration. Changing the 4 byte sample duration to the hex value computed in step 2 will give you the desired playback rate.

In python3, it might look like this:

    with open(filename, 'rb') as f:
        mp4bytes = f.read()
    pos_mdhd = mp4bytes.find(b'mdhd')
    if pos_mdhd > 0:
        time_scale = int.from_bytes(mp4bytes[pos_mdhd + 16:pos_mdhd + 20], 'big')
        new_duration = (time_scale//new_fps).to_bytes(4, 'big')
        pos_stts = mp4bytes.find(b'stts')
        if pos_stts > 0:
            num_entries = int.from_bytes(mp4bytes[pos_stts + 8:pos_stts + 12], 'big')
            with open(filename, 'rb+') as g:
                for i in range(num_entries):
                    g.seek(pos_stts + 16 + (i*8))
                    g.write(new_duration)

That's it, just plug in your desired filename and new_fps. This will rewrite ALL the frame durations to yield the desired playback fps. Note that it also overwrites the input file, so make a backup first.