Outline
- Installation
- BackupPC web user
- Client Connection Preparation - Setup SSH-KEY
- Configure BackupPC to backup Client's /home directory
- Adding Client
- Backup Schedule
1. Installation
Install via Ubuntu BackupPC package
sudo apt-get install backuppc
This will install BackupPC and configure the following automatically
    Linux User   : backuppc (home directory /var/lib/backuppc)
                   BackupPC daemon will run as this user

    HTTP User    : backuppc (For web gui http login)
                   Password is located in /etc/backuppc/htpasswd (See Step 2)

    Config file location : /etc/backupc
    Data file location   : /var/lib/backuppc

    Apache will be configured
    Web Interface URL    : http://<hostname/IP>/backuppc
This guide is base on the above installation method and information.
If manual installation is used, in config.pl, look for following line
set $Conf{CgiAdminUsers} = '';
and change to
set $Conf{CgiAdminUsers} = 'backuppc';
2. BackupPC web user
HTTP Login/User backuppc
To have full administrative right in BackupPC web interface, one have to login as backuppc and password. (This is not the same as the linux user.)
The web interface user(http login) backuppc is created with a random password during installation. If you forget to write down the password, use htpasswd to change it as follow
sudo htpasswd /etc/backuppc/htpasswd backuppc
Additional User
To add additional user
sudo htpasswd /etc/backuppc/htpasswd <username>
In Step 5 Add Client, put < username > into moreUsers field. When < username > login web interface, will only see client they are assigned to.
3. Client Connection Preparation - Setup SSH-KEY
Client SSHD Configuration
To keep it simple, client machines sshd should allow root login. For each client /etc/ssh/sshd_config, make sure following options are there and un-commented
    PermitRootLogin yes
    PubkeyAuthentication yes
    AuthorizedKeysFile  %h/.ssh/authorized_keys
This should be done on all clients to speed up the next step, as scp will be used.
Server SSH KEY Creation and Deployment
On server, login as user backuppc
backuppc@server$ sudo su - backuppc
Generate SSH Key Pair with Empty Pass Phase
backuppc@server$ ssh-keygen
When asked for phasephase, leave it empty(press enter)
Enter passphrase (empty for no passphrase):
Enter same passphrase again:
That will generate 2 files in /var/lib/backuppc/.ssh: id_rsa and id_rsa.pub. You only need to generate one pair of key.
Deploy Key To Client Machine
Copy id_rsa.pub to client machine
backuppc@server$ scp /var/lib/backuppc/.ssh/id_rsa.pub sudo-user@<client machine>:/home/sudo-user/backuppc.id_ras.pub
backuppc@server$ ssh sudo-user@<client machine>

sudo-user@client$ chmod 600 backuppc.id_ras.pub
sudo-user@client$ sudo mkdir /root/.ssh
sudo-user@client$ sudo chmod 700 /root/.ssh
sudo-user@client$ sudo mv backuppc.id_ras.pub /root/.ssh/authorized_keys
sudo-user@client$ sudo chown root:root /root/.ssh/authorized_keys
Test ssh connection(On server, as Linux user backuppc)
backuppc@server$ ssh root@<client machine>
It should not ask for password.
It is important to do the test because this will also add client machine fingerprint to backuppc(linux user) .ssh/known_hosts list. Otherwise when BackupPC(the software) connect(via ssh) to client machine, it will be prompt for fingerprint confirmation, which it cannot handle, and the backup process will fail.
Repeat step 3 for all client machines.
At this point, server user backuppc should be able to ssh into all client machines as root, without being prompt for password nor fingerprint confirmation nor passphase.
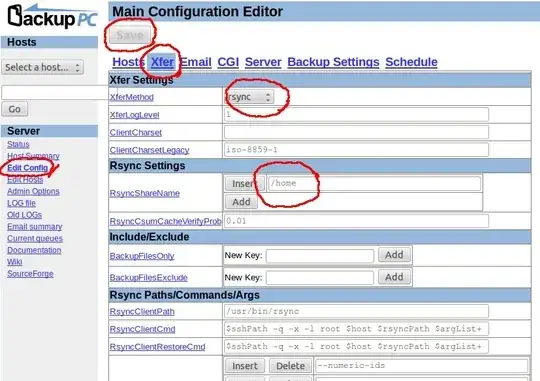
4. Configure BackupPC to backup Client's /home directory
- Open BackupPC web GUI
- On left panel, Server section, click Edit Config
- On right panel, click Xfer tab
In Xfer tab, change following, then click Save on top
XferMethod: rsync
RsyncShareName: /home
(Assume only backing up user home directories)
This will automatically apply to all clients.
5. Adding Client
- Open BackupPC web GUI
- On left panel,
Server section, click Edit Hosts
- For each machine, fill in hostname or IP address under
host, and always use backuppc for user, click Add for more rows. Remember to click Save on top when finish.
Delete localhost from the list
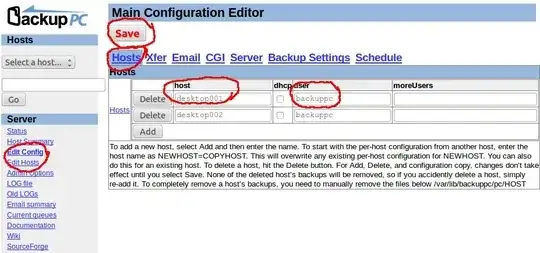
The situation become tricky if dhcp is used for desktop machines. There are a few ways to work around this
- configure dhcpd to assign static IP to them
- change desktop machines to use static IPs
- configure dynamic dns update
In any case, server need to be able to reach(ssh) each client machine consistently either with an IP address or a hostname.
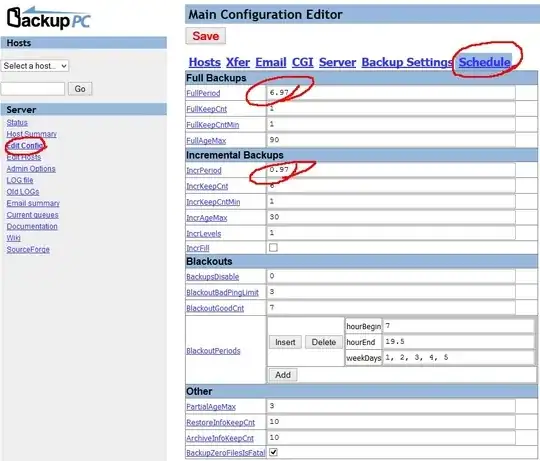
6. Backup Schedule
- Open BackupPC web GUI
- On left panel, Server section, click Edit Config
- On right panel, click Schedule tab
Nothing to be done, the default schedule will perform
Full Backup every 7 days (FullPeriod: 6.97 day)
Incremental Backup everyday (IncrPeriod: 0.97 day)
7. Adding Audit Interface
Adding an Audit Interface to BackupPC has instruction to add an audit only interface to BackupPC.
However the index.cgi in Ubuntu BackupPC package is compiled. /usr/share/backuppc/lib/realindex.cgi should be used to generate audit.cgi mentioned in the blog.