0

Laptop wont boot after driver update

I use a Dell G15 Ryzen edition that i flashed to ubuntu. it currently uses Ubuntu 24.04, and in the process of updating drivers to fix an issue where i couldnt connect a display through hdmi, I screwed up my computer.

I think what went wrong was when I tried doing multiple different driver updates, updating the same driver to different things, all at once before resetting, and now it wont boot. I will admit, i am an absolute idiot who shouldn't be within a mile of Linux, but I wanted to learn. in other words, i know literally nothing.

Although I don't know if I was doing it right, I don't think I can boot into safe mode, when I tried I got the attached errors. My method was to restart the PC, it was in a state where it was blackscreened but on. I restarted it so that it put me in the menu where you get to like the admin password for the device and what not, and i choose the advanced options for Ubuntu, and choose to boot in the most recent version safe mode. and got the errors. the drivers i attempted to download were installed through the commands "sudo apt install nvidia-driver-550" then the command "sudo ubuntu-drivers install" and then going to additional drivers and clicking "xserver-xorg-video-nouveau" and applying, in that specific order if it matters. after which I restarted, and had all the problems.
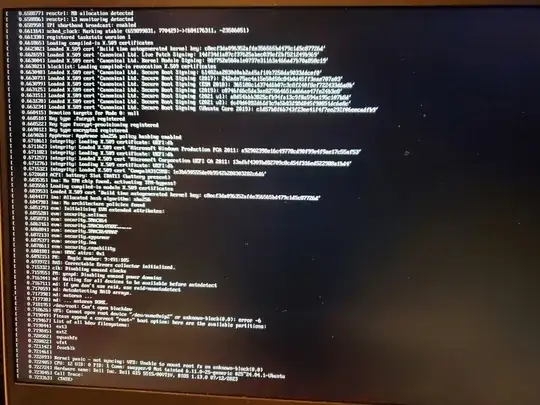
enter image description here

1 Answers1

0

You can use Ubuntu Live(an temporary OS without need to install) to chroot your broken Ubuntu and fix errors manually (you may have some challenges):

1- Live OS USB

On another system or OS, download Ubuntu, create a bootable USB drive, and boot system into the live OS USB. (username is Ubuntu, with no password)


2- Mount broken installed OS and chroot

Open a terminal in the live OS USB and identify your root partition using:

sudo fdisk -l

Usually it is /dev/nvme0n1pX, where X is the partition number. Look for partition labeled ext4 with mount point /. Mount broken OS's root partition by:

sudo mount /dev/nvme0n1pX /mnt

Then mount important current OS directories on broken OS directories:

sudo mount --bind /dev /mnt/dev
sudo mount --bind /dev/pts /mnt/dev/pts
sudo mount --bind /proc /mnt/proc
sudo mount --bind /sys /mnt/sys
sudo mount --bind /run /mnt/run

mount --bind lets you make a folder or file appear in more than one place at same time. It's like creating a mirror or shortcut to a directory — but for the whole system, not just your user interface.

Now chroot into your broken OS:

sudo chroot /mnt

chroot /mnt: It temporarily makes /mnt as a new real root(/) directory for your current terminal session.


3- Fix Kernel and InitRAMFs

Reinstall the kernel and update the InitRAMFs file:

apt update
apt install --reinstall linux-generic-hwe-24.04
update-initramfs -u
  • initramfs: stands for initial RAM filesystem. It’s a small temporary file system loaded into memory during boot, that helps your computer find and load the real operating system.

4- Reinstall bootstrap manager:

Reinstall GRUB:

grub-install /dev/nvme0 # Is this your boot DEVICE? (not partition)
update-grub

Then exit from chroot environment:

exit

5- Unmount and reboot

Unmount everything:

sudo umount /mnt/dev/pts
sudo umount /mnt/dev
sudo umount /mnt/proc
sudo umount /mnt/sys
sudo umount /mnt/run
sudo umount /mnt

Now reboot:

sudo reboot

Note: If the issue persists, disable Secure Boot by entering BIOS firmware, and disable Secure Boot, then save changes. Or even try to reinstall GNOME desktop manager: apt install --reinstall gdm3