You haven't said whether this is a Server or Desktop installation. Either way, I'll outline how to set a search domain for you. Your original post indicates that you were using Ubuntu 20.04, but you've since upgraded to 22.04.
Side note:
The following would apply to both 20.04 and 22.04, but the output of
resolvectl status looks a bit different between versions.
With regards to what search domain to use, this is dependent on what's been defined in the DHCP server on your router. It's typically something like local, localdomain, or lan. You can edit as wanted.
I'm using a pfSense router. A domain is entered on the System/General Setup page. In my case, the default is localdomain, which I've left as configured.

I'm not familiar with Synology routers, so you'll have to consult the manual on how to define a domain. You've indicated in a comment that you "do not have a domain configured on my router anymore." I suspect this is part of the problem.
To clarify the purpose of a search domain, the manpage for systemd-resolved.service(8) explains it rather well:
Queries for the address records (A and AAAA) of single-label
non-synthesized names are resolved via unicast DNS using
search domains. For any interface which defines search
domains, such look-ups are routed to the servers defined for
that interface, suffixed with each of those search domains.
When global search domains are defined, such look-ups are
routed to the global servers. For each search domain, queries
are performed by suffixing the name with each of the search
domains in turn.
Let's get started...
I see that you've edited /etc/resolv.conf in your attempts to solve your problem. So let's reset this file as a symlink to /run/systemd/resolve/stub-resolv.conf, which is the local caching stub resolver and the default setup.
Run ls -l /etc/resolv.conf to see what it currently is. On my system, I get the following:
$ ls -l /etc/resolv.conf
lrwxrwxrwx 1 root root 39 Dec 31 2021 /etc/resolv.conf -> ../run/systemd/resolve/stub-resolv.conf
If it's a file or a symlink to something other than /run/systemd/resolve/stub-resolv.conf, then delete it:
sudo rm /etc/resolv.conf
Next, create a symlink:
sudo ln -s /run/systemd/resolve/stub-resolv.conf /etc/resolv.conf
Now let's add a search domain to a network interface for both a Server and Desktop host.
Server
Networking is typically configured via Netplan and managed by systemd-networkd as the backend renderer. Let's see how the current system is setup before making any changes.
On a virtual machine, I have the following Netplan YAML config file with an interface setup as DHCP.
$ cat /etc/netplan/00-network.yaml
network:
version: 2
renderer: networkd
ethernets:
eth0:
dhcp4: true
Show the output of cat /etc/resolv.conf before any changes. Note that a search domain is not listed.
$ cat /etc/resolv.conf
nameserver 127.0.0.53
options edns0 trust-ad
In the following output of resolvectl status eth0, I'm only showing one specific link. Substitute eth0 with your device name. Notice that it doesn't indicate a setting for DNS Domain, which is where a search domain would be listed.
$ resolvectl status eth0
Link 2 (eth0)
Current Scopes: DNS
Protocols: +DefaultRoute +LLMNR -mDNS -DNSOverTLS
DNSSEC=no/unsupported
Current DNS Server: 192.168.10.1
DNS Servers: 192.168.10.1
Now that we've seen the current state, let's edit your Netplan config file. Substitute the name of your config file in the following command:
sudo /etc/netplan/00-network.yaml
To add a search domain, edit your config file as follows. In this example, I'm adding localdomain as a search domain.
$ cat /etc/netplan/00-network.yaml
network:
  version: 2
  renderer: networkd
  ethernets:
    eth0:
      dhcp4: true
nameservers:
search: [localdomain]
Save and exit the file. Then apply the changes:
sudo netplan try
Restart systemd-resolved:
sudo systemctl restart systemd-resolved
Then look at the output of /etc/resolv.conf and you'll see the search domain has been added.
$ cat /etc/resolv.conf
nameserver 127.0.0.53
options edns0 trust-ad
search localdomain
Likewise, resolvectl status eth0 shows that localdomain is listed under DNS Domain.
$ resolvectl status eth0
Link 2 (eth0)
    Current Scopes: DNS
         Protocols: +DefaultRoute +LLMNR -mDNS -DNSOverTLS
                    DNSSEC=no/unsupported
  Current DNS Server: 192.168.10.1
         DNS Servers: 192.168.10.1
DNS Domain: localdomain
Desktop
With a Desktop installation, networking is typically managed by Network Manager. Therefore, we'll use nm-connection-editor to open the Network Connections editor and add a search domain to an interface.
Before editing a connection, let's look at the current state before adding a new search domain. Enter cat /etc/resolv.conf. On my system...
$ cat /etc/resolv.conf
nameserver 127.0.0.53
options edns0 trust-ad
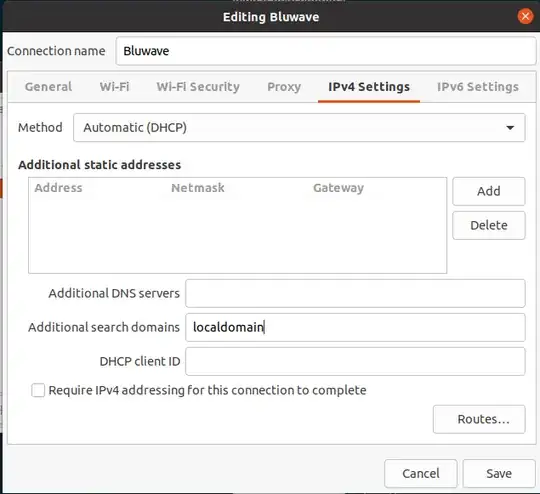
Enter nm-connection-editor in a terminal. A Network Connections window will open. Select your interface that you want to edit, then click the gear icon on the bottom. A new window will open. Select the IPv4 Settings tab and enter a search domain under Additional Search Domains. In the below image, I'm editing a wifi connection called Bluwave and I've entered localdomain as an additional search domain.
Click Save to close this window. Then close the Network Connections window.
The effects of this edit can be seen in Network Manager system-connections config files in the /etc/NetworkManager/system-connections directory. The name of the file for the above connection is Bluewave.nmconnection. Yours will be different. Here are the contents before adding localdomain as a search domain on my interface. Note that dns-search is empty.
$ sudo cat Bluwave.nmconnection
[connection]
id=Bluwave
uuid=e37ca330-8072-4c45-a5f9-e6ac73f3351b
type=wifi
interface-name=wlp9s0
permissions=
timestamp=1691197080
[wifi]
mac-address-blacklist=
mode=infrastructure
seen-bssids=04:D5:90:AC:79:F0;04:D5:90:AC:79:F8;04:D5:90:AC:8E:00;04:D5:90:AC:8E:08;
ssid=Bluwave
[wifi-security]
key-mgmt=wpa-psk
psk=XXXXXXXXXXXXXX
[ipv4]
dns-search=
method=auto
[ipv6]
addr-gen-mode=stable-privacy
dns-search=
ip6-privacy=0
method=auto
[proxy]
After adding the search domain, you'll see the localdomain added to dns-search:
$ sudo cat Bluwave.nmconnection
[connection]
id=Bluwave
uuid=e37ca330-8072-4c45-a5f9-e6ac73f3351b
type=wifi
interface-name=wlp9s0
permissions=
timestamp=1691197080
[wifi]
mac-address-blacklist=
mode=infrastructure
seen-bssids=04:D5:90:AC:79:F0;04:D5:90:AC:79:F8;04:D5:90:AC:8E:00;04:D5:90:AC:8E:08;
ssid=Bluwave
[wifi-security]
key-mgmt=wpa-psk
psk=XXXXXXXXXXXXXX
[ipv4]
dns-search=localdomain
method=auto
[ipv6]
addr-gen-mode=stable-privacy
dns-search=
ip6-privacy=0
method=auto
[proxy]
Anyway, Network Manager needs to restart (or a reboot) for this change to take effect. So back in the terminal, run the following command:
sudo systemctl restart network-manager
Your new search domain should be in effect. To confirm, look again at cat /etc/resolv.conf. Notice how the search domain of localdomain has been added.
$ cat /etc/resolv.conf
nameserver 127.0.0.53
options edns0 trust-ad
search localdomain
This is also shown in the output of resolvectl status. In the following output, I'm only showing my specific wifi device. Substitute wlp9s0 with your device name.
$ resolvectl status wlp9s0
Link 3 (wlp9s0)
$ resolvectl status eth0
Link 2 (eth0)
    Current Scopes: DNS
         Protocols: +DefaultRoute +LLMNR -mDNS -DNSOverTLS
                    DNSSEC=no/unsupported
  Current DNS Server: 192.168.10.1
         DNS Servers: 192.168.10.1
          DNS Domain: ~.
                      localdomain
When it's all said and done, you should be able to ping your server or run nslookup with it's hostname. As an example on my network:
$ ping -c 1 office
PING office.localdomain (192.168.10.30) 56(84) bytes of data.
64 bytes from OFFICE.localdomain (192.168.10.30): icmp_seq=1 ttl=128 time=0.385 ms
--- office.localdomain ping statistics ---
1 packets transmitted, 1 received, 0% packet loss, time 0ms
rtt min/avg/max/mdev = 0.385/0.385/0.385/0.000 ms
$ nslookup office
Server:         127.0.0.53
Address:        127.0.0.53#53
Non-authoritative answer:
Name:   office.localdomain
Address: 192.168.10.30

