Internet Connection Setup in Ubuntu (Wired)
Before I go into this detailed technical babble, I want to go over a basic check list for connectivity to the Internet.
Cable/DSL modem is powered on and is authenticated with your ISP (meaning, the “Cable” or “DSL” light on the front is on solid, and you have a good connection to your ISP).
Your cable modem is directly attached to your PC Ethernet port via a Cat5 Ethernet cable. If you have more than one PC in your house and you own a router see the next item:
Your Cable/DSL modem is attached to your router’s up link port via a Cat5 cable, and your PC is attached to one of the routers down link ports.
Once again: DOUBLE CHECK YOUR PHYSICAL LAYER and make sure everything is correctly connected.
Kind of like this:
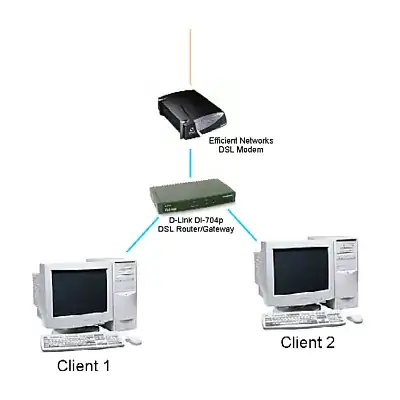
The above is the standard connection scheme of a home network. If you have done the above, shoot for the moon and try to open Firefox and visit www.google.com. If it says the page can’t be displayed, try clicking (inside of Firefox) Edit>Preferences and then select the Advanced catagory at the top-far-right, and then click the Network tab (see below).
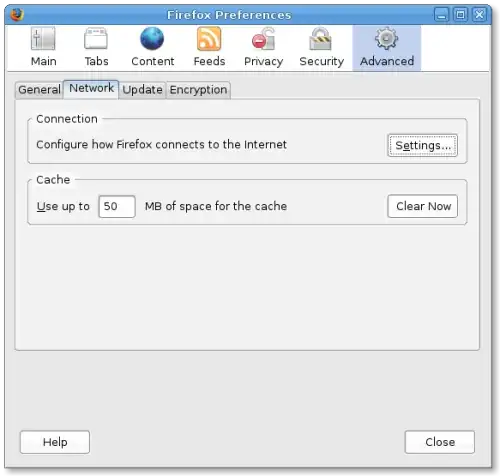
From there, click on the Settings button within the Connection zone of the window. This window will then appear:
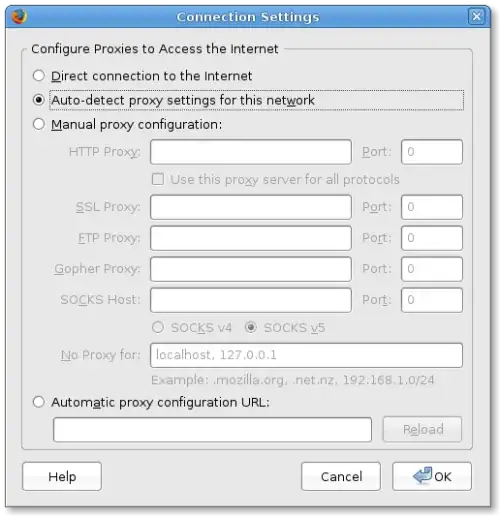
From here, make sure the “Auto-Detect Proxy Settings” radio button is selected (as above). Then hit OK.
Now, close Firefox, restart it and attempt to visit www.google.com again.
Connection Troubleshooting
(skip if you’re not having any problems)
Typical Internet users have to have the following equipment in order to get access to the Internet:
A modem (Could be dial up, could be DSL, could be cable. All three perform the same basic function: Modulate and demodulate data as it is sent to and received from your Internet Service Provider, as well as assign you one single IP address).
An Ethernet Adapter.
A Router (required if you have more than one computer in the house and you want them to access the Internet simultaneously).
Another networking device that is similar to a router, but inadequate for Internet connection management between more than one computer, is a Hub. Hubs are devices that do absolutely no routing of traffic with IP address, but instead, can only route traffic based on MAC addresses. Hubs were originally designed for LAN networks that did not need Internet access; only shared access between local, in-house computers. Hubs are also bad for security reasons, since they are nothing more than repeaters that echo all traffic out of every port on the device.
Basic Internet connectivity requires IP address routing capability (a router, in other words), as well as default gateway and DNS addresses to either be known in advanced, or (much more often) auto-configured by the modem/router using DHCP. In Ubuntu, DHCP is enabled on all Ethernet devices by default. This means that when you turn your computer on, it should ask the router (or cable/DSL modem) “What is my IP address, subnet mask, and default gateway supposed to be?” And the router replies and assigns the client PC an unused IP address along with the rest of the requested information. In this way, multiple computers on a LAN can be dynamically assigned IP addresses by the router as they are needed.
So the first thing you should check is if your computer is being assigned an IP address by the router at all. A quick way to do this is to open Applications>Accessories>Terminal, and once it is open, type in “ifconfig” (which is short for Interface Config). The readout will look similar to this:

In the above screenshot, you’ll see interface names listed down the left side (in this case, there are only two shown: eth0 and lo — which stands for “loopback”). These names vary depending on the type of networking device you are using. Another example: if you had more than one Ethernet adapter in your computer, you would likely see the second one listed here as “eth1″.
To the right of “eth0″ we see a lot of information written out for us. The “inet addr:” is your Local IP address. (In the above example, the IP address assigned to the computer is 192.168.73.129). If you have an address here, then that means your router/modem properly assigned you an address while booting your PC. If you don’t see an ip address here, you can attempt to force your router to assign you one by typing in “dhcpcd eth0″ and pressing enter. (Note: dhcpcd is not installed by default. To installed it from terminal, type “sudo apt-get install dhcpcd”).
An alternative place to check and see if you are being assigned an IP address is System>Administration>Network Tools applet:
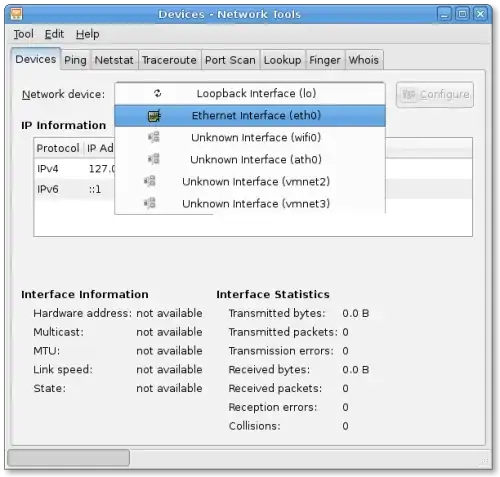
Unlike the ifconfig command, you can only view the IP addressing information for one network device at a time in here. And other than that, you can’t do much here when it comes to setting up your device.
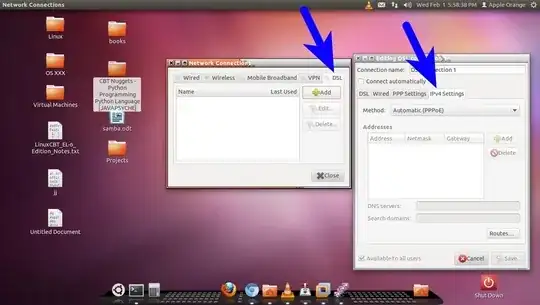
The other place to check your network settings is in System>Administrator>Network. In here, you should select your Ethernet device and make sure it is in “Roaming Mode”, which places the device into DHCP mode.
If you’re still not able to get an IP address assigned to your networking interface then the cause might be a bad cable, the modem/router may need to be reset or your network interface is broken or unsupported (rare).