20

I want to try new OS releases as they arrive, such as Ubuntu 17.04 or Ubuntu 17.10 to see new features. I also like to look at Kubuntu, CentOS or other distros (Windows 11 when it arrives?) - or set up test environments knowing I may trash them and do not want to do this to my core machine.

What set of alternatives are there to do this without risking my main development machine? I am not looking for a debate on the BEST way, but which alternatives are available.

9 Answers9

26

USB alternatives

USB alternatives are good, when

  • you want to test the performance (on bare metal)
  • the computer is not powerful enough to run a system well in a virtual machine

You can use a USB pendrive with at least the same size as the iso file, (in 2024 8 GB is necessary for Ubuntu Desktop, 4 GB for some of the other flavours (e.g. Lubuntu, Xubuntu and Ubuntu Server)) and create a

  • live Ubuntu system in the pendrive.

    Boot from the USB pendrive and select 'Try Ubuntu' in the boot menu (and something similar with other linux distros). If you save data, install programs or tweak the system in a live (live-only) drive, it will not survive shutdown or reboot.


If you want to

  • try Ubuntu in a more advanced way or
  • save data, install programs or tweak the system and
  • you have/get a fast USB pendrive of at least 16 GB,

you can create a

  • persistent live Ubuntu system

or if you have/get a fast USB pendrive of at least 32 GB, you can create an

  • installed Ubuntu system (like installed in an internal drive, but in a USB pendrive).

    An installed system in a USB drive is stable and flexible, can be kept up to date and tweaked without any limits. In this way it is better than a persistent live system. It is portable between computers, if you can avoid proprietary drivers, but a persistent live system is more portable.

Links


sudodus
  • 47,684
15

One way to test new distros and OS versions is with virtualization. It does not require space for an additional PC/keyboard/video/mouse or adapters to run multiple PCs with a single keyboard, video, mouse. It only requires a single PC and some virtualization software.

This assumes that you have a machine with a multi-core CPU capable of virtualization and a reasonable amount of memory. I would recommend at least 8GB of memory with 16GB better if you have it.

If you are running Ubuntu and only want to try Linux distros (I do not believe Windows will work), you can use the free virtualization software packaged in Ubuntu: KVM or Xen. Both work fine, are FREE, and can run various Linux distros. However, the tools to manage the VMs are somewhat lacking. Oracle has a FREE version of a virtualization tool called VirtualBox and of course there is always the commercial VMWare product. Both VirtualBox and VMWare can also run Ubuntu on top of a Windows machine if that is your desktop of choice.

By using a VM manager, you will be able to add new distros as they come out, test them, play with the new features, and then discard them when the new release appears. They only eat up disk space when not running, so they do not even need to be discarded unless that becomes tight. With a VM manager, it is easy to balance 5, 10 or more distros on a machine and be able to boot them up and take them down as needed. If you are lucky enough to have a 32GB or 64GB machine, you can even run them all in parallel.

12

As an even faster and cheaper alternative to sudodus’ answer you can boot directly from a bootable drive image file instead of a dedicated (USB) drive.

At least for Ubuntu ISO images (and derivatives like Linux Mint) the following recipe works. Other distributions may need further tweaking.

  1. Store the bootable drive image(s) in ISO format1 somewhere as a file on your internal storage drive(s)2.

  2. Add a Grub “parts” file, e. g. 35_isofiles, with the content

    #!/bin/bash
    set -e
    . /usr/share/grub/grub-mkconfig_lib
    shopt -s nullglob
    
    make_iso_menuentry()
    {
        local isodevice="$(exec "$grub_probe" -t device -- "$1")" || return $?
        local isogrub="$(make_system_path_relative_to_its_root "$1")"
        local label="${2:-"$1"}"
    
        printf 'menuentry %s {\n' "'${label//\'/\'\\\'\'}'"
        printf '\tset isofile=%s\n' "'${isogrub//\'/\'\\\'\'}'"
        prepare_grub_to_access_device "$isodevice" | sed -e 's/^/\t/'
        printf '\t%s\n' \
            'insmod loopback' 'insmod iso9660' 'loopback loop "$isofile"' \
            'linux (loop)/casper/vmlinuz.efi boot=casper iso-scan/filename="$isofile" ro noprompt noeject noplymouth' \
            'initrd (loop)/casper/initrd.lz'
        printf '}\n\n'
    
        printf 'Found "%s" image: %s\n' "$label" "$1" >&2
    }
    
    
    for iso in /path/to/image.iso # <-- set path to your ISO image here
    do
        make_iso_menuentry "$iso" "${iso##*/}" || true
    done
    

    to /etc/grub.d and make it executable.

    Edit the file path in the indicated line to match your needs. You can add multiple paths and/or Bash glob patterns if you want.

  3. Make the file executable:

    sudo chmod a+x /etc/grub.d/35_isofiles
    
  4. Make sure that the Grub menu is enabled.

  5. Update the Grub configuration:

    sudo update-grub
    
  6. Reboot and select the newly added Grub menu entry to boot from the respective image file.


1 Other file system types are possible but may require other Grub commands and boot parameter tweaking.

2 LVM, RAID and encrypted file systems should work thanks to Grub’s utility library but I didn’t test them.

David Foerster
  • 36,890
  • 56
  • 97
  • 151
9

Virtualization is by far the simplest.

However you have 2 seperate use cases here, which will have different solutions

1. Try out new distro's

Distributions are basically determined by the packaged applications, and userspace environment (e.g. SystemD vs init for boot)

If you want to "evaluate" the UIX of a different distribution, qualitatively, then I would recommend full-blown virtualization where you install the OS in its entirety and evaluate its usability. This is covered adequately in other answers.

If you simply need the userspace environment for testing then read on.

2. Testing and "throw-away instances" in different environments

It is easier, cheaper, and faster to use containerization, a form of light weight virtualization that uses the kernel to create sandboxed environments.

A container shares kernel resources with the Host, but otherwise has its own root file system, userspace, network stack, etc. It can be thought of, conceptually as a chroot on steroids. However, because the kernel is shared the virtualization is "thin", meaning that for most practical purposes it runs at the same speed as the host OS.

There is commonly used container system called docker. Docker has standardized images for practically every linux distribution you would like, and it runs on windows (however, windows images only work on windows, linux images work on both) . It has additional useful features to save space and performance.

There are also native open source alternatives for linux like LXC (which is built into the kernel!) , which can be used to much the same thing (but with more configuration required).

Simplified Example of a testing or build environment in docker

# Dockerfile

FROM ubuntu:17.10

RUN apt-get update && apt-get install -y build-essential

WORKDIR /workdir

  • docker build --tag my-builder .

Then from the command line, compile your project or tests in that environment in a variety of ways

"login" and compile within the environment, run tests etc. Assuming you are in source directory of your project

$ docker run -v "$PWD:/workdir" --rm -it my-builder /bin/bash
# echo "Now in docker container"
# make
...
# build/test/my-test
...
# exit
$ echo "Build artifacts are now on your host OS Directory :) "

Use as one-off

$ docker run -v "$PWD:/workdir" --rm my-builder make

You can even pass environment variables

$ docker run -e "CROSS_COMPILE=arm-linux-gnueabi" -v "$PWD:/workdir" --rm my-builder make

Or start a persistent instance and copy files into it explicitly

$ Start our instance in background 
$ docker run --name my-builder-inst -d my-builder
$ echo "Copy files to instance" 
$ docker cp /my/source/dir my-builder-inst:/workdir
$ echo "run project build"
$ docker exec my-builder-inst make
$ echo "copy build artifacts"
$ docker cp my-builder-inst:/workdir/build /my/output/dir
$ echo "destroy and delete container" 
$ docker rm -f  my-builder-inst

There are literally hundreds of other use patterns, however, the script-like image definition, extendable images, and command line use makes it extremely attractive for development, test, and even deployment environments
crasic
  • 3,882
4

I keep a separate partition on my drive (recommend 20GB minimum, more if you can).

I can install onto that partition any OS I want to test, and then reboot into it.

If everything is working well, I can deprecate my original OS partition, and eventually repurpose it.

But if the new OS is not working out for me (driver issues, unavailable software) then I can simply reboot back into my old OS, and be thankful that I still have it!

Notes:

  • This way you really get to test the new OS on your hardware, so you can detect driver issues.

  • But if you only wanted to experience how the new OS feels, one of the other virtualization solutions is probably faster, easier and safer for you.

  • I keep my /home on a large separate partition, so it is independent of the two OS-es. (Do not accidentally reformat that partition!)

  • But I recommend you do not use a shared /home partition while testing. If the two OS-es have significantly different software versions, an application might change its config files in a way that is unsuitable for the other OS. So keep separate config files for each OS, until you commit to one of them. (*) see below

  • You don't need to create a second swap partition. You can use the same swap partition for both OSes.

  • Of course you need to be careful which partitions you format / install onto. So do a backup, and write down your partition ids and sizes (parted, p, q), before installing a new OS.

  • In order to dual boot between the two OSes, you need grub to detect both of them. In my experience, grub has always done this automatically. (But lilo used to be a different story!)

  • It is often possible to run software from one OS while you are on the other OS. I managed that using sudo chroot /mnt/original_os, although it was a fiddle to set up: I had to bind-mount /dev and /proc.

My record was 4 Linux OSes on one machine, and a Windows XP. I used to boot into Gentoo for speed and fun, but run my webserver and mailserver in a chroot to the trusted Debian OS.

(*) You can configure a different home folder for each OS, by editing /etc/passwd. Set your home to /home/you/arch-test then target the shared home partition in /etc/fstab and reboot. You can symlink some dotfiles to be shared across both OSes, whilst leaving others to be OS-specific.

joeytwiddle
  • 2,009
3

You basically have three options: virtualization (VirtualBox or Docker), a bootable flash drive (modern alternative to a live CD), or dual boot from a partition. Choosing between the three depends on your needs, hardware, and experience. Some of the other answers go into a lot more detail about a particular approach, but here's a high-level comparison to give you a framework for deciding between them.

1. Virtualization

Pros:

  • pretty easy to set up
  • won't affect your primary dev environment
  • you can easily set up as many as you want, as long as you have the hard drive space - even create snapshots before making major changes, and just delete them when you're done with them

Cons:

  • requires decent hardware to run two or more OSes simultaneously
  • performance is limited by the resources allocated to the VM, so you really won't get an accurate idea of how the OS version you're testing compares to your primary OS
  • since the hardware is all virtualized, you won't get an accurate sense of driver availability/compatibility either

2. Bootable flash drive

Pros:

  • moderately easy to set up
  • won't affect your primary dev environment
  • performance is generally good with a USB3 flash drive, although there's definitely some variation depending on the quality of flash drive (USB2 will be slower - I'd avoid it for this purpose)
  • uses your actual hardware (other than the storage device), so you can see how well it plays with drivers and whatnot
  • you can easily set up as many as you want, as long as you have enough flash drives (and you can easily reformat them if you want to try something else)

Cons:

  • requires having one (or more) flash drives dedicated to this purpose
  • performance depends on the quality of flash drive you use

3. Dual boot from a partition

Pros:

  • gives you the best idea of performance, driver compatibility, etc, since it's running on the exact same hardware as your primary OS
  • can set up multiple at once, as long as you have the hard drive space (you just have to set up a separate partition for each one)

Cons:

  • requires some low-level know-how to set up properly
  • messing with hard drive partitions and bootloaders always has some potential to bork your current setup (make sure you have a bootable flash drive or live CD handy before you start)
2

The simplest and easiest way is using virtualization. You can download VirtualBox (it is open source) and install any operating system. And, I recommend you to create a snapshot before run for first time, in this way you can fallback to its previous state if you make any mistake setting it up, changing configuration, etc.

I have use and test several OS in this way. It is very simple and quick. Even, I have used MSDOS and Windows 3.1 using virtualization. You can install anything, even ChromeOS (with a little of work) or any version of Windows or Linux, it doesn't matter its desktop flavor.

2

QEMU

QEMU is a virtualization solution that theoretically solves this question's requirements for cheap and simple.

It allows drag and drop booting of operating system iso files within a Linux or Windows host.

It also allows booting of Live USB hard drives, within a host system and uses the persistence if available.

There is no need to build a virtual hard disk as with VBox.

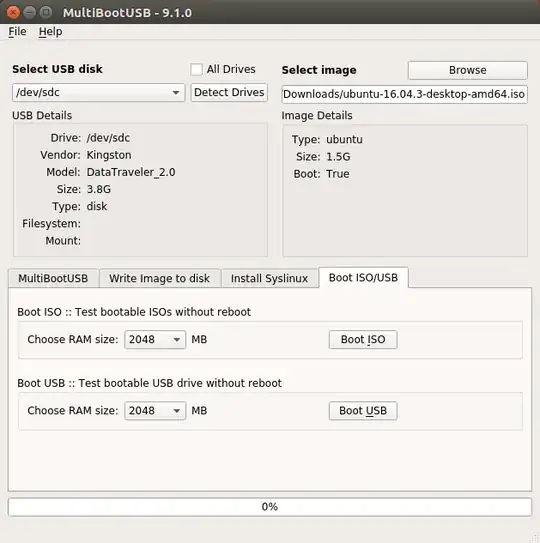
QEMU is available as a command line app for Linux, Windows and other OS. It is also available as a GUI and is included with MultiBootUSB Linux and Windows versions http://multibootusb.org/.

QEMU

QEMU can also be run from Virtual Machine Manager, which is faster than MBUSB but is not drag and drop.

sudo apt-get install qemu-kvm libvirt-bin ubuntu-vm-builder bridge-utils
sudo apt-get install virt-manager

For longer term OS testing a VirtualBox installed system is superior.

C.S.Cameron
  • 20,530
  • 12
  • 78
  • 125
1

I've successfully booted full installs of Ubuntu from USB drives for the last 3 years. USB 2.0 was a little slower than an older 3G SATA HD (7200 rpm 16 MB cache), but USB 3.0 is within a couple seconds of a SSD on a 3G SATA interface.