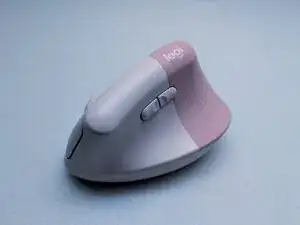
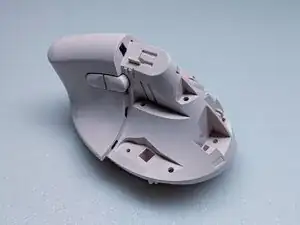
Introduction

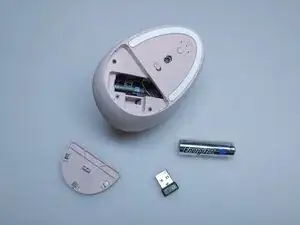
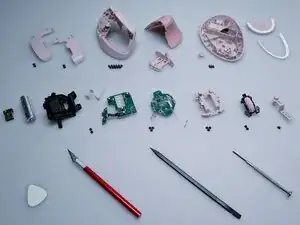
A complete disassembly of the Logitech Lift Vertical Ergonomic Mouse. This guide will show how to access to every part within the mouse.

  1. vNX1WOD6AfASCtg3
    vNX1WOD6AfASCtg3
    1gH1npyG55Vc4lKj
    Bf6FkuCo2QEjYIwX
    • Exterior shots of the mouse. Flip over to begin.

  2. f5wVoWVwoRyZPYel
    f5wVoWVwoRyZPYel
    26ZHFyHMkaq2NIHx
    3Ew2EBScFgImQ6IO
    • Remove the battery cover, battery, and USB receiver.

  3. QlKVlxJPRYkvkNPS
    QlKVlxJPRYkvkNPS
    UUsgOwAs3wgLXHbS
    hKf4esExQFf6WT4l
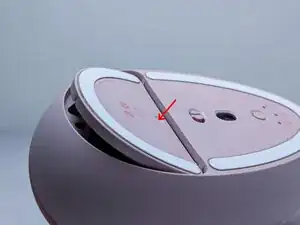
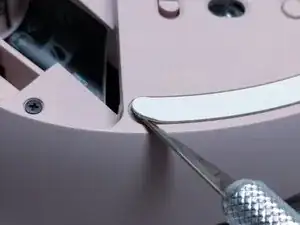
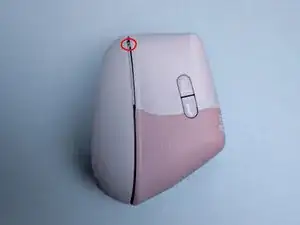
    • There are screws hidden beneath the PTFE skates. Carefully lift one end with a pointed tool and remove completely.

    • Avoid bending or stretching the skates excessively, they are easy to crease. Try to maintain a 30 degree angle and pry gently for best results.

  4. yxynYKfwTBFuXeX1
    yxynYKfwTBFuXeX1
    QXQVIfXTPGJvmclQ
    bQwSTUqKU4feAV2D
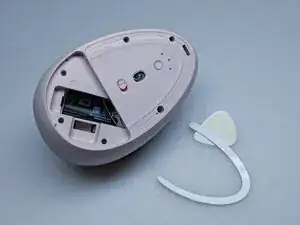
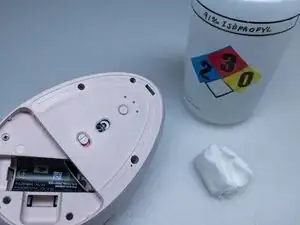
    • Use rubbing alcohol to clean the leftover adhesive, 91% isopropyl alcohol works well and does not damage the plastic. The PTFE skates will stick better during reassembly by doing this.

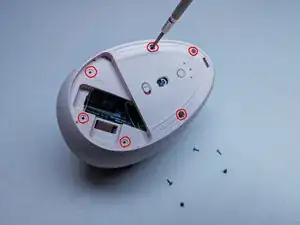
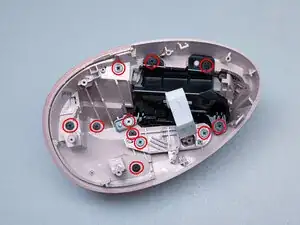
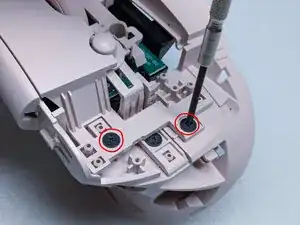
    • Remove the five screws highlighted in the photo. They are identical so mixing them is fine.

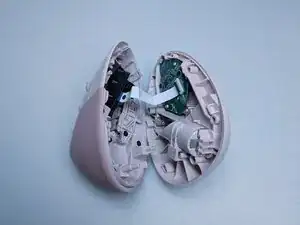
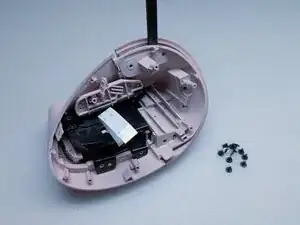
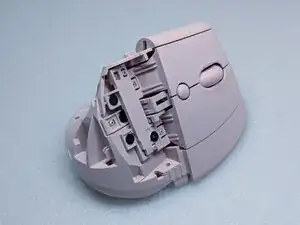
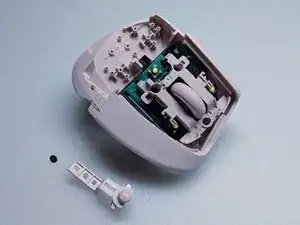
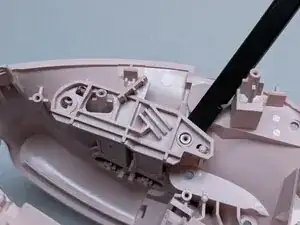
    • Gently pull the base apart from the top shell to expose a gap. The slot where the battery inserts into is a solid place to grip.

    • The base an the top shell are connected with a delicate ribbon cable. Do not use excessive force or it may be damaged.

  5. LRQ6bKXiKiBwmDQX
    LRQ6bKXiKiBwmDQX
    ydcg5prd2vZLG2O4
    4TZ1ZeVJICPLyQaA
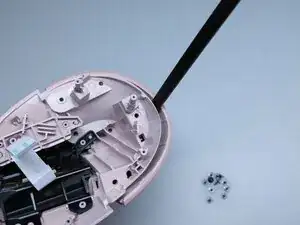
    • Use a guitar pick or similar plastic tool to further split the base from the top shell.

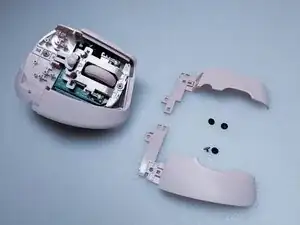
    • There is a clip that holds the two pieces together, highlighted in the second photo. Running the guitar pick across that area should pop it open.

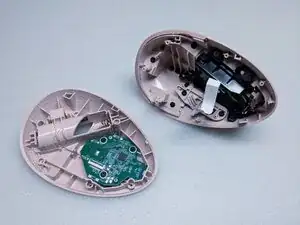
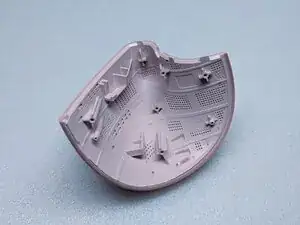
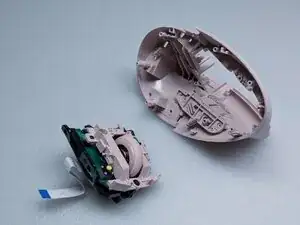
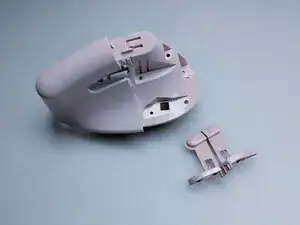
    • The base and top shell should separate with minimal force after the clip is undone.

    • The base an the top shell are connected with a delicate ribbon cable. Do not use excessive force or it may be damaged.

  6. KTKCGQmomNv5DWaI
    KTKCGQmomNv5DWaI
    qe3kRNWVwboMOpBF
    TFXTQvDpYYM3hvau
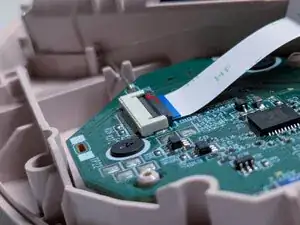
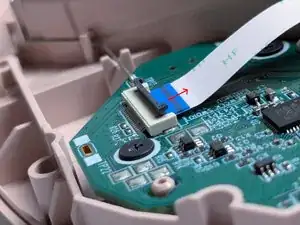
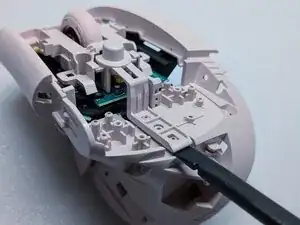
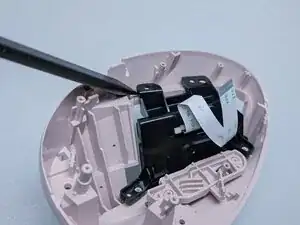
    • On the circuit board of the base, there is a connector holding the ribbon cable in place. Gently flip the black piece up with a fingernail and the cable can be removed with minimal force.

  7. UK4uHqVlyGKuCKtQ
    UK4uHqVlyGKuCKtQ
    XWDMRPgykCbfms5D
    JBOoILvT6Cd4xwl6
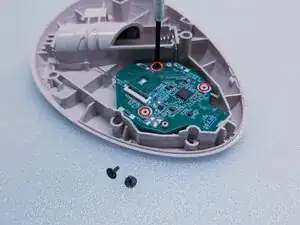
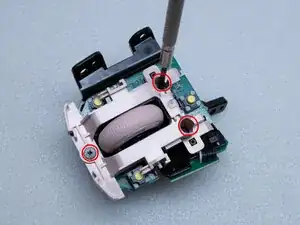
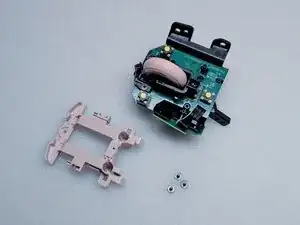
    • The sensor board is connected to the base with 3 identical screws. Remove them and the board can be lifted out easily by the battery contacts.

    • The power switch slider is loose and should drop out after the circuit board is removed. It can only be reassembled in one direction, so there's no need to keep track of the orientation.

  8. TwYGLdhMPpAx2B3p
    TwYGLdhMPpAx2B3p
    s1ggniXFbOBTvjOJ
    • Detailed view of the sensor board.

  9. ukDMvccJHVDu1TaT
    ukDMvccJHVDu1TaT
    NtOJRwBH5TubnGNQ
    RSBDuodyvaBwNCx6
    • Remove all 11 screws that are visible in the top shell. They are identical so just keep them together in a safe place.

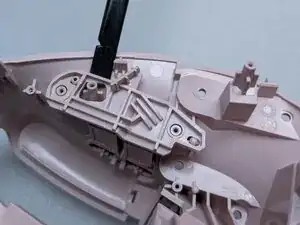
    • Gently pry at the rubber grip using a plastic tool like a spudger. This piece is held in strongly by a few plastic clips.

  10. NQnxugQQjlFgRFiJ
    NQnxugQQjlFgRFiJ
    EtXLaAUTu4cHQMSH
    Nn3UBS5ZvANDHUmC
    • Continue prying around the grip, then pull the pieces apart.

    • This is the most challenging part of the disassembly because it takes quite a bit of force, is hard to grip, and it is difficult to tell if something will break. Do not give up, it gets easier from here.

  11. CCNJMP2mBwe5tL4I
    CCNJMP2mBwe5tL4I
    IYRG36BAftgDiWv1
    • Detailed view of the top shell without a grip.

  12. ymZam3b3cithUYaW
    ymZam3b3cithUYaW
    WgNxERpBmFetFVhT
    ZWKN5QcdWlydU3TL
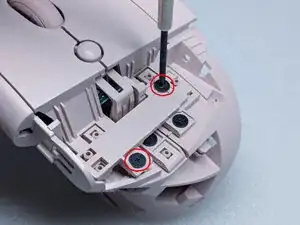
    • The right button is attached with two screws, as highlighted. These are different from screws from previous steps, so keep them separate.

    • Gently lift the connecting piece with a tool, then continue lifting it while also pushing it forward, as seen in the third photo.

  13. DG6H3fnHiny2nEUA
    DG6H3fnHiny2nEUA
    RXuoXTwCctCgKKkd
    BeGrrkF52sAXBGTY
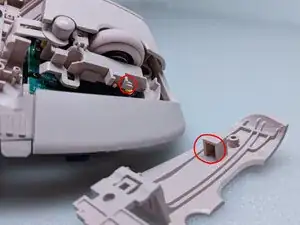
    • The button is held in place by a beam and its corresponding slot, which is why it cannot be lifted straight up.

    • Take out the 2 screws for the left button and remove it in the same way as the right button. The screws for these two buttons are the same.

    • Putting the buttons back on is fairly straightforward. Just press down while pulling it backwards, the opposite motion of taking them off, and they should snap into place. Make sure to put the right button on first.

  14. LYrjYZaBN6FkbuWY
    LYrjYZaBN6FkbuWY
    nfL1WxuJi2PJrJE6
    qeWuyVDYbTMCSBeq
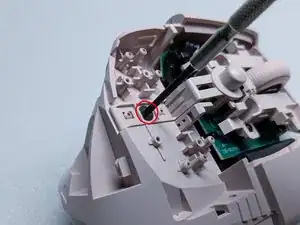
    • Take out the screw holding the DPI button in place. It should come out easily with a bit of prying.

    • This screw is unique, do not mix it with any other screw.

  15. hiIdJGfCRGdSm11G
    hiIdJGfCRGdSm11G
    SbtNmPLmCsYYIJXC
    FOvISZVPaOkDetDt
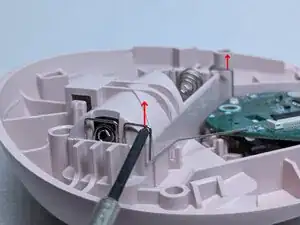
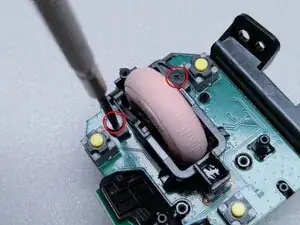
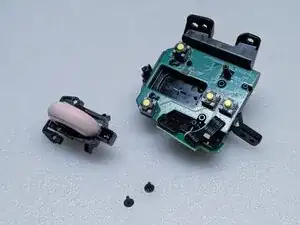
    • The switch assembly is snapped into place. Pry at the locations indicated in the first and second photo and it can be removed from the top shell with minimal force.

  16. 4xnZe3NHPECaM3Vm
    4xnZe3NHPECaM3Vm
    vXKUEZoZ6TibicOL
    hY3DEvZEijuHMbWO
    • The side buttons are also held in with a snap fit. Pry at the locations indicated to loosen them. The buttons themselves might get caught on the casing, so push them in to remove them.

    • It is recommended to skip this step unless the buttons are being replaced, it does not get in the way of any other disassembly.

  17. DWld2kNOkRPFIltD
    DWld2kNOkRPFIltD
    hvVI4YGudEc4WBxu
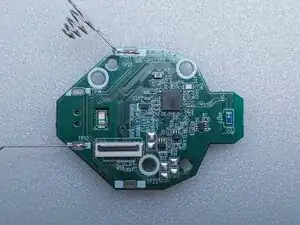
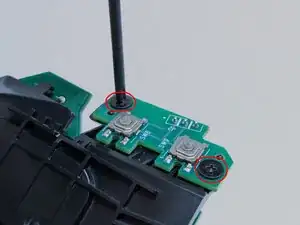
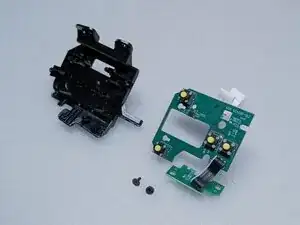
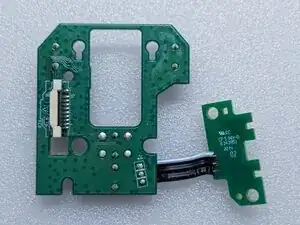
    • The switch button frame is held in place with 3 screws. Remove them and it will lift right out.

  18. Md61REtjWPFBsHmu
    Md61REtjWPFBsHmu
    UJO4iWymdXOwNMpi
    • The scroll wheel is held in place with 2 screws.

    I'm wondering what to do to make the roller faster.

    Zegarmistrz Swiatla -

    Besides cleaning the scroll wheel if it's dirty, I don't think there's much you can do physically. However, you might be able to adjust your PC's settings to scroll further.

    I'm using Windows 11 but the steps are probably similar for Windows 10. Sorry if you're on Mac.

    Open the "Settings" app, click on "Bluetooth & devices" on the left side, click on "Mouse", and under the "Scrolling" section adjust the "Lines to scroll at a time" slider. Test your mouse on a browser or something until you are happy with the setting.

    James Huang -

  19. Pw5oNJE6QRKVTcKK
    Pw5oNJE6QRKVTcKK
    coImNpHA2jqPtAHv
    lSYKUMTJGXlNsi5X
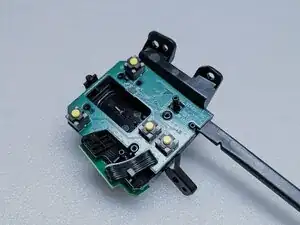
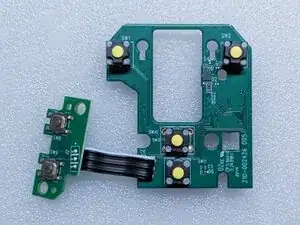
    • The side buttons are mounted to the frame with 2 screws. Once they are removed, the boards can be gently pried away from the frame.

    • It is okay to bend the ribbon cable so that the boards are easier to remove. Try not to flex it more than necessary to prevent damage.

  20. Wp1gn3TmhTHhQcPv
    Wp1gn3TmhTHhQcPv
    DAWTTVQfW2RFTl5t
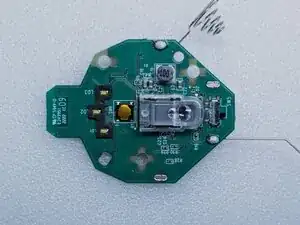
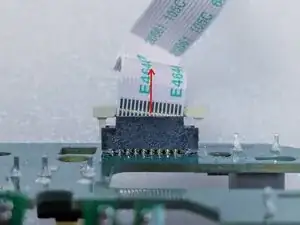
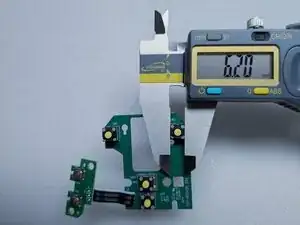
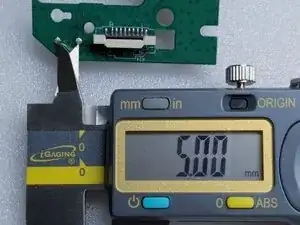
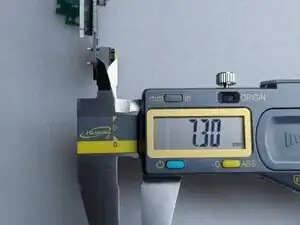
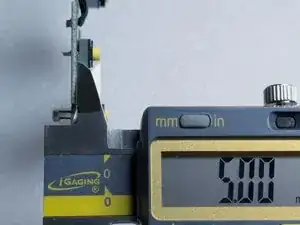
    • The ribbon cable can be released from the switch board by pulling on the two white tabs on the connector. The ribbon cable should come out very easily, do not force it.

    • Take note of the orientation of the ribbon cable, or it will not reassemble in the same way.

  21. kpAt1SmBWRm5IqCt
    kpAt1SmBWRm5IqCt
    vtOG1tDsdXmHdfSV
    5agyoWbxSNf6ZGpA
    • Detailed view of the switch boards and switch dimensions.

    • The primary buttons are 6.2mm × 6.2mm, 7.3mm tall (circuit board to top of button), and have a pin pitch of 5mm.

    • The middle click and DPI button have the same dimensions, but are 5mm tall instead.

  22. jacRX1HTbwALUKvY
    jacRX1HTbwALUKvY
    OA4bAQBYsRRAu5S6
    1vd6sxRKU5oBfgZb
    • When purchasing new switches, they may be labeled as 6mm instead (6*6*7.3mm, for example). This is fine, the schematic in the product listing should show the correct dimensions.

    • There are red versions of these switches that seem to be identical and can be found on AliExpress, made by the same company "Kailh". The switches purchased for this mouse were titled "1/3/5Pcs Kailh Mute Button 6*6*7.3mm Square Silent Wireless Wired Mouse Micro switch Mouse Button Tact Switch" and sold by Kailh's official store.

  23. hgLVAlqOuwla1pXB
    • Congrats! If you are reading this then either one of your primary buttons is probably double clicking. Best of luck with the repair!

James Huang

Member since: 07/12/24

687 Reputation

3 comments

Thank You!!!

Zegarmistrz Swiatla -

Thank you for this tear down. I was looking for ways to save this mouse I gave as a present as it was really ergonomic to use.
Whatever switches Logitech were soldering onto these are extremely unreliable.

Arvin Alvarez (Calvira) -

Thank you for the teardown! The left mouse switch on my Logitech Lift went bad - clicks didn't consistently register and it sometimes let go while dragging. This guide was super useful in helping me replace it - for reference, I used a Kailh Mute Red switch (6x6x7.3mm).

One thing I noticed is that the mouse doesn't power on and connect if the scroll wheel is missing. If you're trying to test the mouse before fully reassembling, it's worth putting the switch assembly back together first (as pictured in step 18) so that the scroll wheel is in position.

Ace4896 -