Introduction

This is a step-by-step guide demonstrates how to remove the battery.

WARNING: This is a lithium battery which should be handled with care.

TIPS:

  • Be sure to check the screwdriver heads before performing this task; otherwise, screws may become damaged.
  • Use an ice cube tray or egg carton, place each screw in its own cup to organize the screws.
  1. WM3MUSJ4j5SKKqpT
    WM3MUSJ4j5SKKqpT
    e3P6rjl2YbXQQwo3
    yyoJEk3PD2LNn6nR
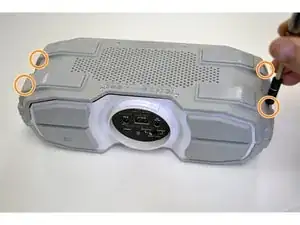
    • Flip the Braven BRV-X upside down so you are facing the bottom side.

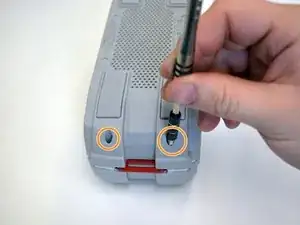
    • With the H1.5 Head Screwdriver, unscrew the four screws.

    • All screws on this device can be stripped easily. Hold your screwdriver with the thumb on top and swivel with the opposite hand's thumb and index finger.

    • Using the #0 Phillips screwdriver, unscrew the four screws on the four corners of the bottom side.

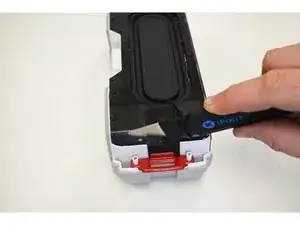
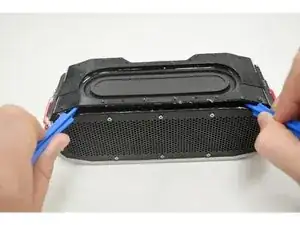
    • Gently remove the outer casing, which should reveal the inner shell.

    I have the Braven XXL that is just over 12 Months old. The Battery no longer charges and Zagg (bought out Braven) is offering me a $30 gift card since I’m out of warranty, no thanks. Do you know how I can replace the battery for this unit.

    Thanks

    Greg Beckler -

  2. A5ykW3sP5sDTXrBh
    A5ykW3sP5sDTXrBh
    Sq2XhAZ2NWCs1qAb
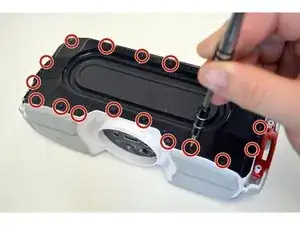
    • With a Jimmy, cut the two warranty seals on either side.

    • You may also use a tech knife instead of a Jimmy.

    • WARNING: Once warranty seals are broken, you may no longer return the product.

    • Next, remove the 18 screws with a #00 Phillips screwdriver.

  3. alr64tSSxnjxZkLJ
    alr64tSSxnjxZkLJ
    Fn5Z62RpO4ldWTTr
    • Using two plastic opening tools, slide under the cover and slowly lift.

    • There is glue nearly all around the inner shell, so strength will be necessary. When both tools are inserted, you can slide out along the edges.

  4. IJR15ORJmyqrcE5g
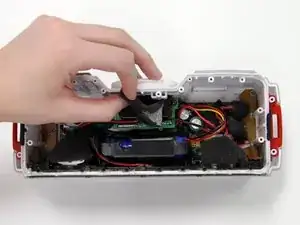
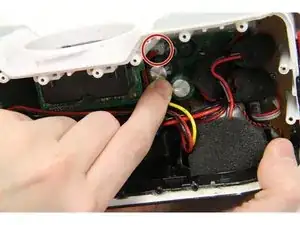
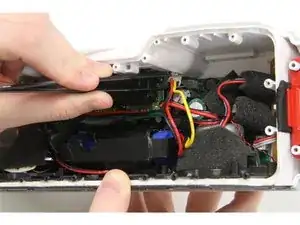
    • Remove the black foam squares from the red, yellow, and black wire on the top right side of the device.

  5. gH4XHqfndscDs4jY
    gH4XHqfndscDs4jY
    LrxF2SbFVwY12f2P
    MDvcrAUCbLfYjT6o
    • Now that the three wires are exposed, follow the wires to the white base that is plugged into the motherboard.

    • Using the tech knife, carefully remove the glue that keeps the plug in place.

    • Using the tweezers, carefully disconnect the plug from the motherboard.

    • WARNING: Make sure the battery is drained of all power for safety reasons.

    • There should still be a small white base attached to the motherboard, where the plug will eventually be plugged back in.

  6. AXTD4e1C1YMxgrCn
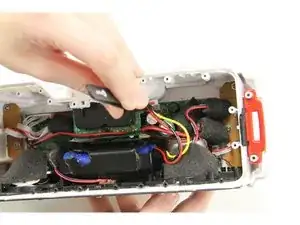
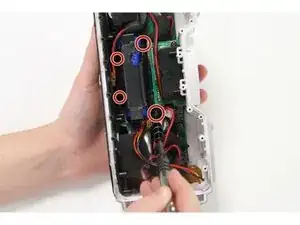
    • The battery's black shell is connected to the motherboard with four screws. Use the #00 Phillips screwdriver to remove the four screws.

    • The screws near the speaker side of the device will be a tight squeeze to get to.

  7. gxJqNFyHbuo3GdqB
    • Now, you should be able to lift the battery along with the black container up.

    • Pull the battery pack straight out so you do not damage other wires or the motherboard.

  8. J5SNQTRKANmGGA2P
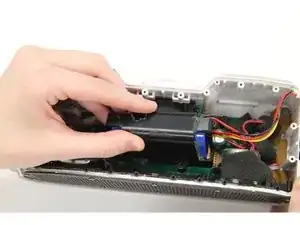
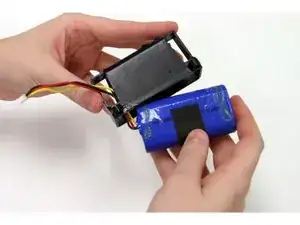
    • Slide the blue battery out from the black container. Your battery is now removed from the device and is ready for replacement.

    I have replaced my battery with a replacement battery off Amazon. Did not work. Kept trying with 2 more batteries- still not charging.

    Carefully checked my original battery that only lasts about 4 hours now, and it has a chip in it. It does charge. That means the other 3 batteries don’t have the security programming to work with the unit.

    It would have been nice to have a new battery in there, but just not worth the aggravation, time, and money spent trying to resurrect the speaker.

    I hate waste, but just buy a new one.

    Hawk Pettengill -

Conclusion

To reassemble your device, follow these instructions in reverse order.

Courtney Crockett

Member since: 29/09/15

348 Reputation

10 comments

Thank you for the replacement steps - do you know where I could buy a replacement battery?

jmckeag7 -

Anyone ever figure out what battery they needed?

Aaron Eisenbarth -

I also would love to know what battery is actually needed for this.

grenchpickle -

The batteries are two 18650's in tandem. You can get these from batteries plus

nick -

Parallel or series connection?

Vladimir Skrbic -

What is the MAh on the required batteries for this device?

Doyle Redwine -

The best batteries are the panasonic 18650 batteries. Do a google search for them. You can usually find them for $8-10 (and higher) each with a little work. The Panasonic brand is definitely more expensive but of superior quality to all the chinese knock off batteries. Will hold a charge better and last much longer on a charge. You will have to connect the batteries and do a little soldering before fitting them back in the container. Two 2600 mAh batteries would equal the OEM rating on this device of 5200 mAh.

Doyle Redwine -

The batteries are in Parallel to give 3.7v, and 6800mah (or whatever amp ratting batteries you buy)

Paul Lambert -

18650”s are too big

Patrick Walsh -

Good lord this was a chore. Thanks for the writeup!

Jamie Watts -